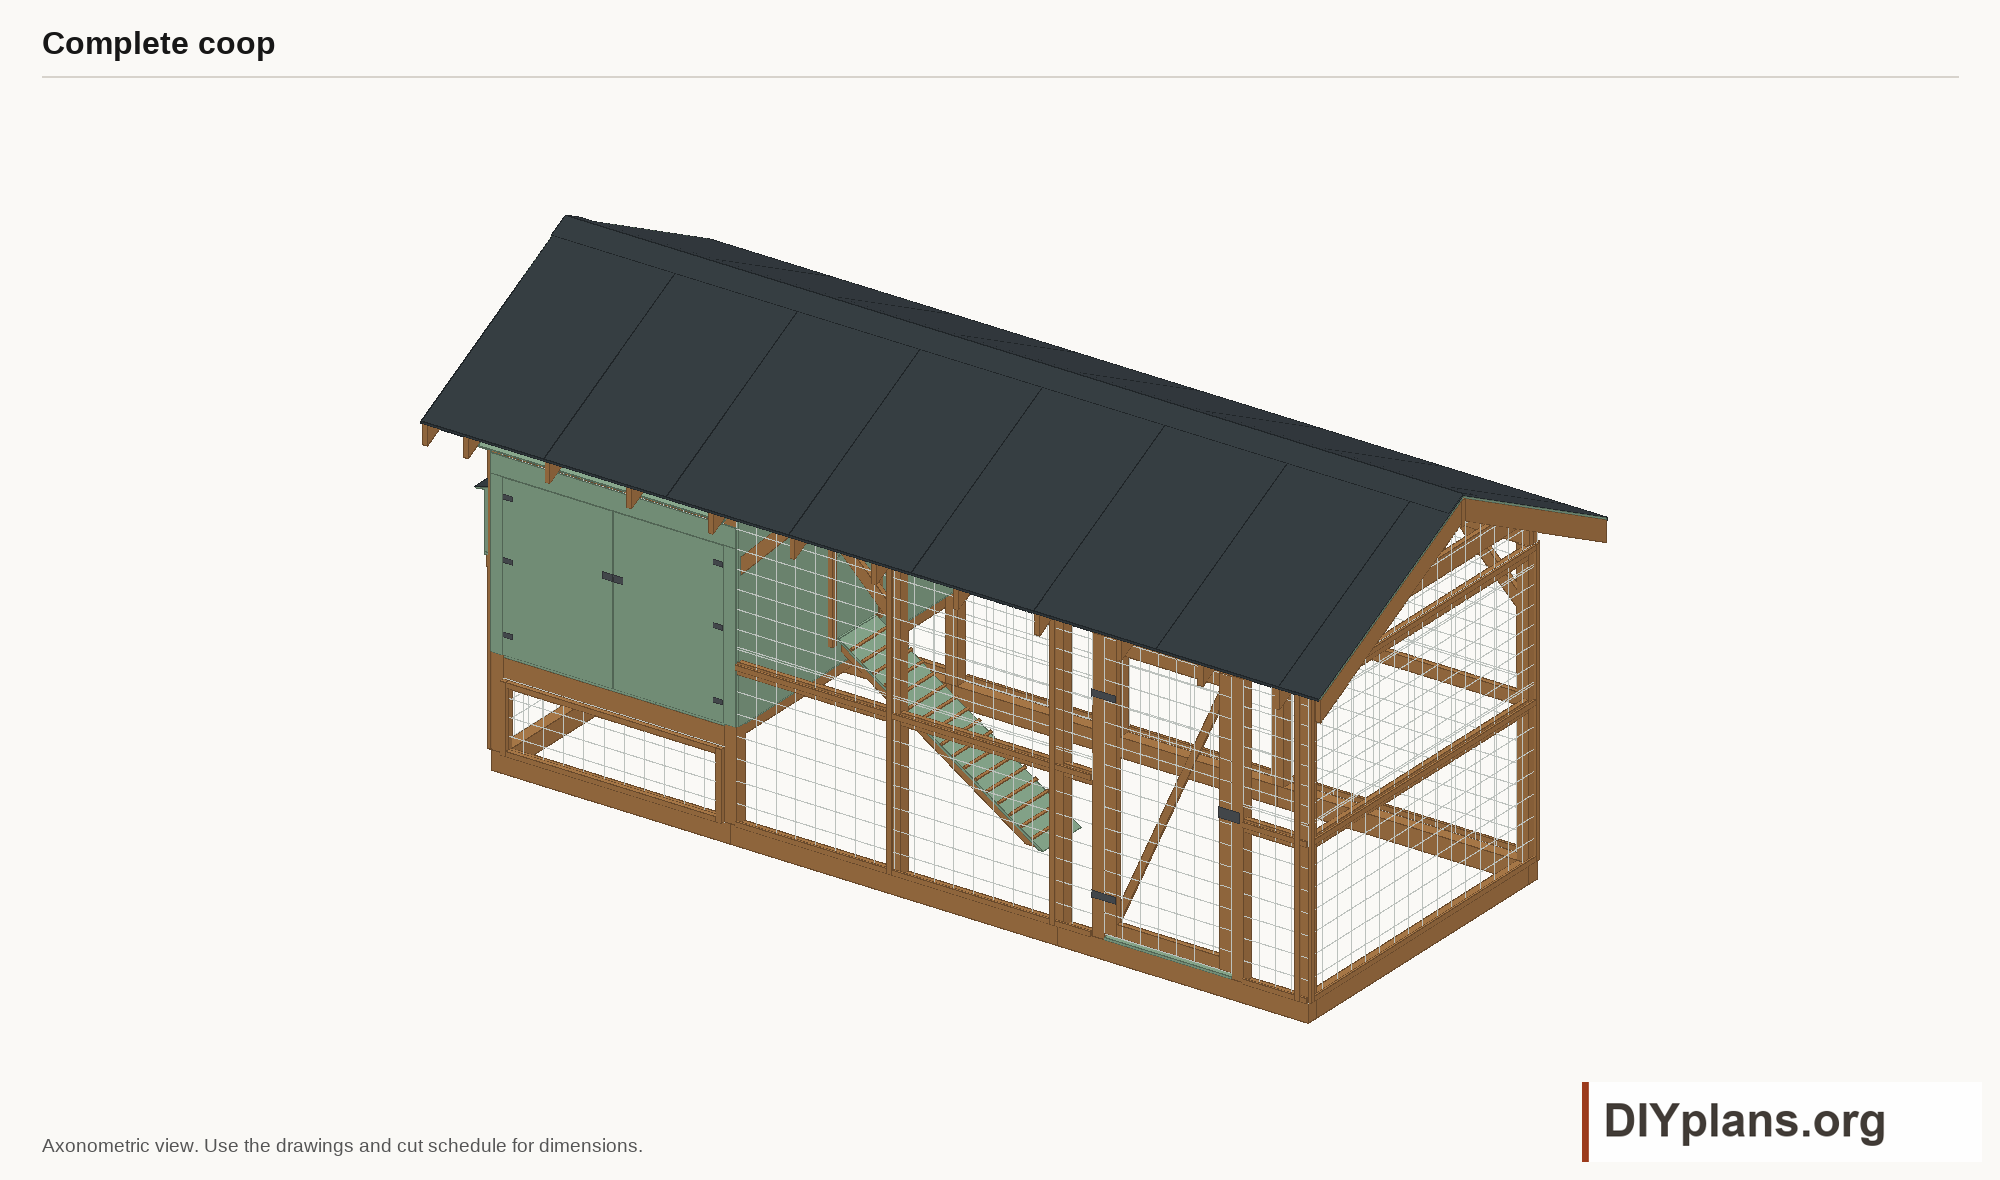
Before you start
- Unverified concept materials. Not construction-ready. Obtain independent qualified design and review before building.
- Confirm site drainage, utilities, local snow and wind loads, foundations, anchors and structural connections with a qualified local designer before construction. The model has not been physically built.
- Retain the horizontal rafter ties and the 6:12 roof pitch shown.
- Use the drawings and schedules together; confirm stock sizes and hardware before cutting.
Dimensions and opening sizes
- Base length
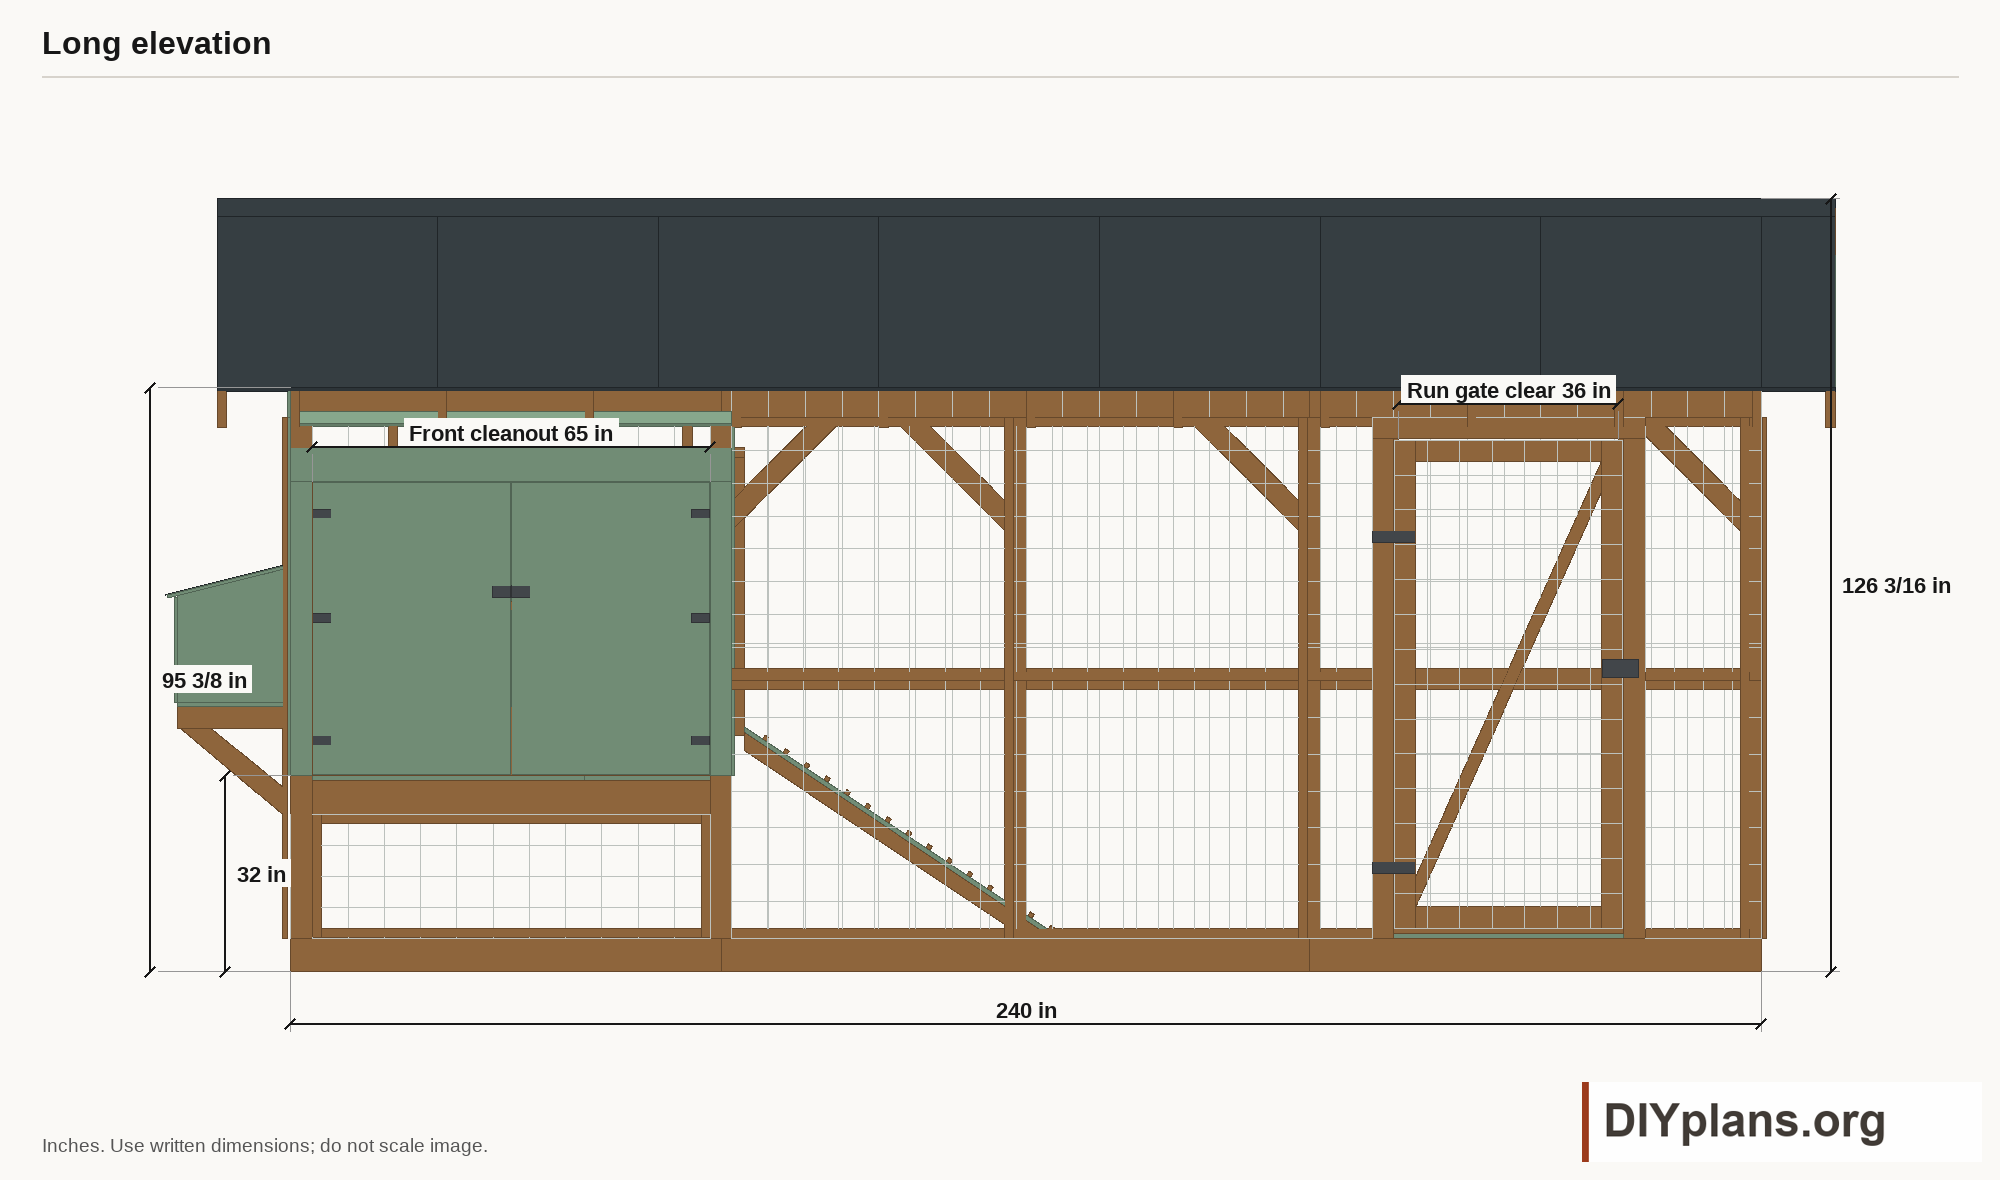
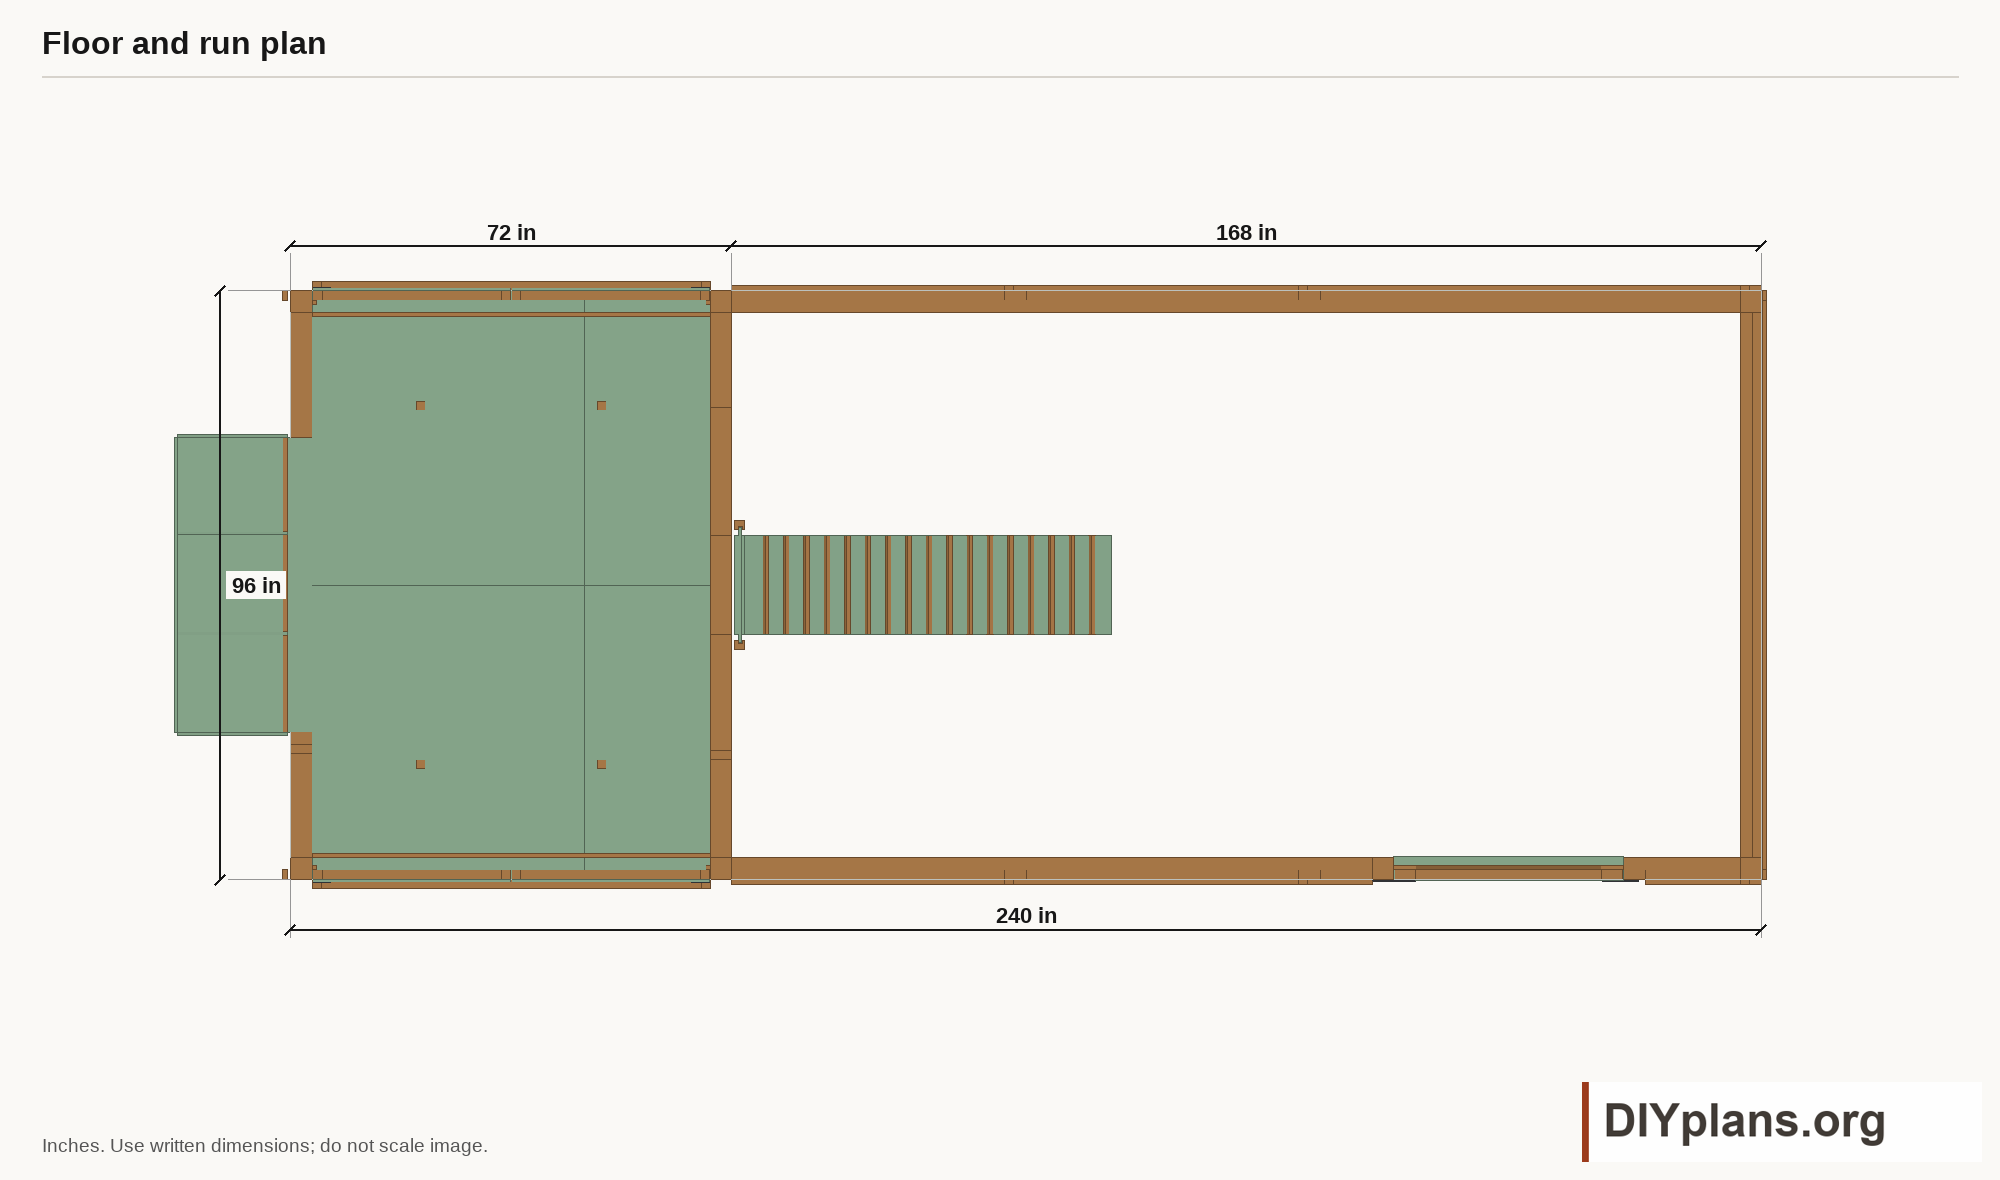
- 240 in
- Base width
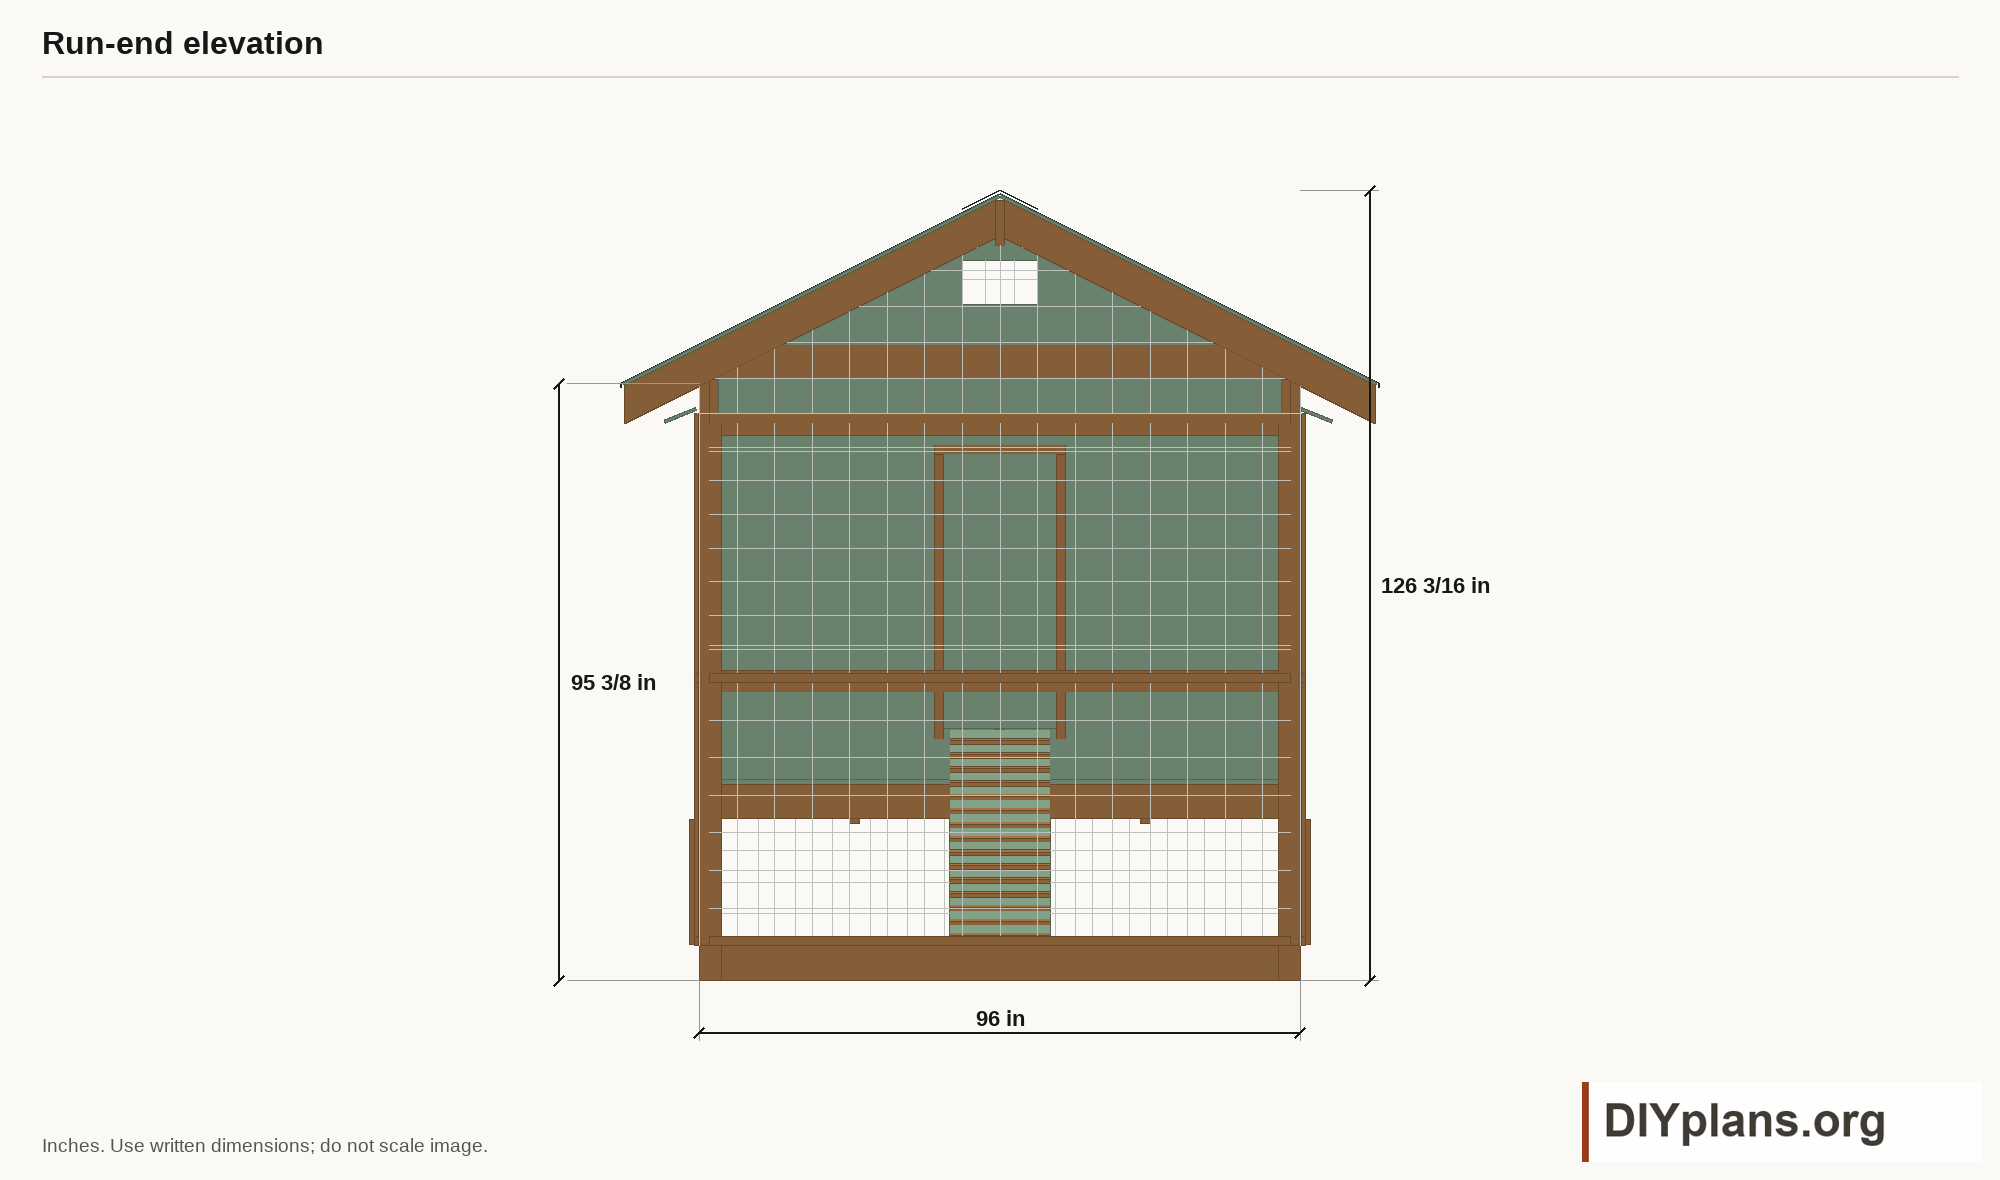
- 96 in
- Henhouse lengthRaised 32 in above the ground datum.
- 72 in
- Ramp horizontal run40 in rise; 16 in wide.
- 60 in
- Buried mesh depth12 in outward toe, with secured overlaps.
- 18 in
Shopping list
| Buy | Material | Stock size |
|---|---|---|
| 1 board | Timber | 1x12, 12 ft |
| 1 board | Timber reserve | 1x12, 8 ft spare |
| 1 board | Timber | 1x2, 8 ft |
| 5 boards | Timber | 1x2, 10 ft |
| 9 boards | Timber | 1x2, 12 ft |
| 6 boards | Timber | 1x2, 16 ft |
| 1 board | Timber reserve | 1x2, 8 ft spare |
| 2 boards | Timber | 1x2 ground-contact compatible, 8 ft |
| 4 boards | Timber | 1x2 ground-contact compatible, 10 ft |
| 1 board | Timber reserve | 1x2 ground-contact compatible, 8 ft spare |
| 2 boards | Timber | 1x4, 8 ft |
| 1 board | Timber reserve | 1x4, 8 ft spare |
| 6 boards | Timber | 2x2, 8 ft |
| 2 boards | Timber | 2x2, 10 ft |
| 1 board | Timber | 2x2, 12 ft |
| 2 boards | Timber | 2x2, 16 ft |
| 1 board | Timber reserve | 2x2, 8 ft spare |
| 1 board | Timber | 2x3, 16 ft |
| 1 board | Timber reserve | 2x3, 8 ft spare |
| 5 boards | Timber | 2x4, 8 ft |
| 7 boards | Timber | 2x4, 10 ft |
| 2 boards | Timber | 2x4, 12 ft |
| 3 boards | Timber | 2x4, 16 ft |
| 1 board | Timber reserve | 2x4, 8 ft spare |
| 6 boards | Timber | 2x6, 8 ft |
| 1 board | Timber | 2x6, 10 ft |
| 15 boards | Timber | 2x6, 12 ft |
| 14 boards | Timber | 2x6, 16 ft |
| 1 board | Timber reserve | 2x6, 8 ft spare |
| 3 boards | Timber | 2x8, 8 ft |
| 2 boards | Timber | 2x8, 16 ft |
| 1 board | Timber reserve | 2x8, 8 ft spare |
| 2 boards | Timber | 4x4, 12 ft |
| 5 boards | Timber | 4x4, 16 ft |
| 1 board | Timber reserve | 4x4, 8 ft spare |
| 2 boards | Timber | 4x6 ground-contact treated, 8 ft |
| 1 board | Timber | 4x6 ground-contact treated, 12 ft |
| 2 boards | Timber | 4x6 ground-contact treated, 16 ft |
| 1 board | Timber reserve | 4x6 ground-contact treated, 8 ft spare |
| 6 | Sheet goods | 1/2 in exterior panel siding, 4 x 8 ft |
| 1 | Sheet reserve | 1/2 in exterior panel siding, 4 x 8 ft spare |
| 2 | Sheet goods | 1/2 in exterior plywood, 4 x 8 ft |
| 1 | Sheet reserve | 1/2 in exterior plywood, 4 x 8 ft spare |
| 9 | Sheet goods | 1/2 in exterior roof plywood, 4 x 8 ft |
| 1 | Sheet reserve | 1/2 in exterior roof plywood, 4 x 8 ft spare |
| 3 | Sheet goods | 3/4 in exterior plywood, 4 x 8 ft |
| 1 | Sheet reserve | 3/4 in exterior plywood, 4 x 8 ft spare |
| 1 roll | Mesh | 1/2 in square, 19 ga galvanized-after-weld hardware cloth; 48 in x 100 ft |
| 1 roll | Mesh | 1/2 in square, 19 ga galvanized-after-weld hardware cloth; 48 in x 100 ft |
| 1 roll | Mesh | 1/4 in galvanized welded hardware cloth, 24 in x 10 ft |
| 16 panels | Roofing | Metal roof panels, 36 in coverage, painted galvanized/Galvalume |
| 3 sections | Roofing | Matching ridge cap, 10 ft sections |
| 6 sections | Roofing | Matching eave/drip flashing, 10 ft sections |
| 4 sections | Roofing | Matching rake/gable flashing, 10 ft sections |
| 286 sq ft minimum coverage | Roofing | Metal-compatible roofing underlayment |
| 14 sets | Hardware | Exterior hinges, complete sets |
| 4 sets | Hardware | Two-action cleanout latches, complete sets |
| 1 set | Hardware | Two-action run gate latch with inside release |
| 1 fabricated set | Roofing | Nest roof metal and wall flashing |
| 1 board | Threshold | Exterior hardwood 1x6, 8 ft, actual thickness 3/4 in |
| 7 boxes of 100 | Nonstructural hardware | Exterior corrosion-compatible #8 or #10 x 2 in batten screws |
| 300 pieces | Nonstructural hardware | Galvanized/stainless mesh seam ties or hog rings |
| 2 complete sets | Nonstructural hardware | Nest hatch exterior hinges |
| 2 complete sets | Nonstructural hardware | Nest hatch two-action latches |
| 1 set | Nonstructural hardware | Pop-door closed-position retaining pin/latch and lift handle |
| 8 sets | Nonstructural hardware | Removable under-house panel fasteners |
| 400 screws | Nonstructural hardware | Exterior panel/trim screws, #8 x 1-5/8 in |
Quantity notes
8 × 20 Garden Chicken Coop. Whole-stock quantities preserve the original cutting layout, with separate reserves. Cut blanks round upward to the next 1/16 in; fit finished profiles to CAD. Buried mesh uses one 70 ft allowance, separate from the wall-mesh roll. Hardware quantities marked as allowances do not establish structural capacity.
- Timber, 1x12, 12 ft: Packed 2 cut segments across this stock family; 1/8 in kerf between cuts. See stock-layout.csv. Net cutting purchase. Add the separate spare board below. Factory ends may be used for exact stock-length members.
- Timber reserve, 1x12, 8 ft spare: One separate spare for this stock family, in addition to the cutting layout. Allows rejection of knots, checks, damaged ends, and cutting errors. Inspect structural lumber grade before purchase.
- Timber, 1x2, 8 ft: Packed 85 cut segments across this stock family; 1/8 in kerf between cuts. See stock-layout.csv. Net cutting purchase. Add the separate spare board below. Factory ends may be used for exact stock-length members.
- Timber, 1x2, 10 ft: Packed 85 cut segments across this stock family; 1/8 in kerf between cuts. See stock-layout.csv. Net cutting purchase. Add the separate spare board below. Factory ends may be used for exact stock-length members.
- Timber, 1x2, 12 ft: Packed 85 cut segments across this stock family; 1/8 in kerf between cuts. See stock-layout.csv. Net cutting purchase. Add the separate spare board below. Factory ends may be used for exact stock-length members.
- Timber, 1x2, 16 ft: Packed 85 cut segments across this stock family; 1/8 in kerf between cuts. See stock-layout.csv. Net cutting purchase. Add the separate spare board below. Factory ends may be used for exact stock-length members.
- Timber reserve, 1x2, 8 ft spare: One separate spare for this stock family, in addition to the cutting layout. Allows rejection of knots, checks, damaged ends, and cutting errors. Inspect structural lumber grade before purchase.
- Timber, 1x2 ground-contact compatible, 8 ft: Packed 6 cut segments across this stock family; 1/8 in kerf between cuts. See stock-layout.csv. Net cutting purchase. Add the separate spare board below. Factory ends may be used for exact stock-length members.
- Timber, 1x2 ground-contact compatible, 10 ft: Packed 6 cut segments across this stock family; 1/8 in kerf between cuts. See stock-layout.csv. Net cutting purchase. Add the separate spare board below. Factory ends may be used for exact stock-length members.
- Timber reserve, 1x2 ground-contact compatible, 8 ft spare: One separate spare for this stock family, in addition to the cutting layout. Allows rejection of knots, checks, damaged ends, and cutting errors. Inspect structural lumber grade before purchase.
- Timber, 1x4, 8 ft: Packed 4 cut segments across this stock family; 1/8 in kerf between cuts. See stock-layout.csv. Net cutting purchase. Add the separate spare board below. Factory ends may be used for exact stock-length members.
- Timber reserve, 1x4, 8 ft spare: One separate spare for this stock family, in addition to the cutting layout. Allows rejection of knots, checks, damaged ends, and cutting errors. Inspect structural lumber grade before purchase.
- Timber, 2x2, 8 ft: Packed 33 cut segments across this stock family; 1/8 in kerf between cuts. See stock-layout.csv. Net cutting purchase. Add the separate spare board below. Factory ends may be used for exact stock-length members.
- Timber, 2x2, 10 ft: Packed 33 cut segments across this stock family; 1/8 in kerf between cuts. See stock-layout.csv. Net cutting purchase. Add the separate spare board below. Factory ends may be used for exact stock-length members.
- Timber, 2x2, 12 ft: Packed 33 cut segments across this stock family; 1/8 in kerf between cuts. See stock-layout.csv. Net cutting purchase. Add the separate spare board below. Factory ends may be used for exact stock-length members.
- Timber, 2x2, 16 ft: Packed 33 cut segments across this stock family; 1/8 in kerf between cuts. See stock-layout.csv. Net cutting purchase. Add the separate spare board below. Factory ends may be used for exact stock-length members.
- Timber reserve, 2x2, 8 ft spare: One separate spare for this stock family, in addition to the cutting layout. Allows rejection of knots, checks, damaged ends, and cutting errors. Inspect structural lumber grade before purchase.
- Timber, 2x3, 16 ft: Packed 2 cut segments across this stock family; 1/8 in kerf between cuts. See stock-layout.csv. Net cutting purchase. Add the separate spare board below. Factory ends may be used for exact stock-length members.
- Timber reserve, 2x3, 8 ft spare: One separate spare for this stock family, in addition to the cutting layout. Allows rejection of knots, checks, damaged ends, and cutting errors. Inspect structural lumber grade before purchase.
- Timber, 2x4, 8 ft: Packed 55 cut segments across this stock family; 1/8 in kerf between cuts. See stock-layout.csv. Net cutting purchase. Add the separate spare board below. Factory ends may be used for exact stock-length members.
- Timber, 2x4, 10 ft: Packed 55 cut segments across this stock family; 1/8 in kerf between cuts. See stock-layout.csv. Net cutting purchase. Add the separate spare board below. Factory ends may be used for exact stock-length members.
- Timber, 2x4, 12 ft: Packed 55 cut segments across this stock family; 1/8 in kerf between cuts. See stock-layout.csv. Net cutting purchase. Add the separate spare board below. Factory ends may be used for exact stock-length members.
- Timber, 2x4, 16 ft: Packed 55 cut segments across this stock family; 1/8 in kerf between cuts. See stock-layout.csv. Net cutting purchase. Add the separate spare board below. Factory ends may be used for exact stock-length members.
- Timber reserve, 2x4, 8 ft spare: One separate spare for this stock family, in addition to the cutting layout. Allows rejection of knots, checks, damaged ends, and cutting errors. Inspect structural lumber grade before purchase.
- Timber, 2x6, 8 ft: Packed 100 cut segments across this stock family; 1/8 in kerf between cuts. See stock-layout.csv. Net cutting purchase. Add the separate spare board below. Factory ends may be used for exact stock-length members.
- Timber, 2x6, 10 ft: Packed 100 cut segments across this stock family; 1/8 in kerf between cuts. See stock-layout.csv. Net cutting purchase. Add the separate spare board below. Factory ends may be used for exact stock-length members.
- Timber, 2x6, 12 ft: Packed 100 cut segments across this stock family; 1/8 in kerf between cuts. See stock-layout.csv. Net cutting purchase. Add the separate spare board below. Factory ends may be used for exact stock-length members.
- Timber, 2x6, 16 ft: Packed 100 cut segments across this stock family; 1/8 in kerf between cuts. See stock-layout.csv. Net cutting purchase. Add the separate spare board below. Factory ends may be used for exact stock-length members.
- Timber reserve, 2x6, 8 ft spare: One separate spare for this stock family, in addition to the cutting layout. Allows rejection of knots, checks, damaged ends, and cutting errors. Inspect structural lumber grade before purchase.
- Timber, 2x8, 8 ft: Packed 17 cut segments across this stock family; 1/8 in kerf between cuts. See stock-layout.csv. Net cutting purchase. Add the separate spare board below. Factory ends may be used for exact stock-length members.
- Timber, 2x8, 16 ft: Packed 17 cut segments across this stock family; 1/8 in kerf between cuts. See stock-layout.csv. Net cutting purchase. Add the separate spare board below. Factory ends may be used for exact stock-length members.
- Timber reserve, 2x8, 8 ft spare: One separate spare for this stock family, in addition to the cutting layout. Allows rejection of knots, checks, damaged ends, and cutting errors. Inspect structural lumber grade before purchase.
- Timber, 4x4, 12 ft: Packed 15 cut segments across this stock family; 1/8 in kerf between cuts. See stock-layout.csv. Net cutting purchase. Add the separate spare board below. Factory ends may be used for exact stock-length members.
- Timber, 4x4, 16 ft: Packed 15 cut segments across this stock family; 1/8 in kerf between cuts. See stock-layout.csv. Net cutting purchase. Add the separate spare board below. Factory ends may be used for exact stock-length members.
- Timber reserve, 4x4, 8 ft spare: One separate spare for this stock family, in addition to the cutting layout. Allows rejection of knots, checks, damaged ends, and cutting errors. Inspect structural lumber grade before purchase.
- Timber, 4x6 ground-contact treated, 8 ft: Packed 8 cut segments across this stock family; 1/8 in kerf between cuts. See stock-layout.csv. Net cutting purchase. Add the separate spare board below. Factory ends may be used for exact stock-length members.
- Timber, 4x6 ground-contact treated, 12 ft: Packed 8 cut segments across this stock family; 1/8 in kerf between cuts. See stock-layout.csv. Net cutting purchase. Add the separate spare board below. Factory ends may be used for exact stock-length members.
- Timber, 4x6 ground-contact treated, 16 ft: Packed 8 cut segments across this stock family; 1/8 in kerf between cuts. See stock-layout.csv. Net cutting purchase. Add the separate spare board below. Factory ends may be used for exact stock-length members.
- Timber reserve, 4x6 ground-contact treated, 8 ft spare: One separate spare for this stock family, in addition to the cutting layout. Allows rejection of knots, checks, damaged ends, and cutting errors. Inspect structural lumber grade before purchase.
- Sheet goods, 1/2 in exterior panel siding, 4 x 8 ft: Guillotine nesting of 16 full rectangular/profile bounding blanks, including 1/8 in kerf. See sheet-layout.csv. No credit for door/window cutouts. Roof panel long axes kept along recorded length. Smooth panels; directional siding needs a revised layout.
- Sheet reserve, 1/2 in exterior panel siding, 4 x 8 ft spare: One separate spare sheet in addition to the nesting layout. Covers damaged edges and fitting changes. Do not substitute a lower structural span rating.
- Sheet goods, 1/2 in exterior plywood, 4 x 8 ft: Guillotine nesting of 9 full rectangular/profile bounding blanks, including 1/8 in kerf. See sheet-layout.csv. No credit for door/window cutouts. Roof panel long axes kept along recorded length. Smooth panels; directional siding needs a revised layout.
- Sheet reserve, 1/2 in exterior plywood, 4 x 8 ft spare: One separate spare sheet in addition to the nesting layout. Covers damaged edges and fitting changes. Do not substitute a lower structural span rating.
- Sheet goods, 1/2 in exterior roof plywood, 4 x 8 ft: Guillotine nesting of 16 full rectangular/profile bounding blanks, including 1/8 in kerf. See sheet-layout.csv. No credit for door/window cutouts. Roof panel long axes kept along recorded length. Smooth panels; directional siding needs a revised layout.
- Sheet reserve, 1/2 in exterior roof plywood, 4 x 8 ft spare: One separate spare sheet in addition to the nesting layout. Covers damaged edges and fitting changes. Do not substitute a lower structural span rating.
- Sheet goods, 3/4 in exterior plywood, 4 x 8 ft: Guillotine nesting of 8 full rectangular/profile bounding blanks, including 1/8 in kerf. See sheet-layout.csv. No credit for door/window cutouts. Roof panel long axes kept along recorded length. Smooth panels; directional siding needs a revised layout.
- Sheet reserve, 3/4 in exterior plywood, 4 x 8 ft spare: One separate spare sheet in addition to the nesting layout. Covers damaged edges and fitting changes. Do not substitute a lower structural span rating.
- Mesh, 1/2 in square, 19 ga galvanized-after-weld hardware cloth; 48 in x 100 ft: Reserve 70 linear ft x 48 in for 56 ft perimeter, corner wraps, toe patches and seam overlaps. Bends are one sheet: do not add vertical faces and toes. 18 in up + 18 in down + 12 in toe; trim gate above-grade leg. Remaining roll length is spare.
- Mesh, 1/2 in square, 19 ga galvanized-after-weld hardware cloth; 48 in x 100 ft: Separate nesting for 15 run, gate, under-house and eave pieces; existing overlaps included. See mesh-layout.csv. Full bounding blanks; gable offcuts remain spare. No burial material counted here. Verify supplier roll width and corrosion coating; maintain all drawing overlaps.
- Mesh, 1/4 in galvanized welded hardware cloth, 24 in x 10 ft: Henhouse vent screens; nested full blanks. This fine layer does not replace the heavier run mesh. Retain at least the modeled perimeter overlap and protect cut edges.
- Roofing, Metal roof panels, 36 in coverage, painted galvanized/Galvalume: Each eave-to-ridge coverage blank is 67 11/16 in before product-specific order allowances; 16 coverage pieces modeled. Order continuous panels only after setting ridge/eave trim allowances. Nominal 6 ft stock is a candidate, not a confirmed final cut. Last coverage strip each side is ripped.
- Roofing, Matching ridge cap, 10 ft sections: One assembled ridge of 22 ft. Two CAD faces represent one folded cap. Quantity includes 2 ft total lap/cut allowance; verify manufacturer's lap requirement.
- Roofing, Matching eave/drip flashing, 10 ft sections: 2 eaves totaling 44 ft. Allow 1 ft per eave for laps and trimming; confirm selected product.
- Roofing, Matching rake/gable flashing, 10 ft sections: Four sloping edges total about 22 ft 4 5/16 in; one unspliced section per edge. Detail not represented by individual corrugated trim solids; field fit to selected roof system.
- Roofing, Metal-compatible roofing underlayment: Modeled main-roof coverage 248.0172 sq ft plus 15% for laps and fitting. Convert to whole manufacturer rolls using net coverage; select temperature rating and deck compatibility.
- Hardware, Exterior hinges, complete sets: One complete fitting per modeled hinge/latch position. Select rating, offset and corrosion finish for finished door weight and actual swing; model plates are locating envelopes.
- Hardware, Two-action cleanout latches, complete sets: One complete fitting per modeled hinge/latch position. Select rating, offset and corrosion finish for finished door weight and actual swing; model plates are locating envelopes.
- Hardware, Two-action run gate latch with inside release: One complete fitting per modeled hinge/latch position. Select rating, offset and corrosion finish for finished door weight and actual swing; model plates are locating envelopes.
- Roofing, Nest roof metal and wall flashing: Coverage blank 52 x 20 5/8 in; see nest profile. Use a formed compatible sheet or selected 3:12-rated roof product. Main-roof offcuts may help, but no reuse is assumed. Add wall flashing and closure pieces.
- Threshold, Exterior hardwood 1x6, 8 ft, actual thickness 3/4 in: Rip/cut threshold blank 37 1/2 x 4 in. Seal ends and relieve exposed edges. Spare length available for fitting.
- Nonstructural hardware, Exterior corrosion-compatible #8 or #10 x 2 in batten screws: At least 604 positions at maximum 6 in centers, plus 10% allowance rounded to boxes. Clamp-only preliminary spacing; embed at least 1 in into timber and avoid points projecting into bird space. Use greater protection where soil/treatment requires it.
- Nonstructural hardware, Galvanized/stainless mesh seam ties or hog rings: Design allowance for bury-strip laps, corner patches and seams away from clamp battens. Tie at no more than 4 in centers; recount final seam length. Match mesh coating and avoid sharp tails.
- Nonstructural hardware, Nest hatch exterior hinges: Allowance for one external hatch. Check hatch weight and chosen opening direction; fit positive hold-open hardware.
- Nonstructural hardware, Nest hatch two-action latches: Allowance to retain both ends of hatch. Use positive stops and seals; do not rely on friction or gravity.
- Nonstructural hardware, Pop-door closed-position retaining pin/latch and lift handle: Sliding door must remain secured when shut. Pin must be operable from the run and inaccessible to predators through mesh.
- Nonstructural hardware, Removable under-house panel fasteners: Four captive screw/washer fixing points per front/rear panel. Use exterior-rated fittings and retain a continuous lower barrier when panels are removed.
- Nonstructural hardware, Exterior panel/trim screws, #8 x 1-5/8 in: Design allowance for cladding, cabinet and light trim; count framing intersections before purchase. This allowance is not a structural sheathing fastening schedule. Check penetration and no exposed points.
Required installation supplies
- Determine local loads, soil bearing, frost depth, footing size, anchorage and drainage before procurement. Ten roof-post anchor locations are shown; no footing capacity or concrete quantity is specified.
- Select lumber grades and check member adequacy. Design the post/beam splices, knee-brace joints, floor connections, rafter seats and both ends of every rafter tie. The ridge board is not a structural ridge beam.
- Select rated connectors and their complete fastener schedules, including required embedment, edge distances, corrosion resistance and uplift restraint. Do not treat the modeled fitting envelopes as rated products.
- Select roof and floor panel span ratings, edge gaps and structural sheathing fastening. Resolve any required diaphragm attachment and bracing.
- Confirm roof panel, trim and nest-roof order lengths from the completed framing. Select compatible underlayment, closures, sealants, flashing and washered fasteners using the chosen roof system requirements.
- Select the structural support connections for the external nests, ramp and landing. Confirm actual hinge weight ratings, offsets, latches, stops and seals against the modeled movements.
- Profile-matched closures, butyl tape, roof screws, stitch screws and flashing fasteners: Required for the selected panel product at both eaves, both rake ends and ridge. Fastener gauge, embedment, washer, spacing and closure ventilation are product/site selections, not approved by CAD.
- Footings, anchors/hold-downs, post/beam joints, floor hangers, rafter/tie connectors and structural sheathing fasteners: 10 roof-post anchor locations shown; connection classes listed in connections.md. Member grades, wind/snow/seismic loads, soil bearing/frost depth and connector capacities must be resolved before procurement.
- Exterior finish, end-grain sealer, compatible flashing tape, weather seals and sealant: Required on exposed timber/panel edges and weather joints. Select finish compatible with intended poultry use; follow cure times. Do not seal intended ventilation openings.
Optional material depending on installation
- Gutters, downspouts, drainage aggregate, frost protection and site preparation: Roof water must drain away from the base and buried barrier. Size drainage and footing materials for the actual site; no concrete quantity is implied by anchor circles.
- Feeder, waterer, bedding and flock-specific ventilation/weather protection: Equipment not included in the timber part count. Keep permanent equipment out of the service path and reserve usable bird space.
Tools & equipment
- Tape measure and framing square
- String lines, stakes and a level
- Circular saw or miter saw
- Jigsaw for panel notches and openings
- Drill and driver with bits for the selected fasteners
- Clamps and a workbench
- Metal snips or shears suited to the selected wire mesh
- Router or table saw for the pop-door guide grooves
- Shovel and trenching tools
- Eye protection, hearing protection and cut-resistant gloves
BEFORE YOU BUILD
Use this work at your own risk
Unverified concept materials—for inspiration only. These files have not been checked for accuracy, safety, structural adequacy, or building-code compliance. They may contain serious errors and are not construction-ready. Obtain independent qualified design and review before building.
No person or organization makes any guarantee or warranty, express or implied, regarding this design, its documentation, digital files, or website views. They are not professional services and do not create an architect-client or other professional-client relationship. No promise is made about accuracy, completeness, reliability, code compliance, or fitness for your project.
Buildings and building projects are complex, and many things can go wrong. You are responsible for checking dimensions and site conditions, choosing suitable materials and methods, obtaining permits, following codes and manufacturer instructions, and getting qualified professional help when needed. To the fullest extent permitted by law, DIYPlans.org disclaims liability for damages resulting from use of this work. Read the FAQ about your responsibilities.
CC CC BY-NC-SA 4.0 InternationalShare and adapt this free design for noncommercial purposes with appropriate credit. Link to the license, indicate changes, and license adaptations under the same terms.
Instructions
Step 1 Prepare the site
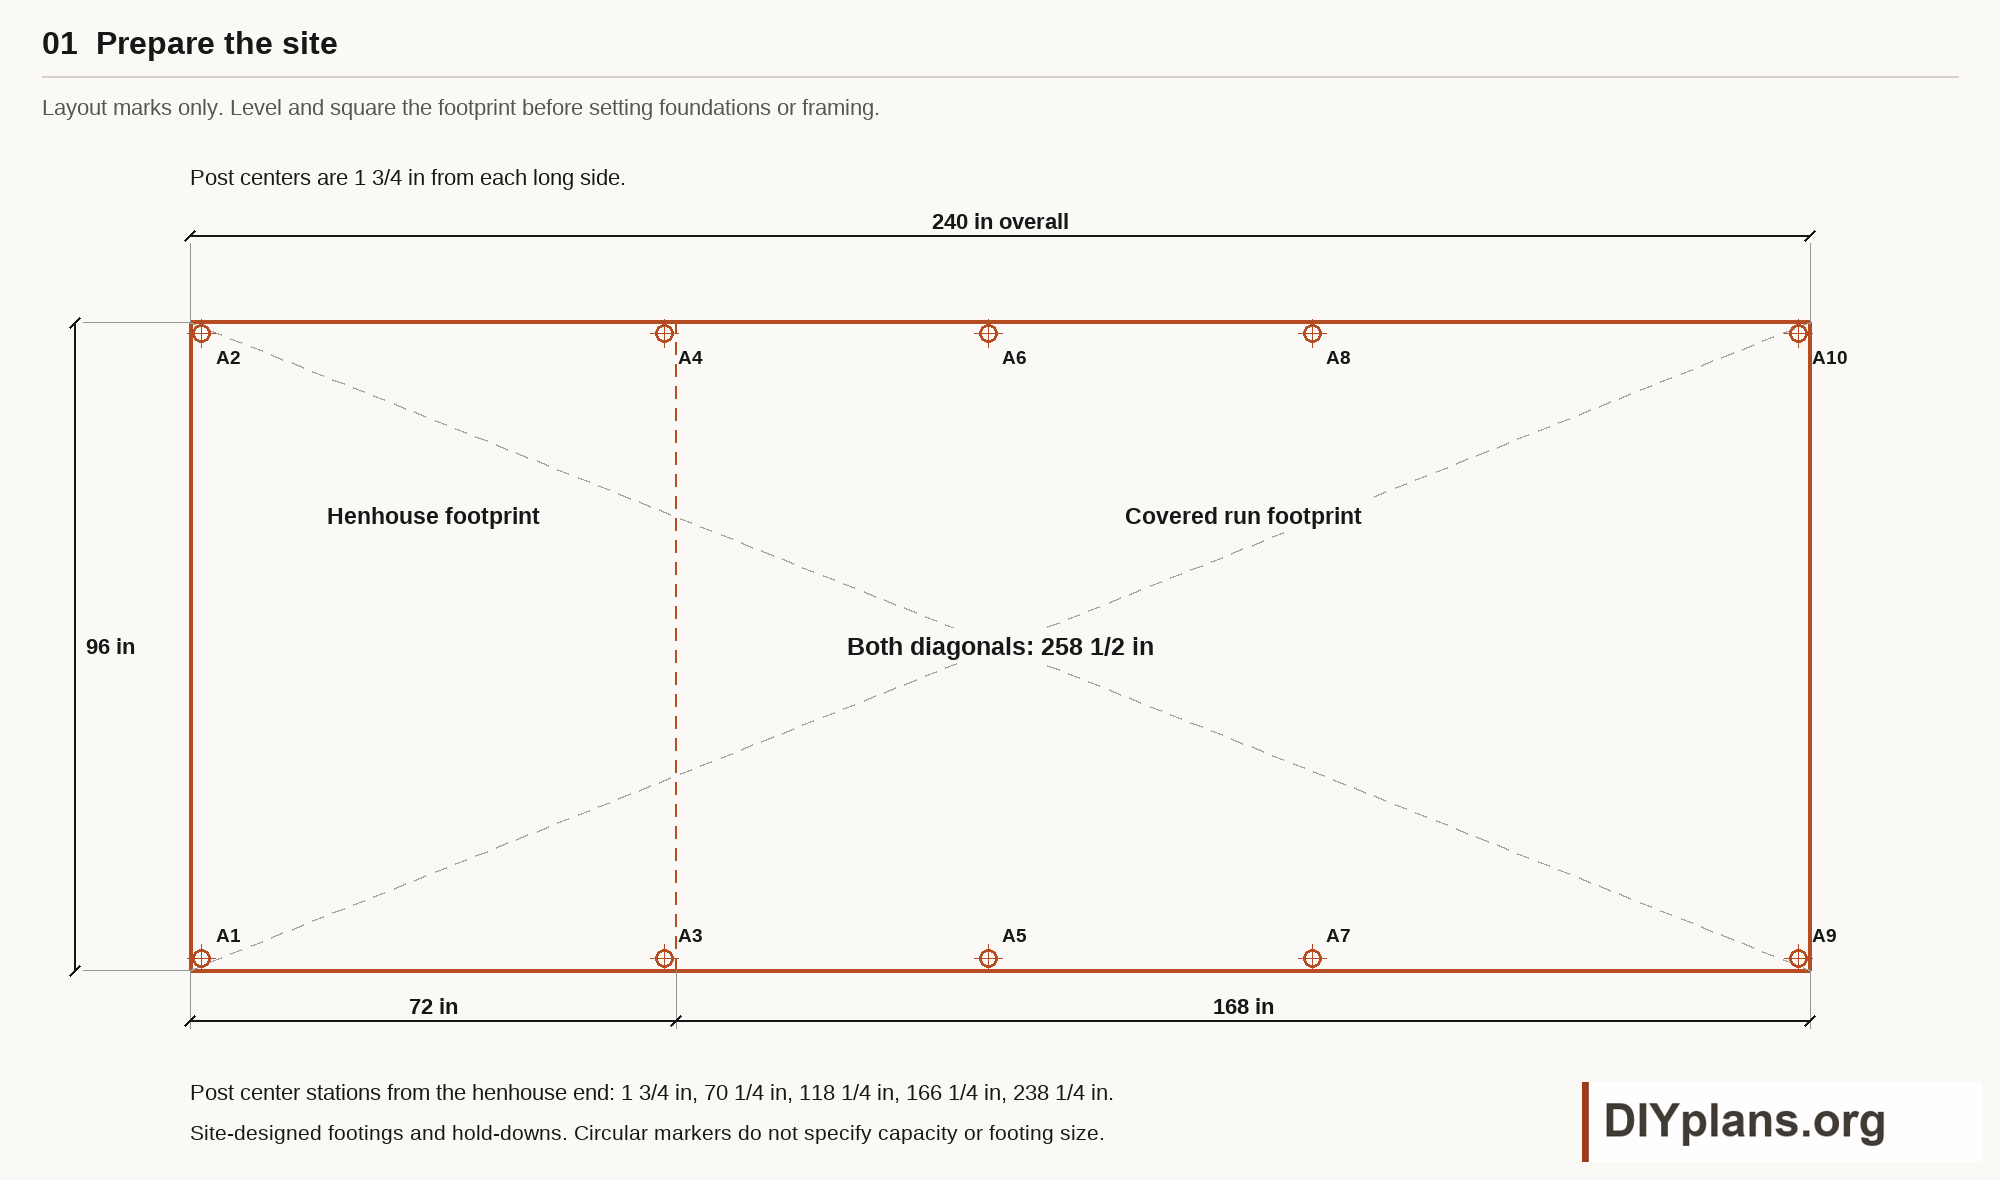
- Choose a well-drained position and check local setbacks, permits, wind, snow and frost requirements. Have underground utilities located before digging.
- Confirm the footing, anchoring and structural connection design for the site before buying materials. The drawings locate supports but do not specify footing sizes or load capacities.
- Mark a rectangle 240 x 96 in along the outside timber faces. Adjust the corners until both diagonals measure 258 1/2 in and the sides match.
- Mark the henhouse at the first 72 in of the length. Leave room outside the frame for the 12 in buried mesh return, roof overhangs, nest box and working access.
- Establish a level height reference and mark the post centers shown in the site layout. Keep surface water draining away from the coop.
Check: The footprint measures 240 x 96 in, both diagonals measure 258 1/2 in, and the support locations and site requirements are confirmed.
Step 2 Set the base frame
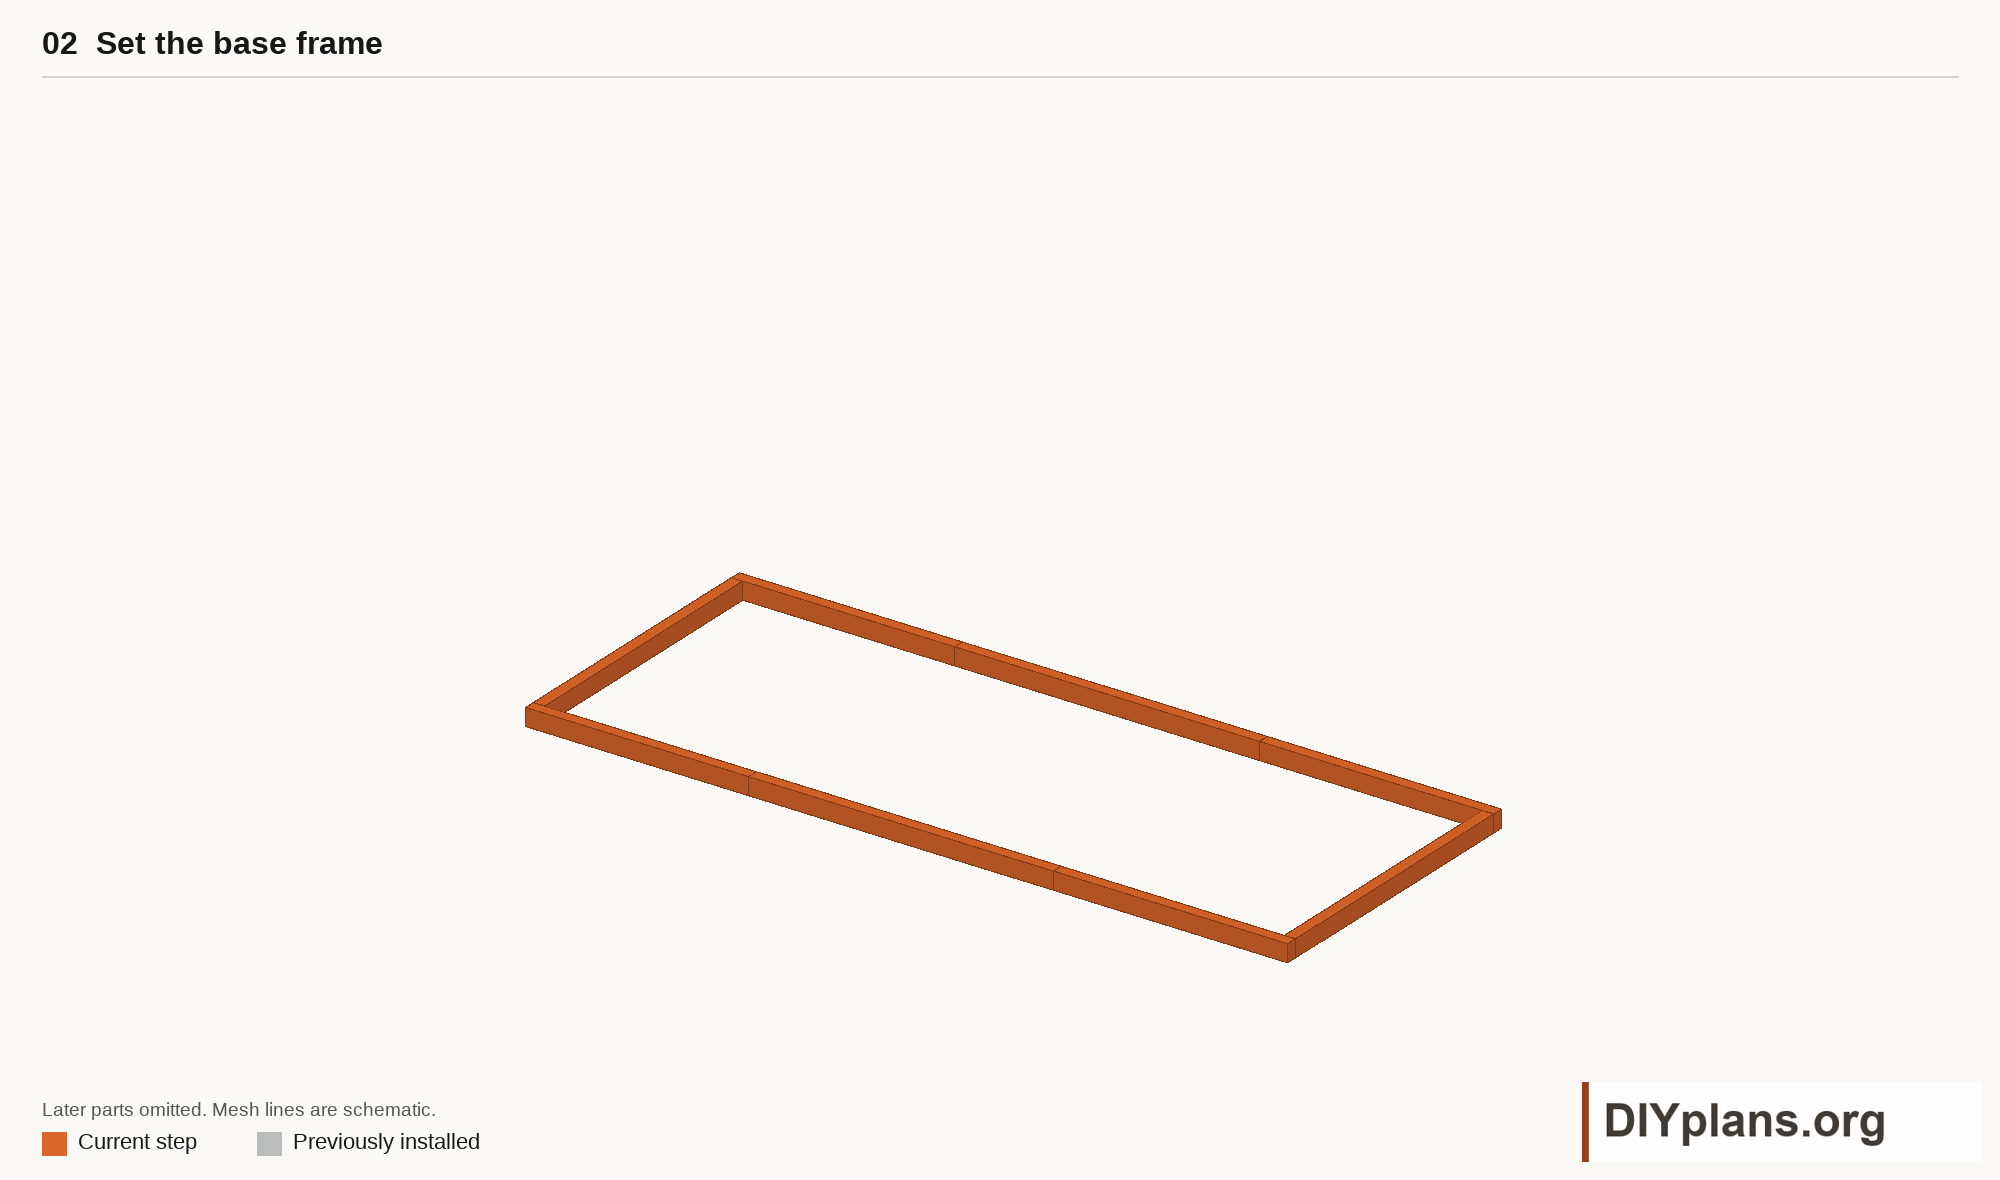
- Select ground-contact 4x6 timbers and compatible corrosion-resistant connectors. Cut the perimeter pieces from the stock and cut lists.
- Set the perimeter on the prepared supports with the timber tops 5 1/2 in above the finished-ground reference. Keep the outside frame 240 x 96 in.
- Join the timbers at the butt joints shown in the plan. Recheck both diagonals before fixing the frame to the site-designed supports.
- Provide anchored bearing beneath every roof post. Keep mesh fasteners and ground staples separate from the structural anchors.
Check: The perimeter is level and square, with anchored bearing at every roof post.
Step 3 Close the buried perimeter
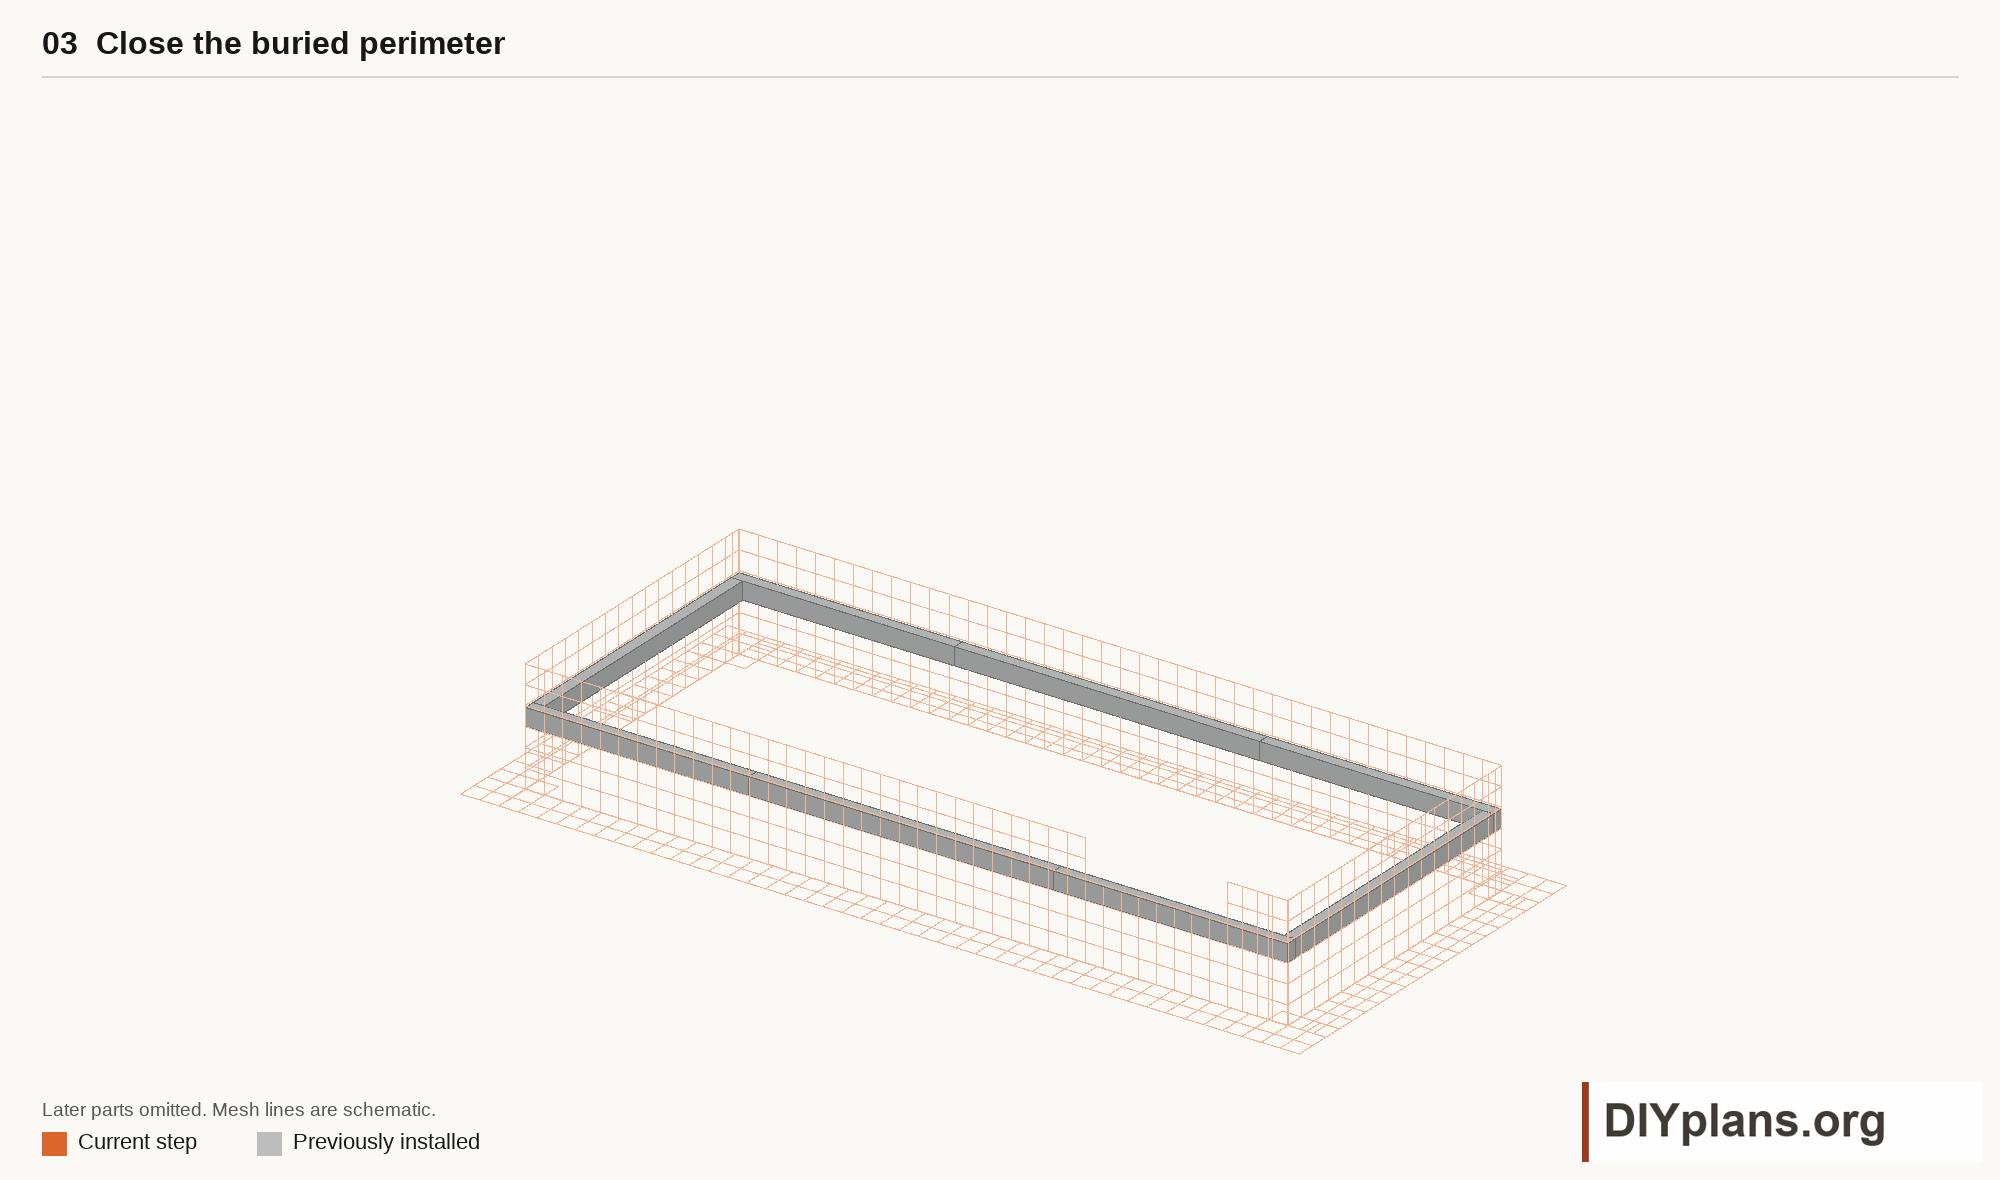
- Use 1/2 in welded hardware cloth, 19 gauge and galvanized after welding. Excavate the perimeter trench without undermining the foundation supports.
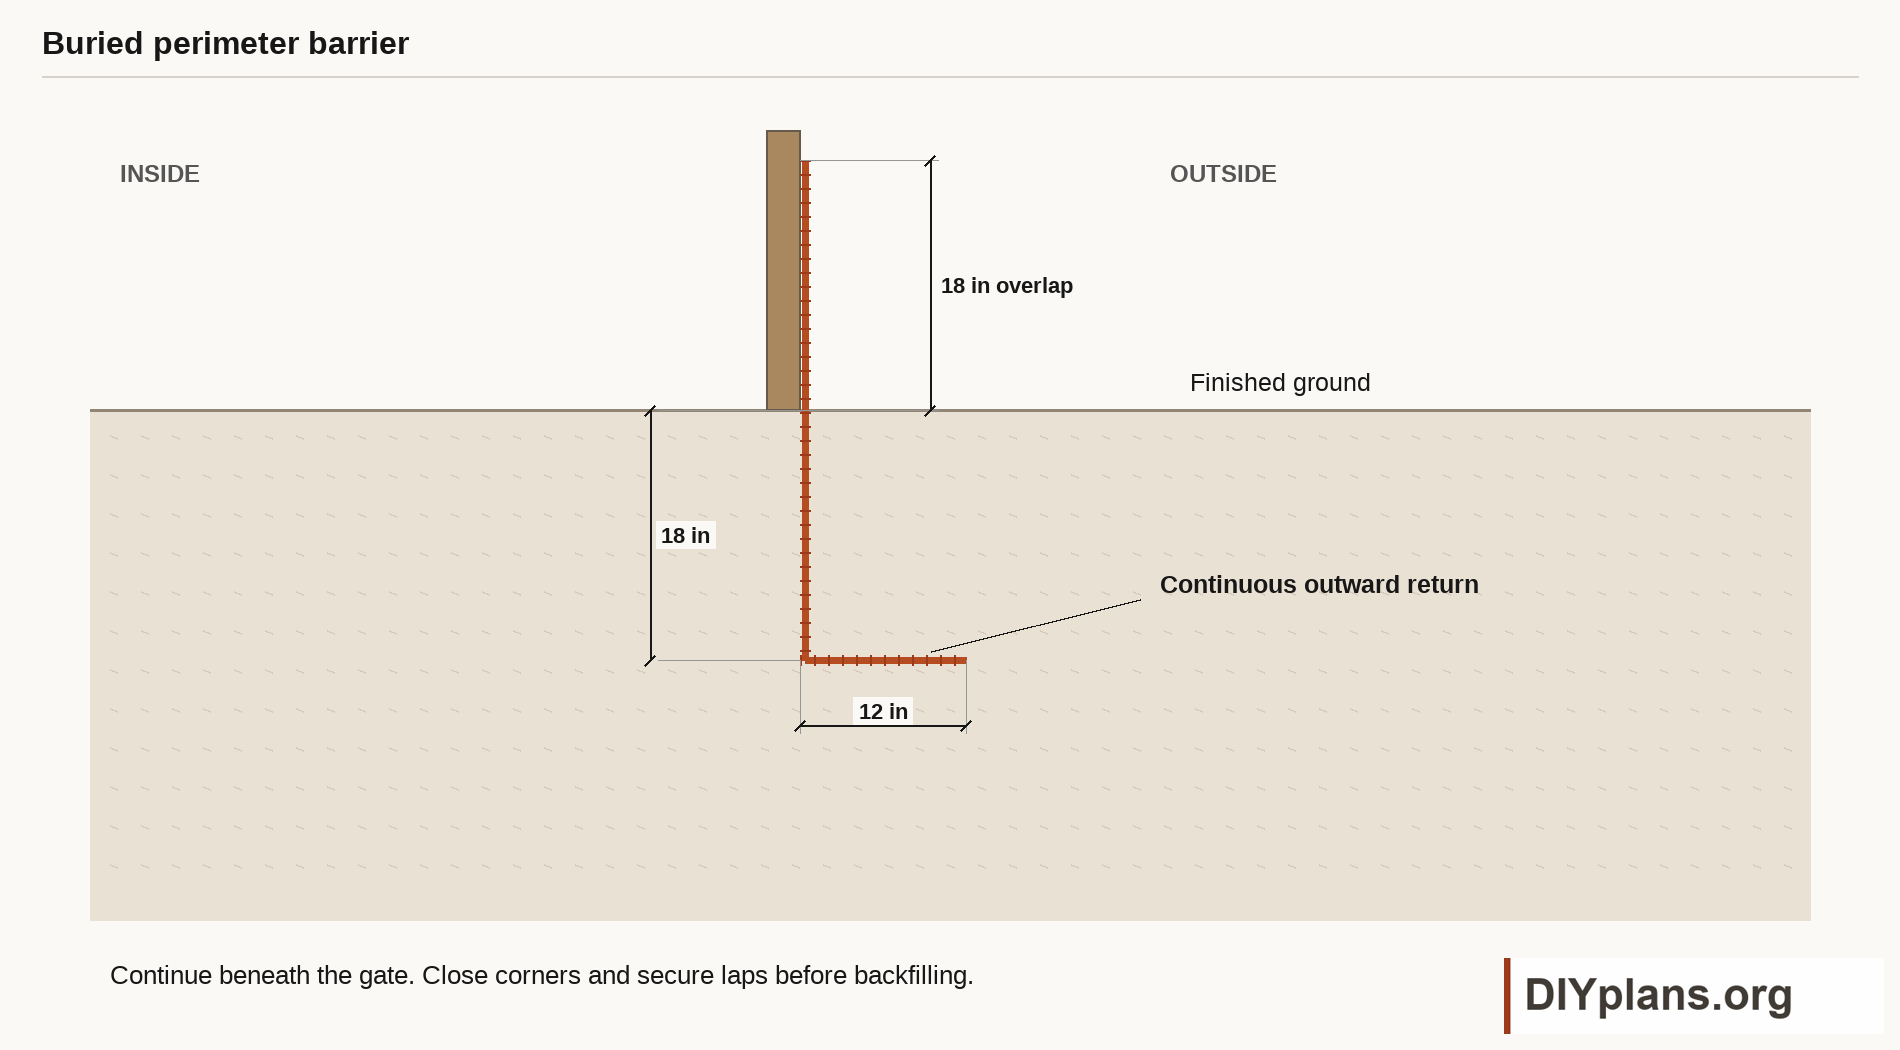
- Form the 48 in wide wall strips into an 18 in above-ground leg, an 18 in buried leg and a 12 in outward return. Keep at least 6 in of secured overlap with the wall enclosure.
- Continue the underground barrier beneath the gate. At that opening, trim the above-ground leg to 6 in and secure it beneath the fixed threshold.
- Overlap adjoining strips and close every corner with the separate patches. Clamp or fasten the seams so an animal cannot pull them apart.
- Inspect the full perimeter, gate crossing and every foundation interface before backfilling. Protect the mesh from damage while completing the frame.
Check: The buried mesh forms a continuous enclosure beneath the walls and gate, with secured seams and corners before backfilling.
Step 4 Raise the posts and beams
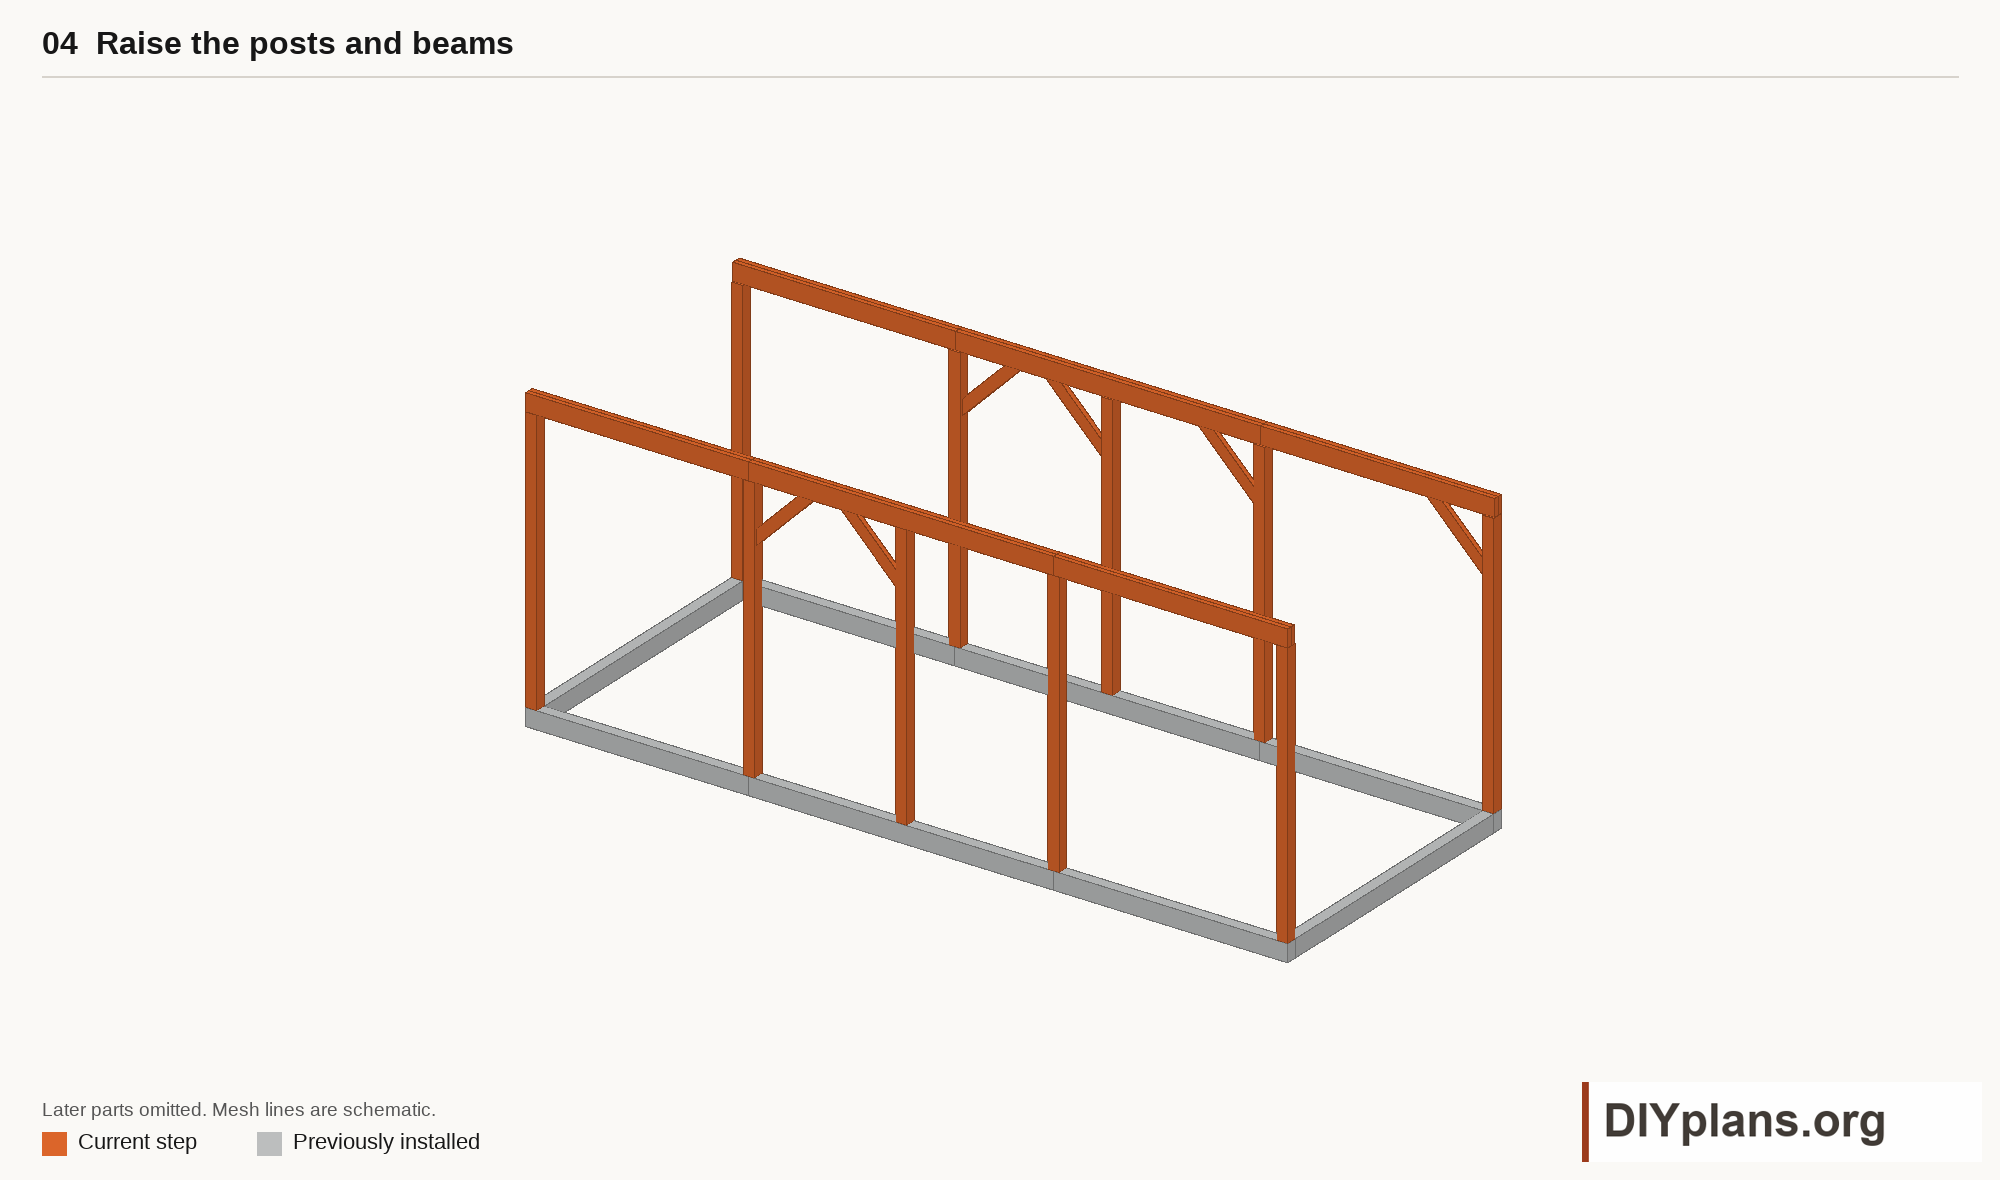
- Cut the 4x4 posts and position them at the marked stations. Clamp temporary braces in place while bringing each post plumb.
- Fit the paired 2x6 top beams with their top faces 96 in above the ground reference. Center every beam butt joint over its supporting post.
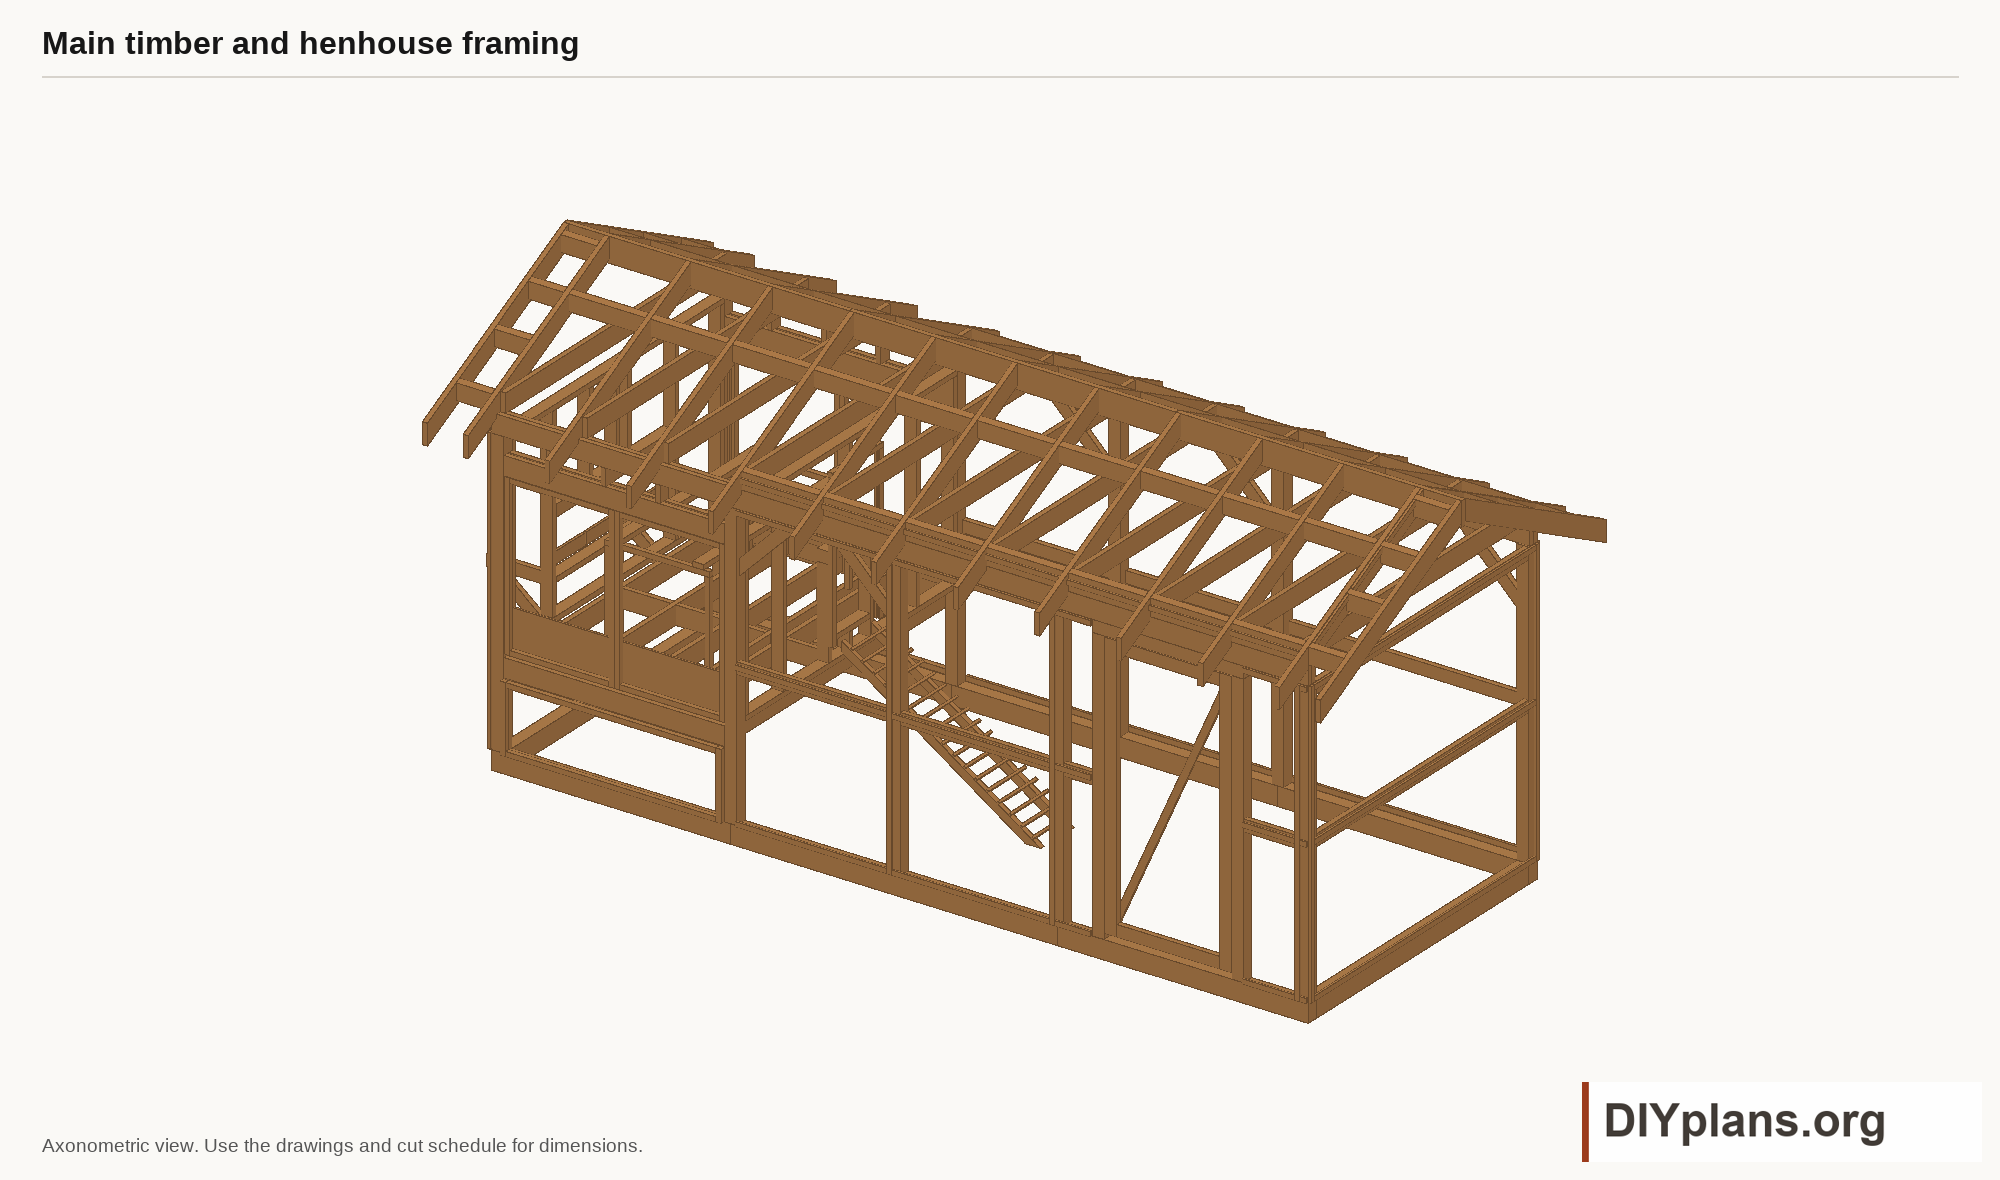
- Fit the permanent knee braces shown in the framing view. Use the selected structural connectors and their specified fasteners.
- Recheck post plumb, beam level and both frame diagonals before tightening the connections. Keep temporary bracing until the frame is stable.
Check: The posts are plumb, beam tops are level at 96 in, and the selected bracing and connections are fitted.
Step 5 Frame and deck the raised floor
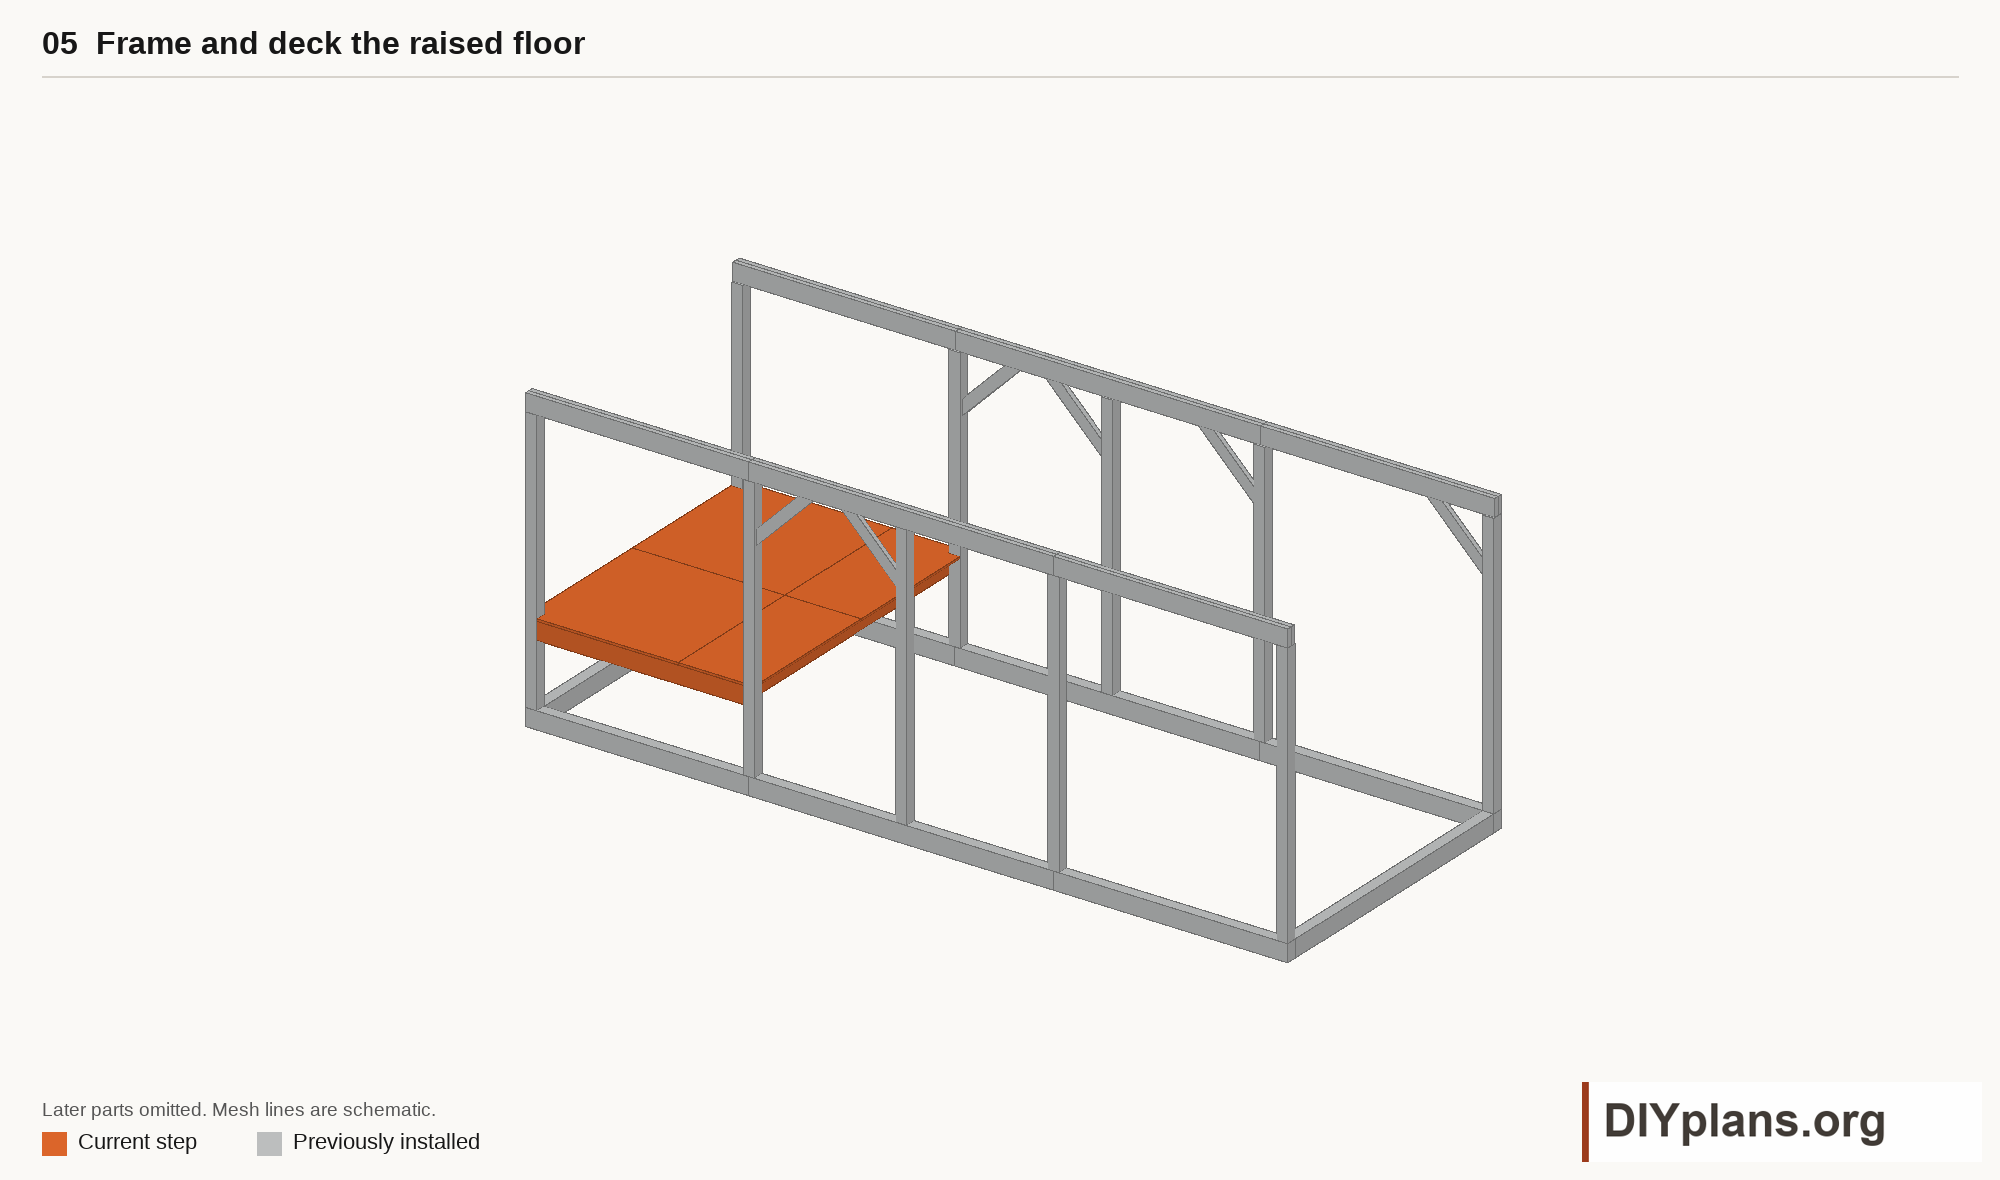
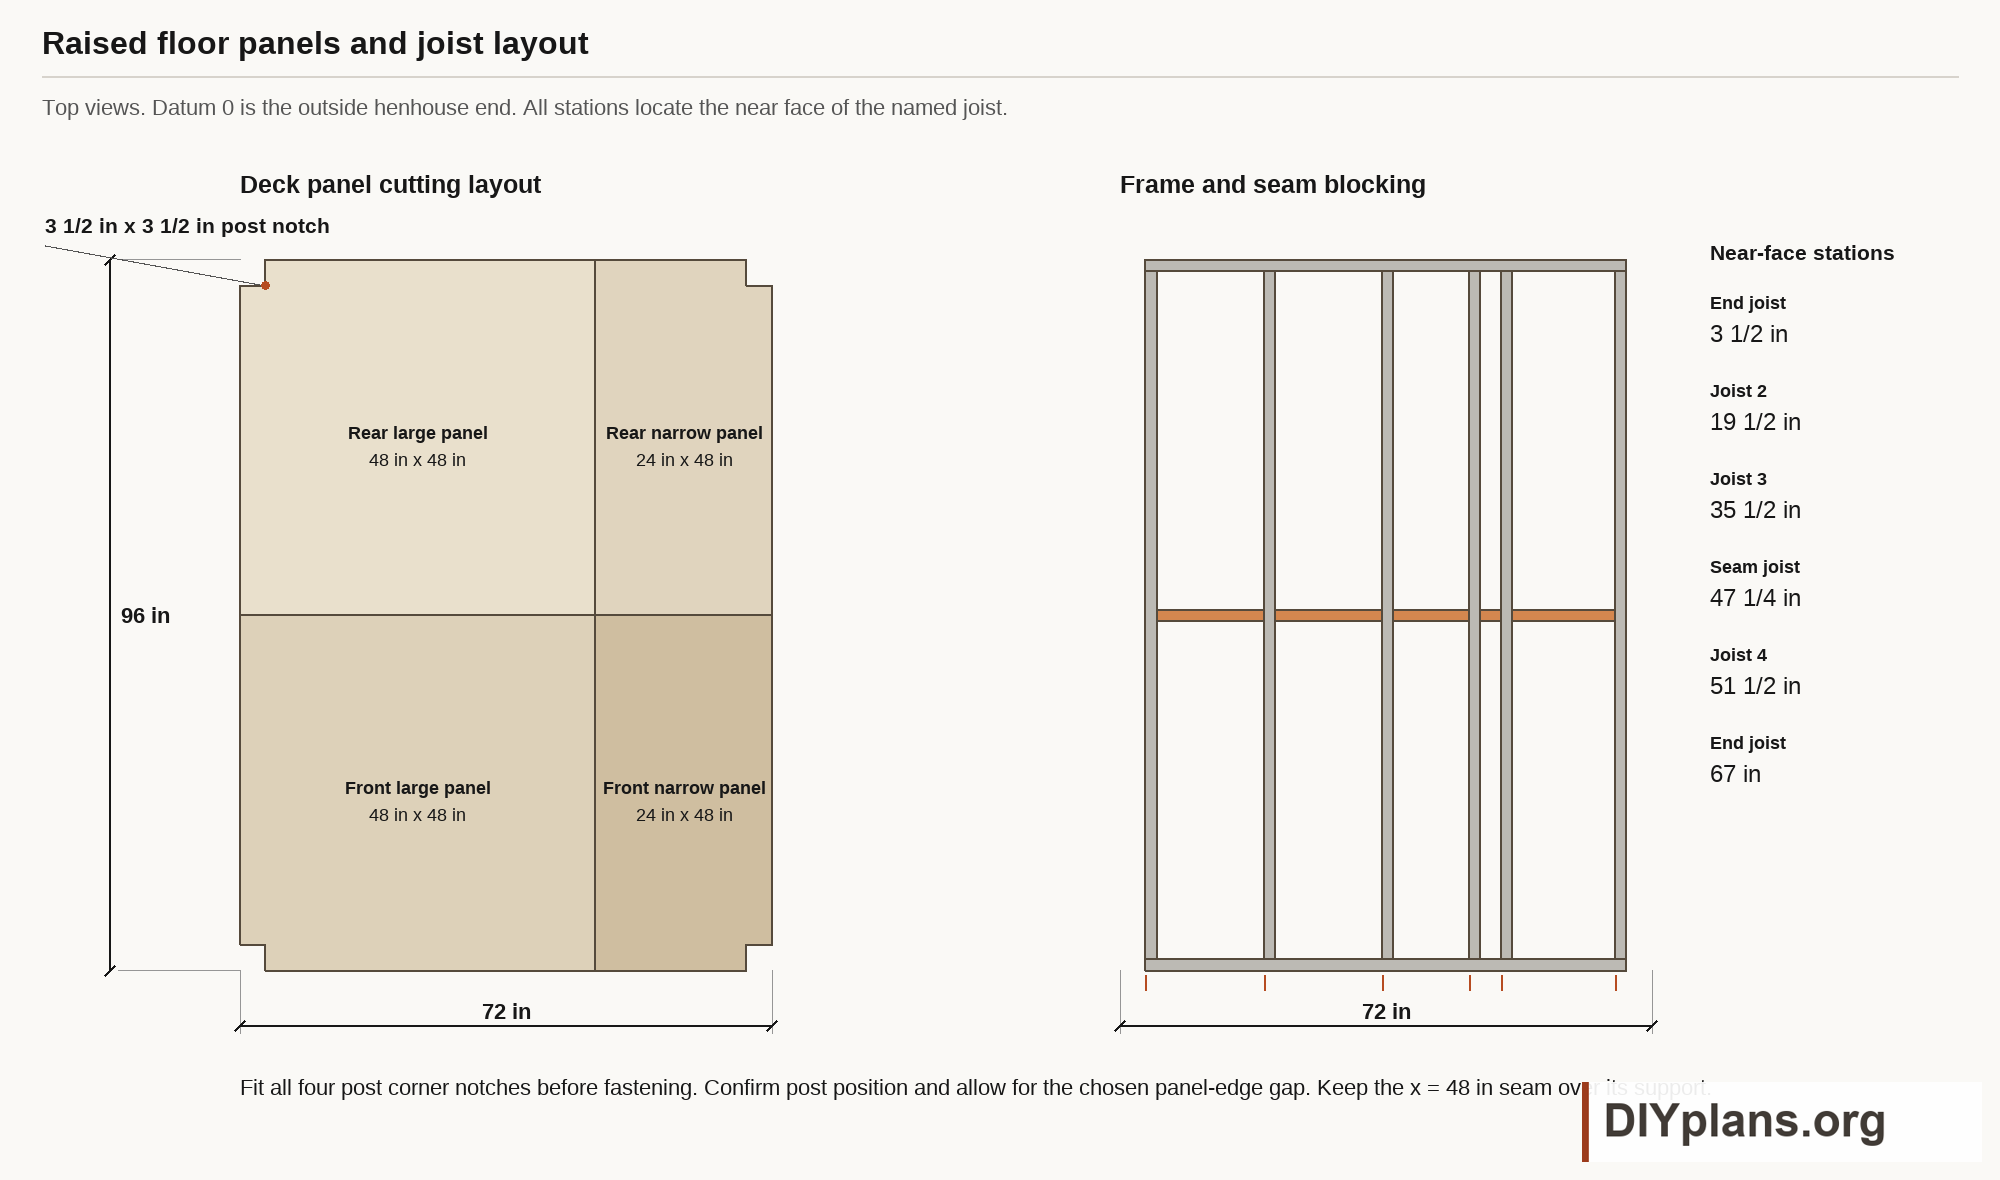
- Cut the 2x6 floor bands and joists. Set every joist top at 31 1/4 in so the 3/4 in deck finishes at 32 in.
- Mark the near joist faces from the outside henhouse end at 3 1/2, 19 1/2, 35 1/2, 47 1/4, 51 1/2 and 67 in. Fit the seam blocking shown in the floor layout.
- Cut two 48 x 48 in and two 24 x 48 in floor panels. Mark and cut the 3 1/2 x 3 1/2 in outer post notches shown on the panel layout.
- Dry-fit all four panels. Check the post locations and the panel manufacturer's edge-gap requirements before fastening to the bands, joists and blocking.
- Seal exposed panel edges with a finish suitable for this use. Keep the deck flat and the finished floor at the 32 in reference.
Check: The deck finishes at 32 in, every panel edge has support, and the post notches fit.
Step 6 Frame the henhouse openings
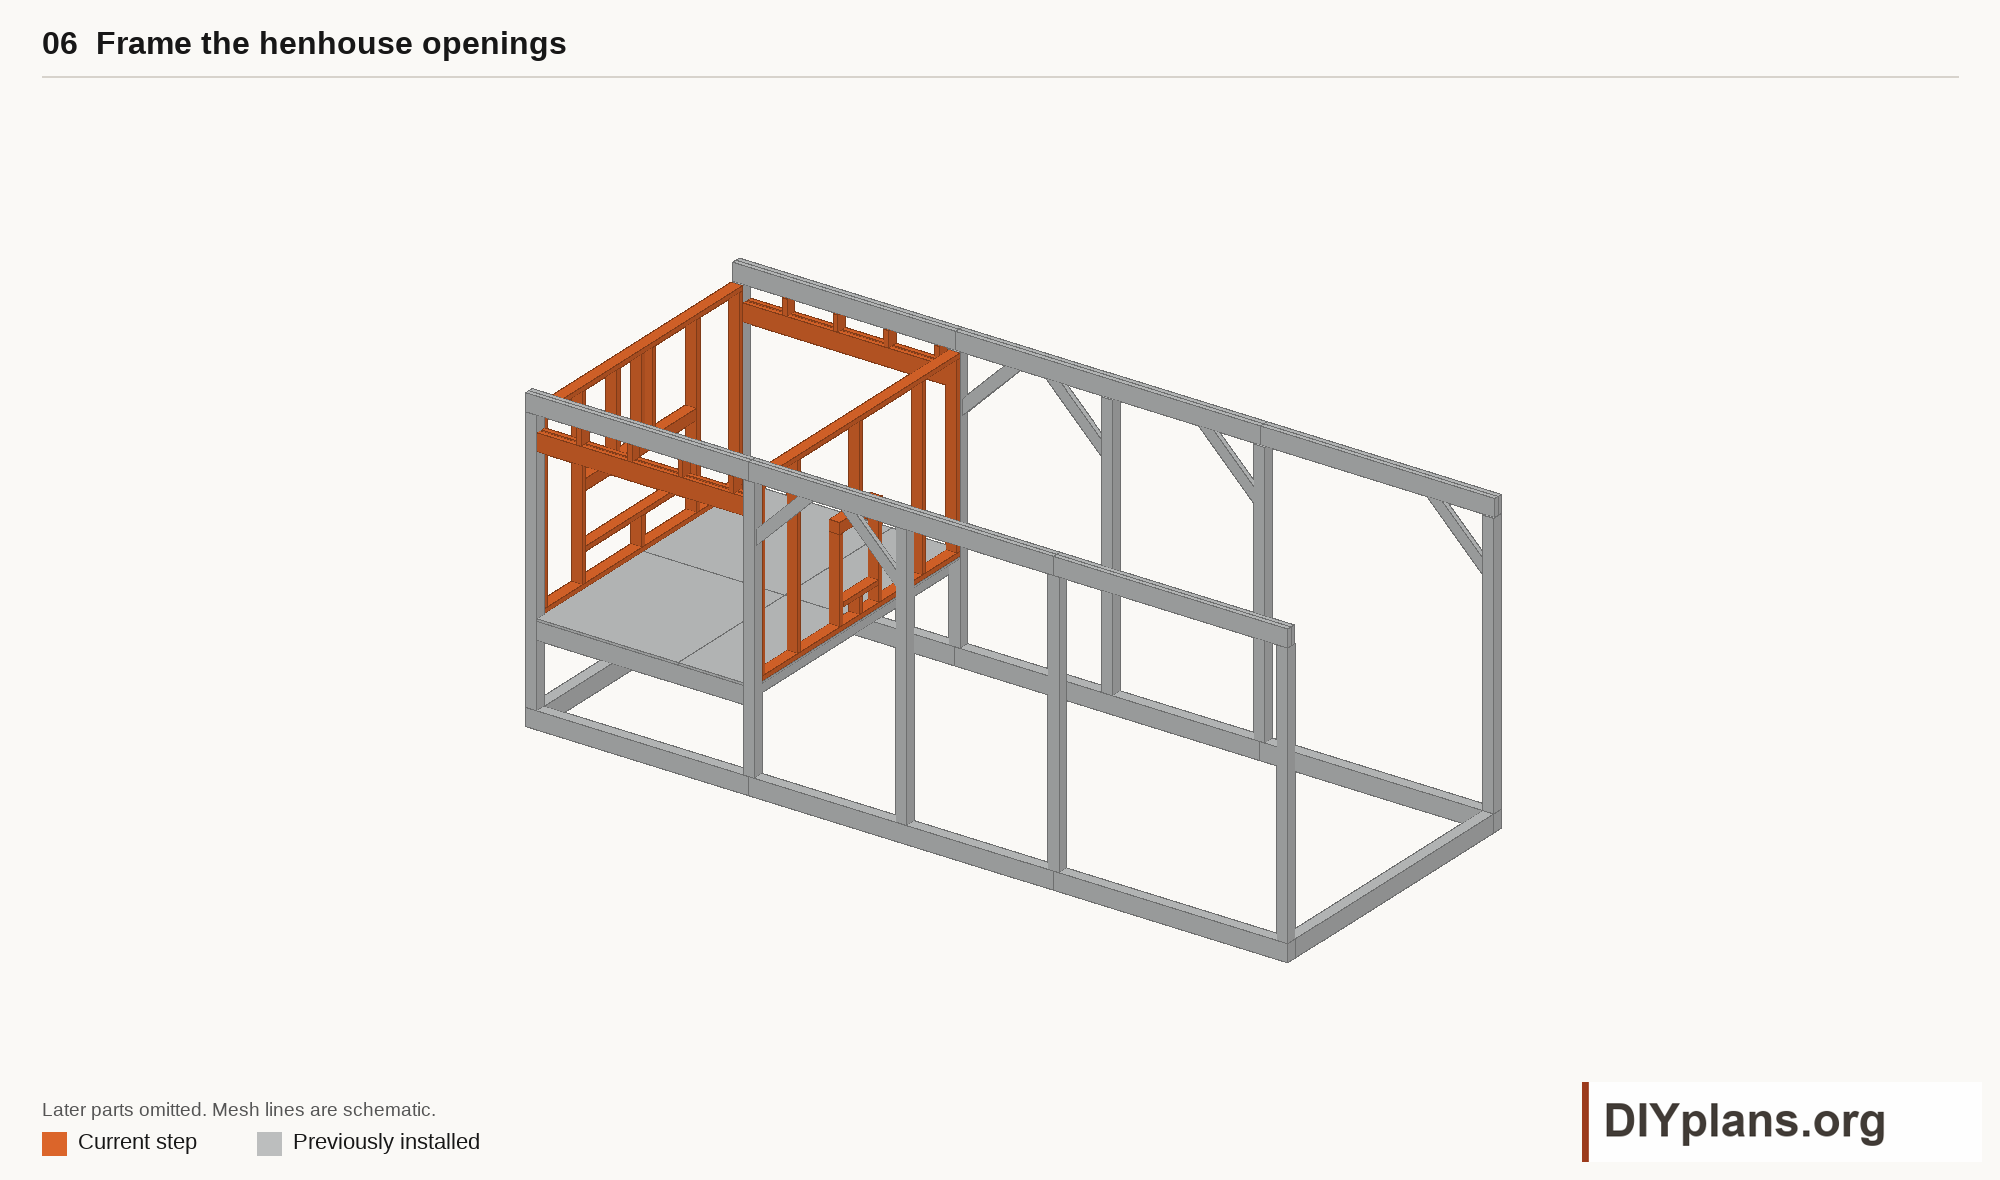
- Frame the front and rear cleanout openings 65 in wide and 48 in high, from the 32 in floor to the 80 in header underside.
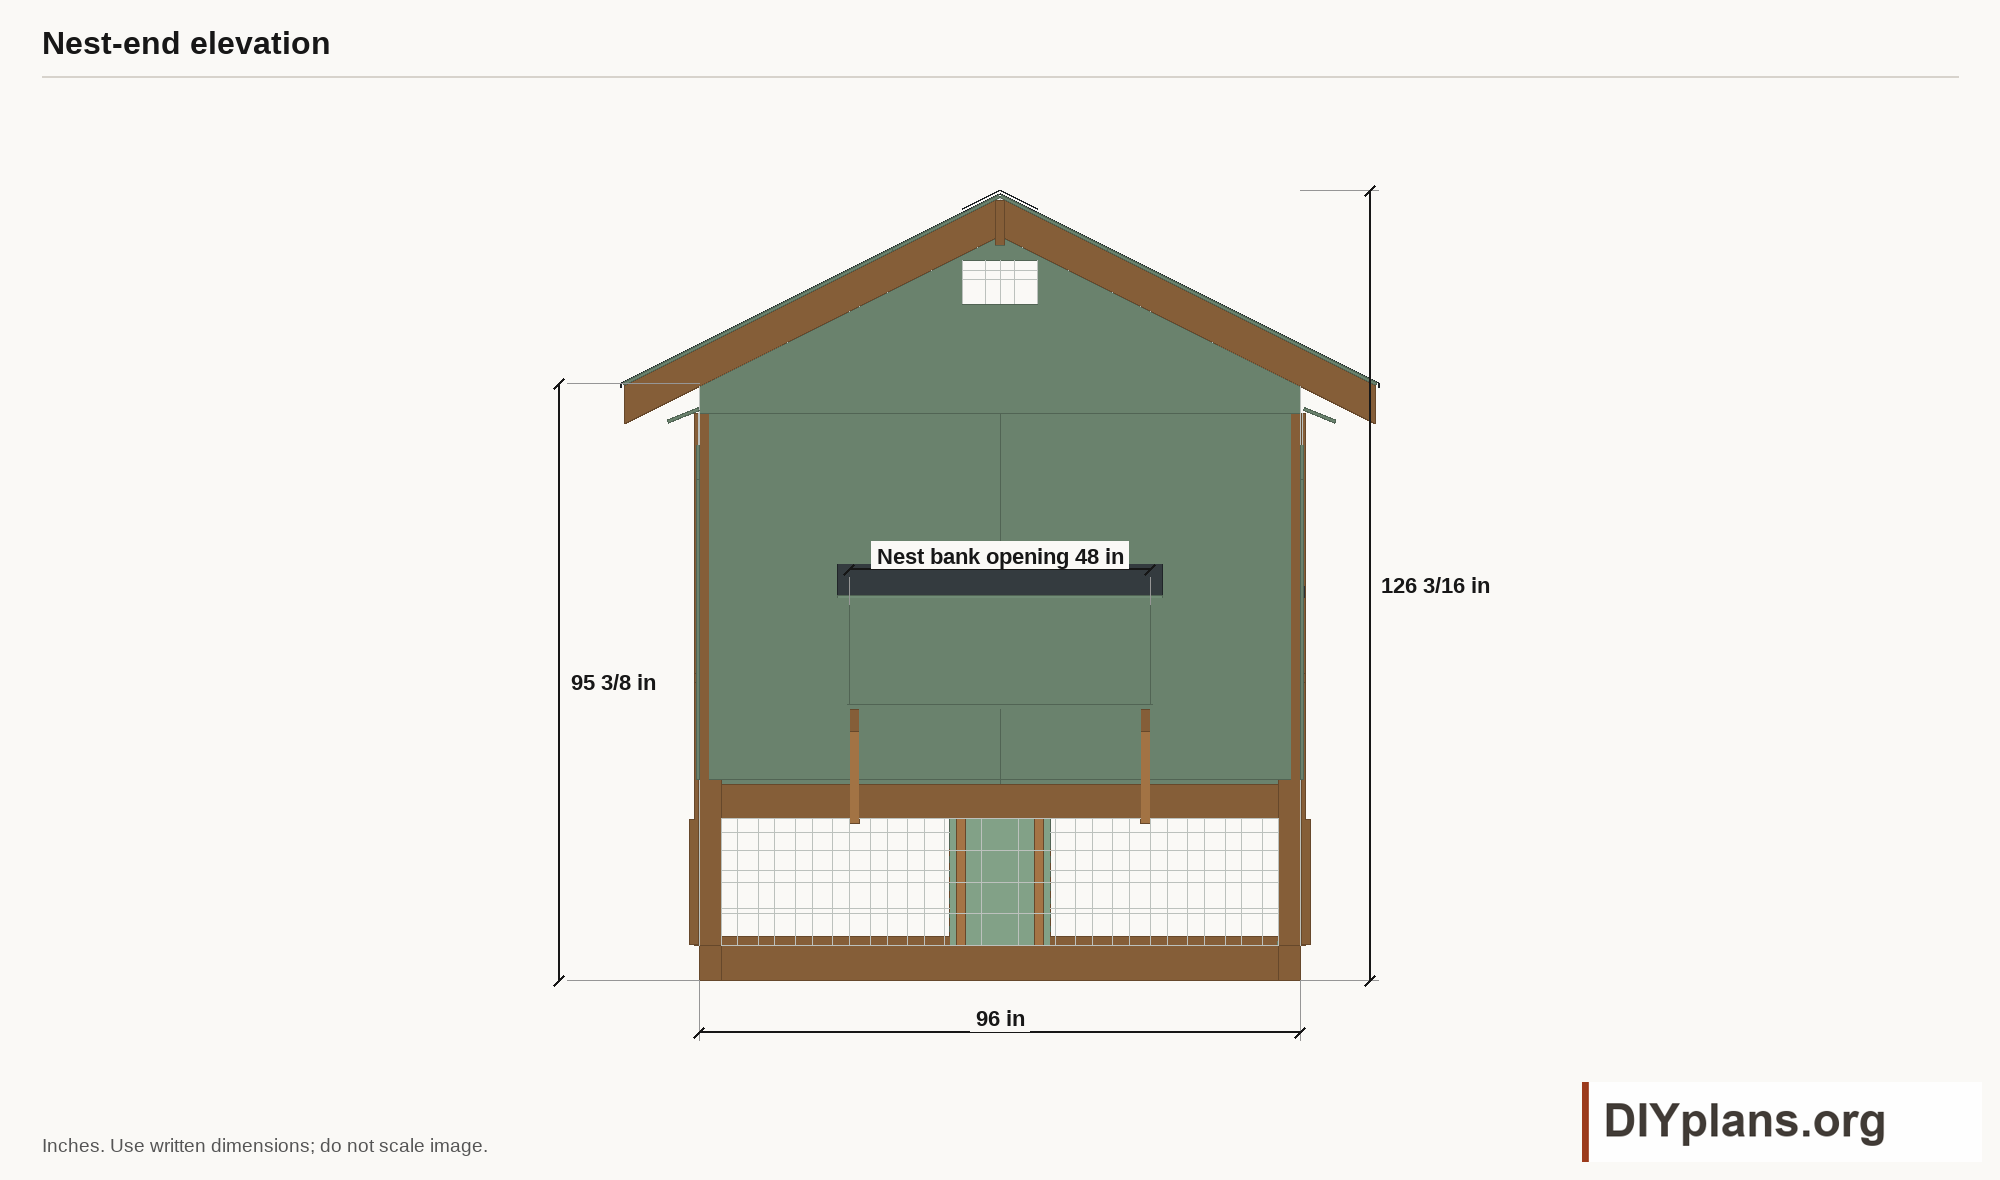
- Frame the nest-bank opening 48 in wide and 16 in high, with its lower edge 44 in above grade. Check its position against the nest-end elevation.
- Frame the pop opening 16 in wide and 20 in high. Set its lower edge at 40 in and leave space above it for the sliding door and guides.
- Fit the remaining wall and gable members shown in the framing view. Keep the high wall slots and gable vents open.
- Check every opening for size, square and alignment before cutting siding or door skins.
Check: The cleanout, nest and pop openings match the drawing dimensions, with ventilation passages left clear.
Step 7 Assemble the roof frame
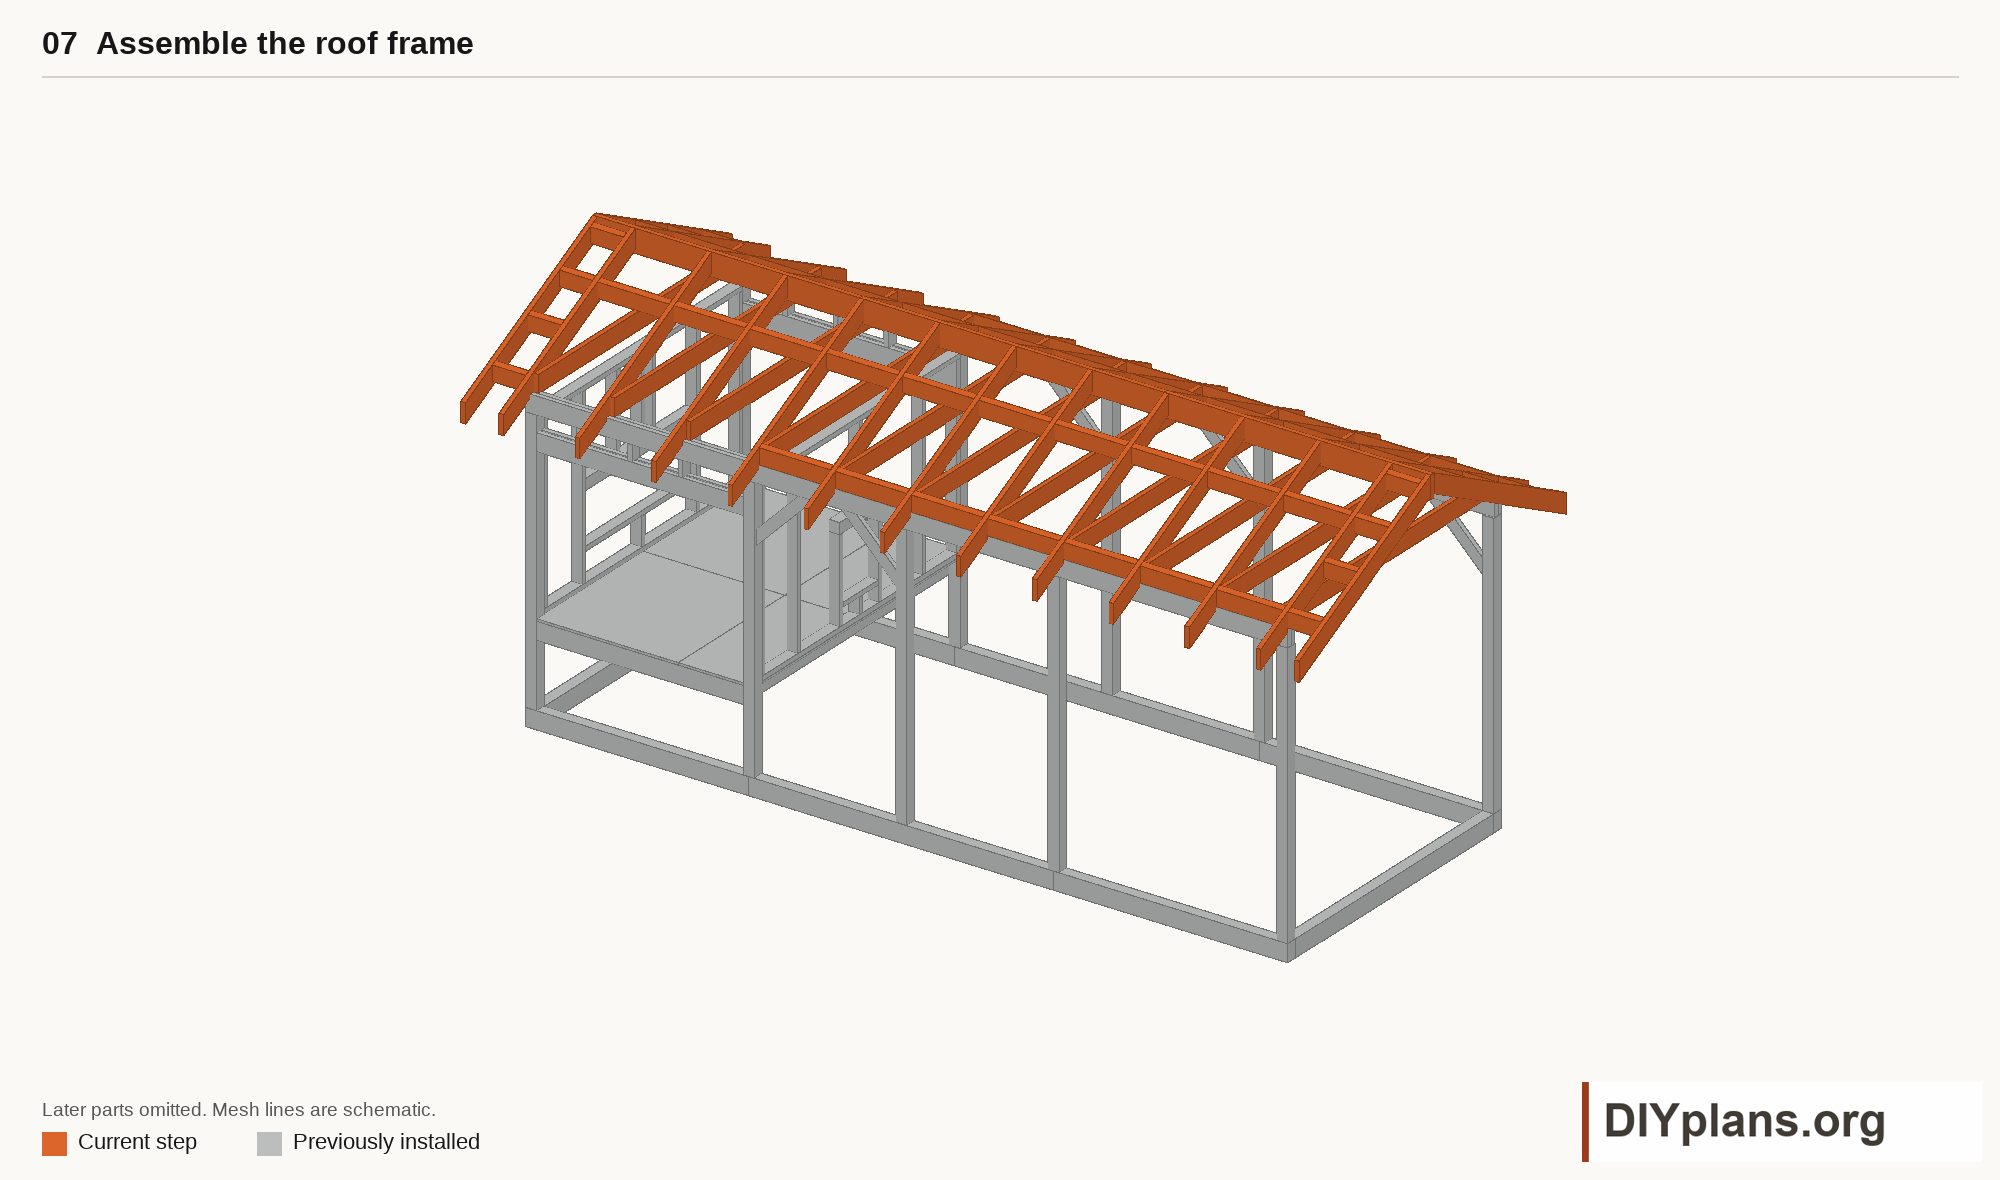
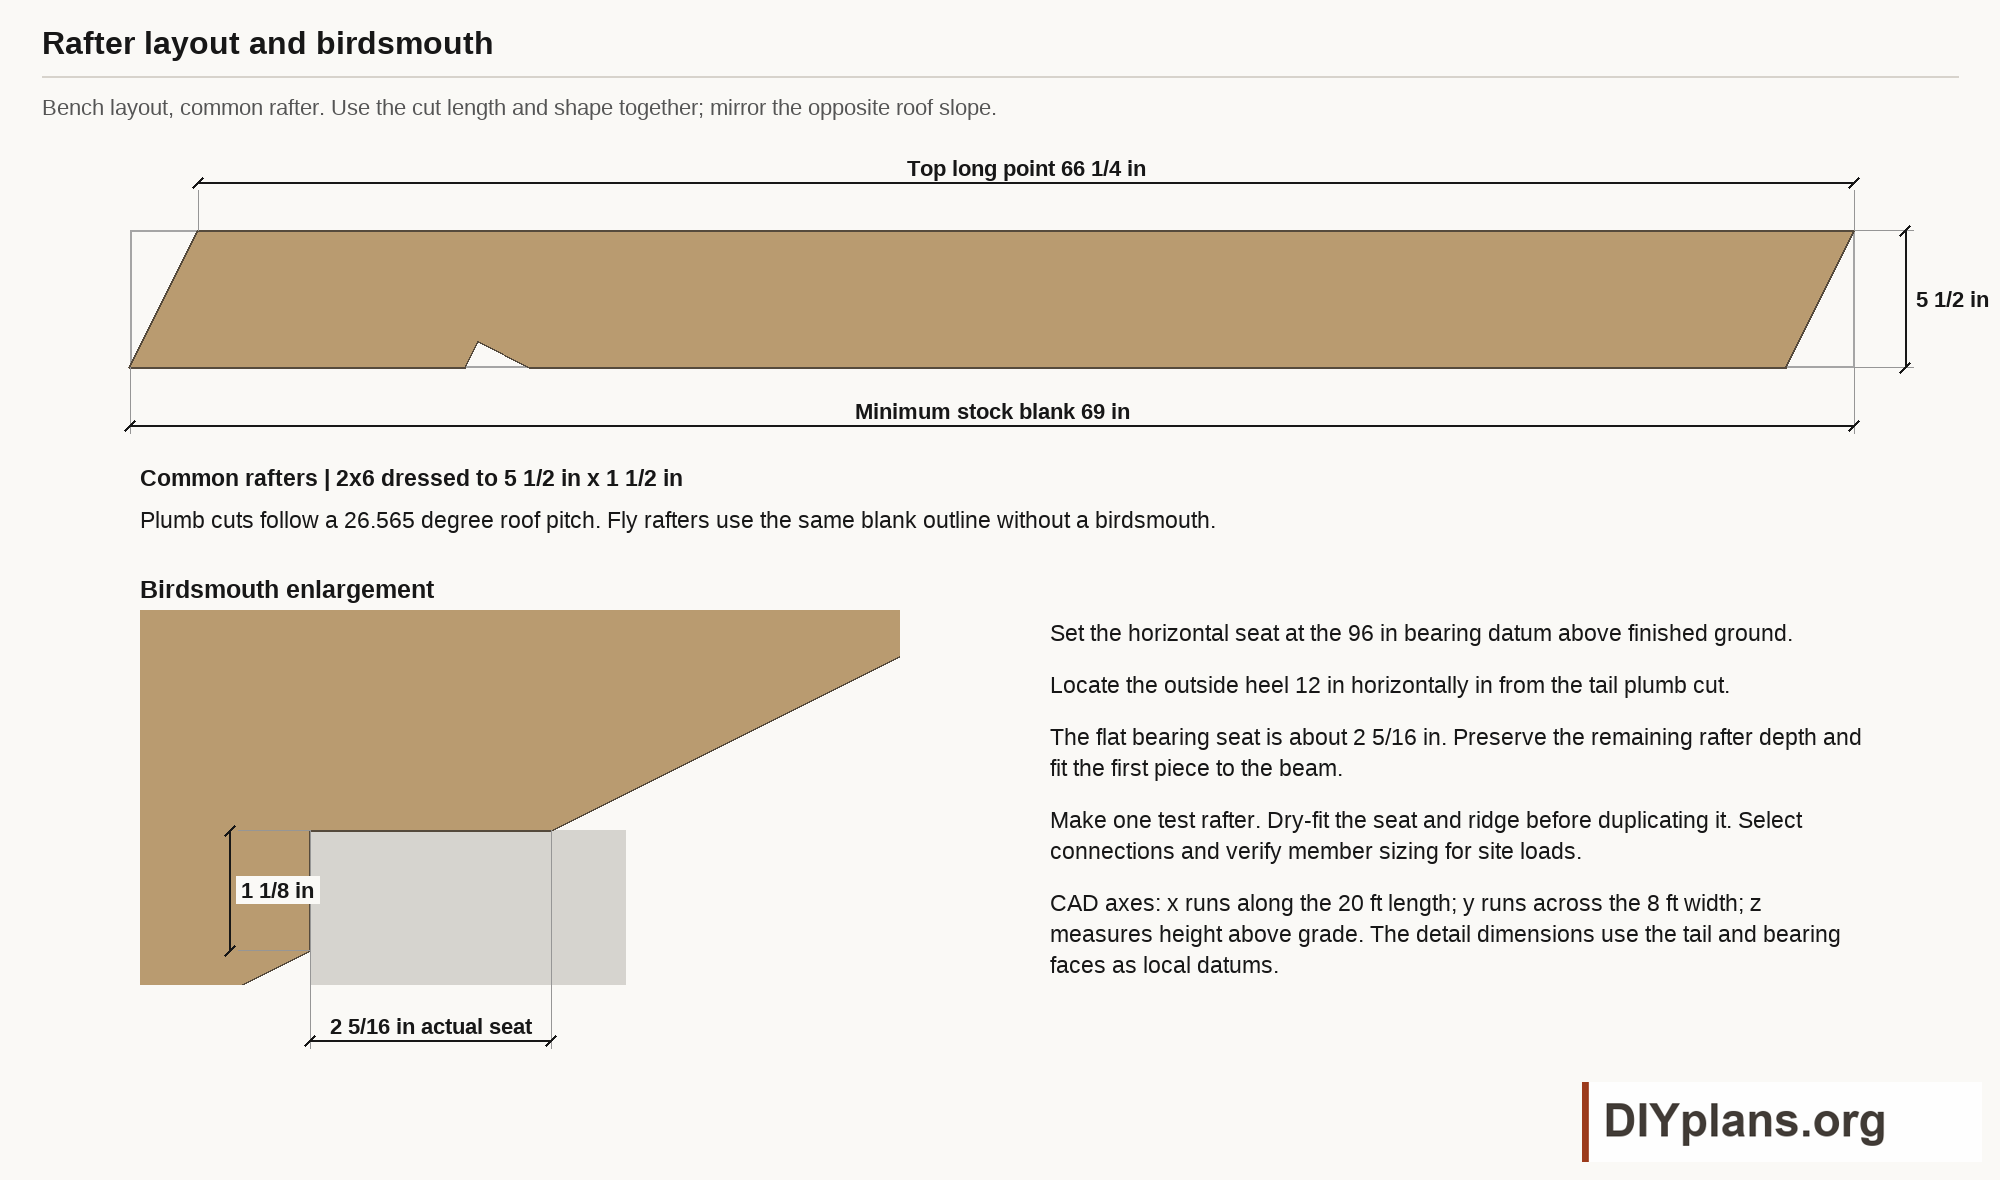
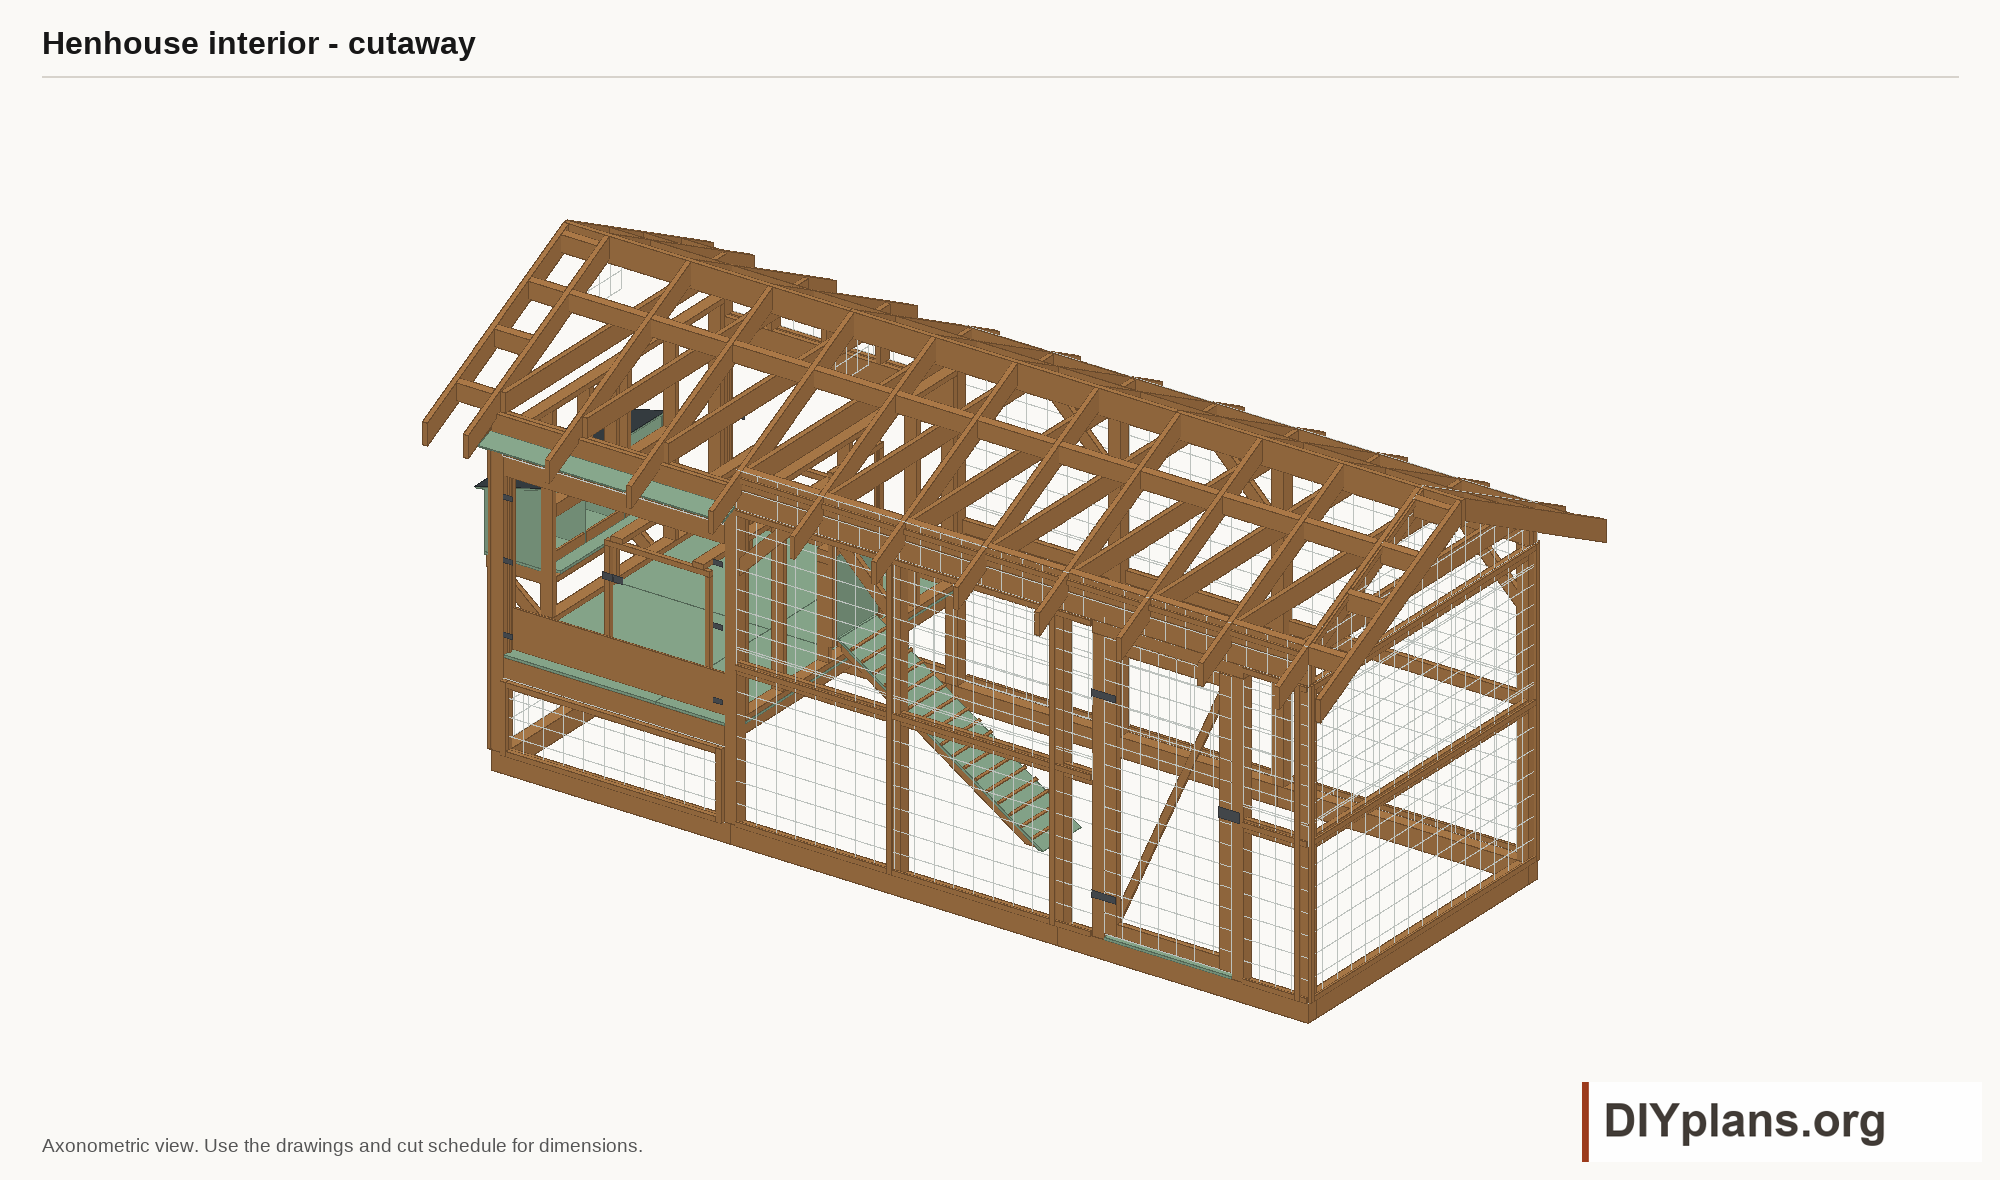
- Lay out one common rafter on 2x6 stock using the profile drawing. Start with a blank at least 69 in long; the roof pitch is 6:12.
- Cut the plumb ends and birdsmouth from the template. Fit the horizontal seat to the 96 in beam-top reference, then test the ridge contact before cutting matching rafters.
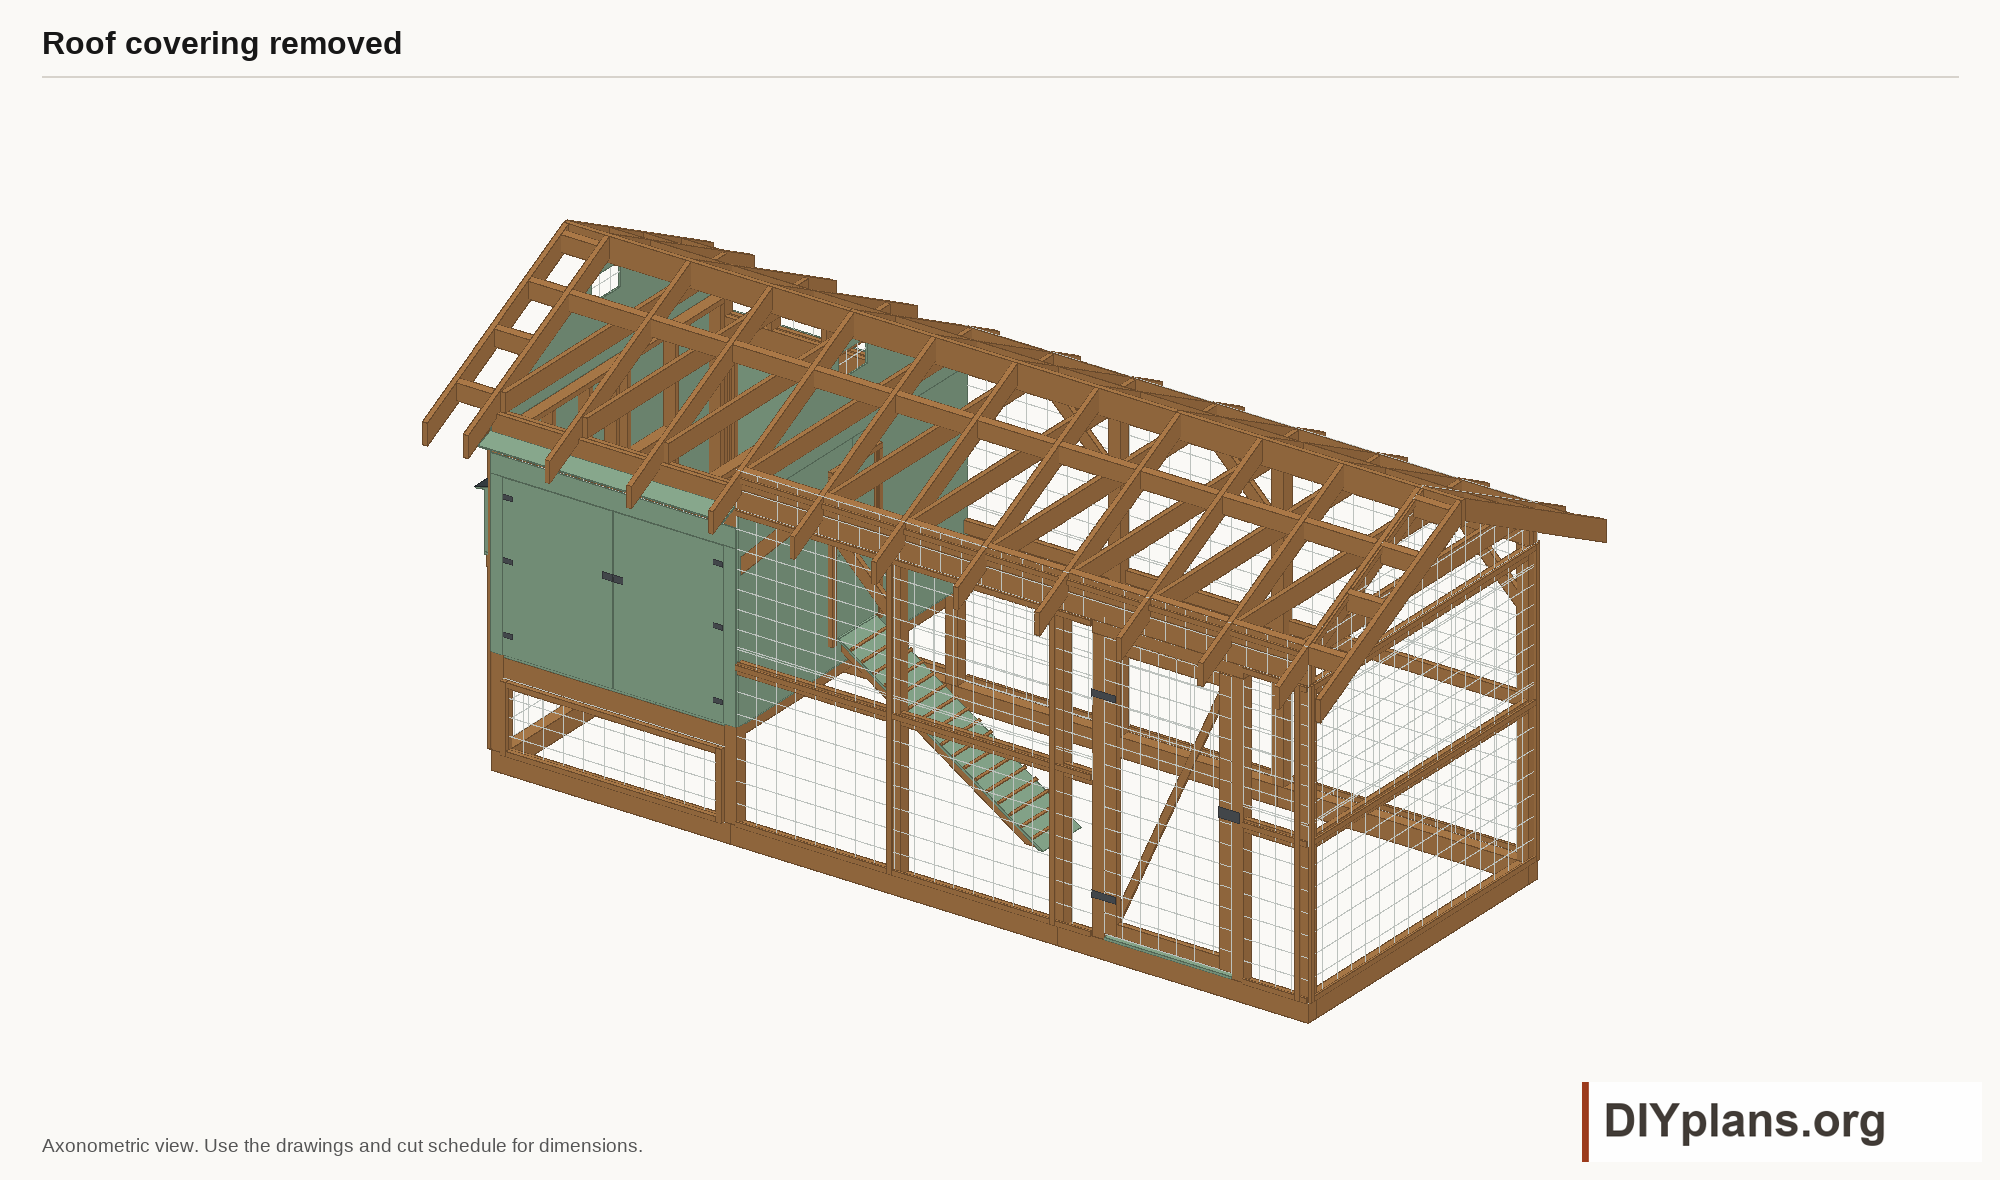
- Install paired rafters against the ridge board at the stations shown. Fit the adjacent horizontal rafter ties and the overhang members.
- Fit the roof seam blocking and continuous eave backing. Keep the fly-rafter profiles free of birdsmouth cuts.
- Check bearing, ridge contact, tie connections and bracing before sheathing. Use the site-specific member and fastening design for the roof loads.
Check: Rafters bear on their seats and meet the ridge; ties, roof blocking and bracing are fitted before sheathing.
Step 8 Sheathe and roof the coop
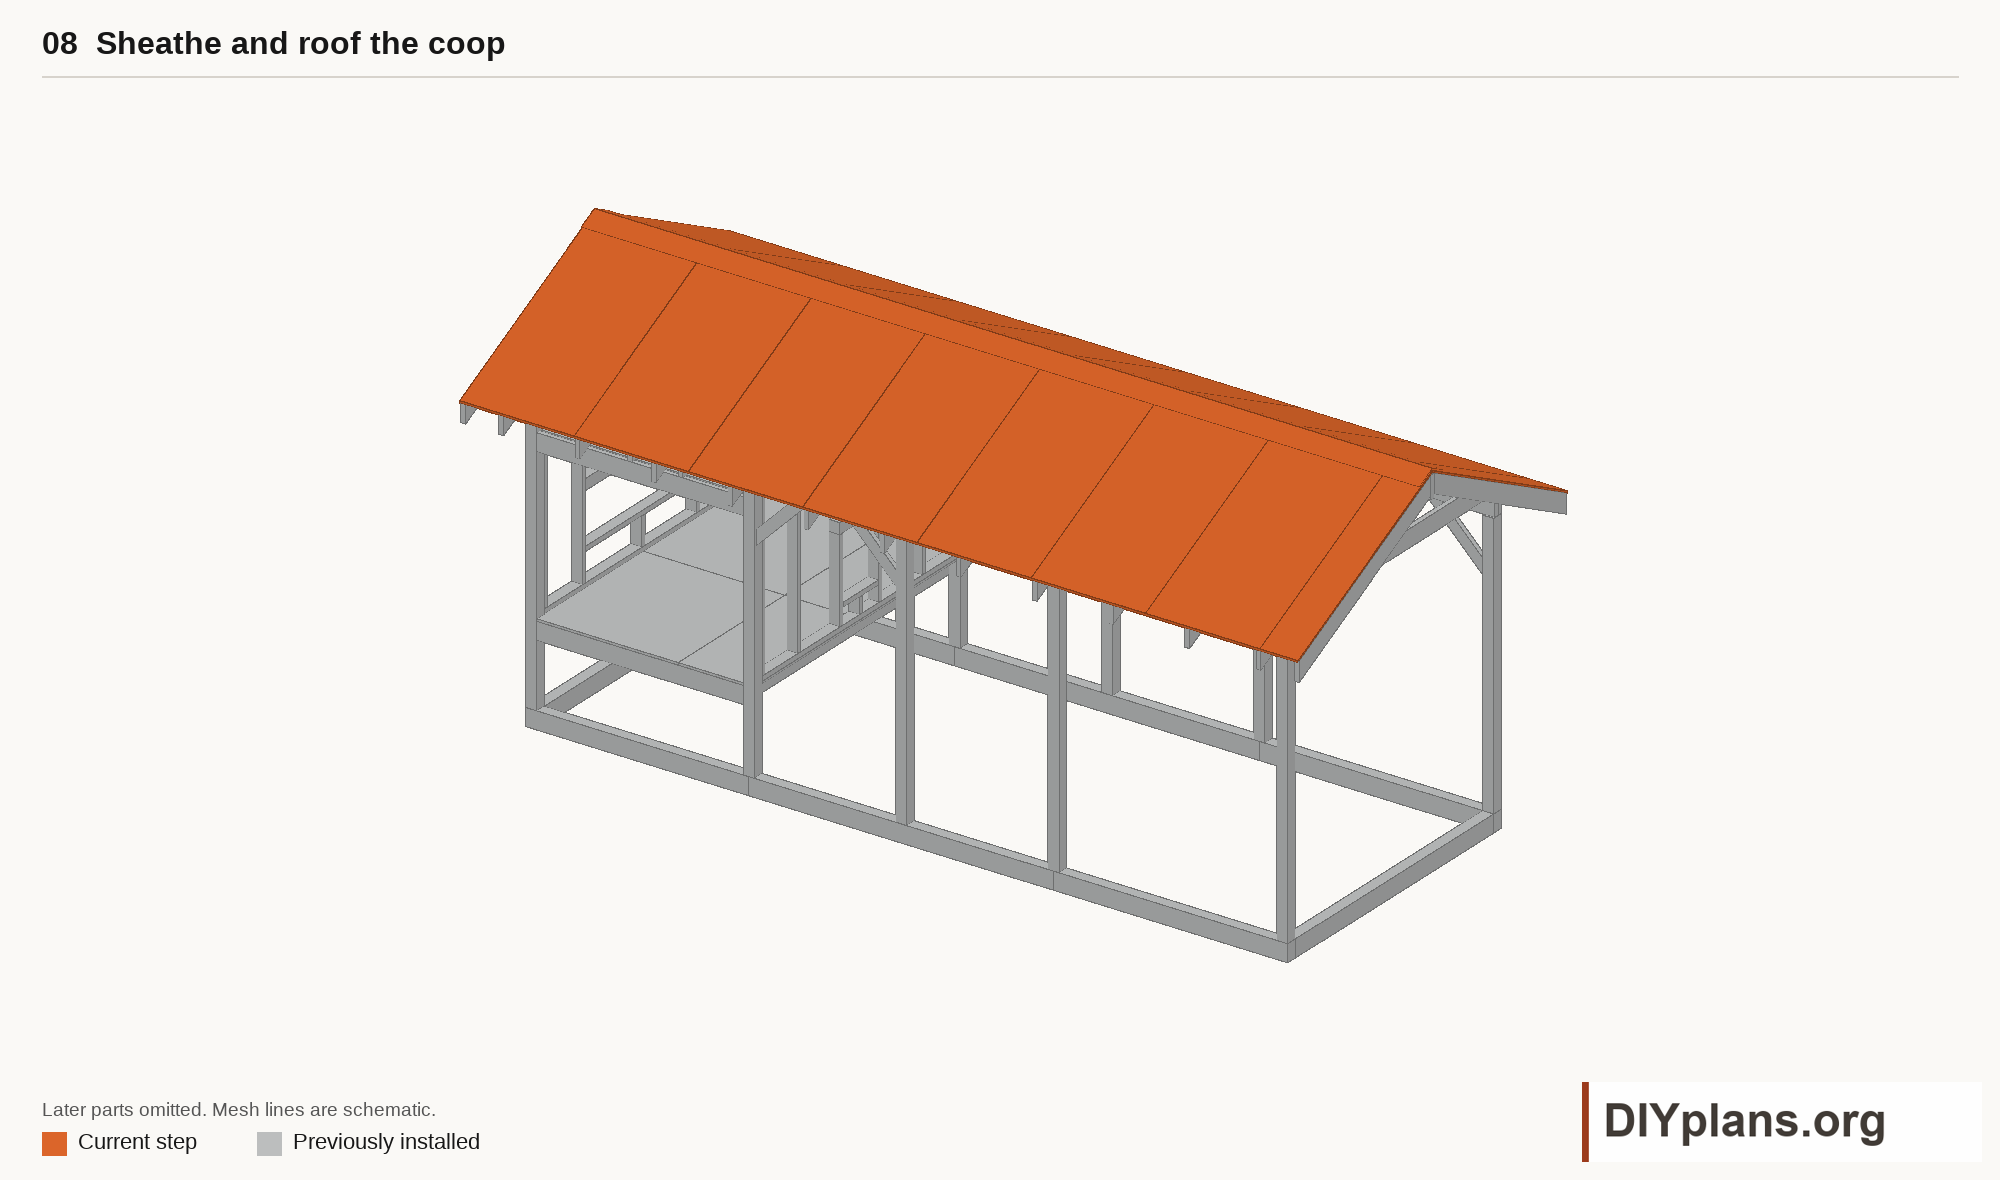
Play movementStop movement

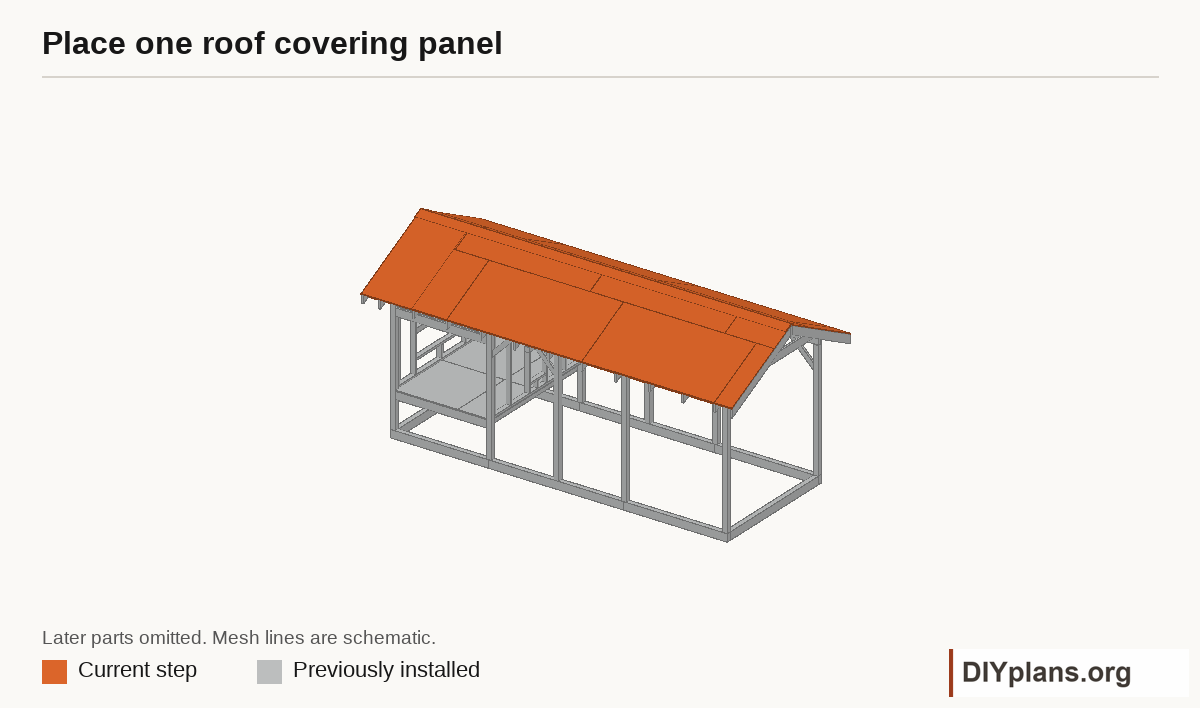
- Dry-fit the 1/2 in roof plywood over the rafters and blocking. Keep every panel edge supported and stagger the upper-row joints as shown in the roof layout.
- Leave the panel manufacturer's required edge gaps, then fasten with the selected roof-deck schedule.
- Install compatible underlayment, eave and rake flashing, and continuous eave-to-ridge metal panels. Use the roofing manufacturer's laps, fasteners, closures and ridge details.
- Keep the metal drip edge 1/2 in beyond the rafter-tail overhang shown in the model. Confirm the final trim and gutter fit with the roofing system.
- Fit gutters and discharge water away from the base and buried mesh. Use the movement view only to understand panel placement; plan safe handling and temporary support for the actual panels.
Check: The roof deck has supported edges and the complete roofing system drains away from the base.
Step 9 Clad the henhouse
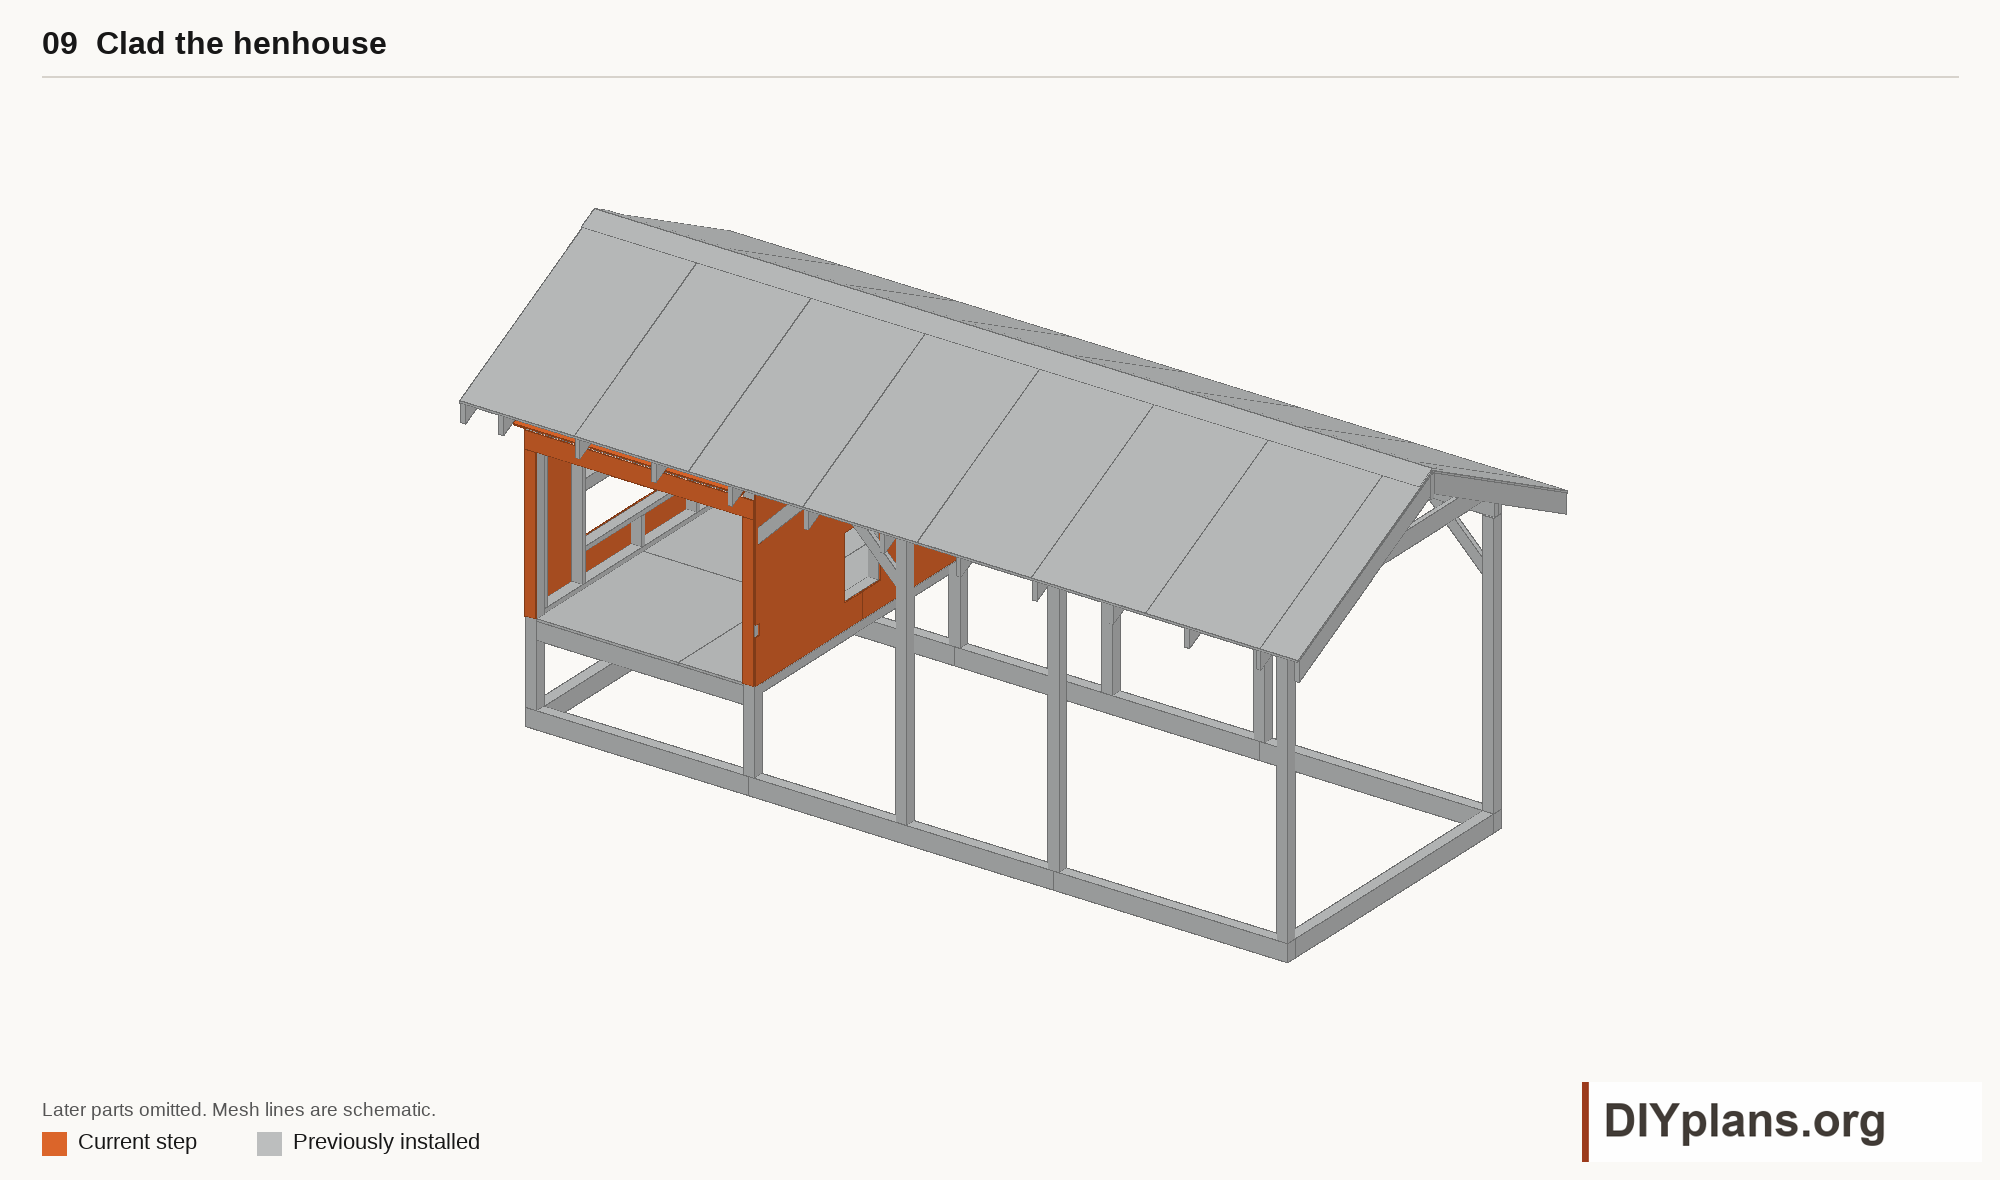
- Mark the cleanout, nest, vent and pop openings on the wall panels before cutting. Dry-fit each panel against the framing.
- Fit the end-wall panels with their vertical center seam on its support. Follow the siding manufacturer's edge-gap and fastening requirements.
- Fit hardware cloth to the high wall vents and both gables. Secure all edges and install the outward-sloping rain hoods without blocking airflow.
- Close the wall-to-roof transitions while keeping the intended ventilation openings clear. Flash exposed joints so water drains outside.
- Finish outside faces and cut edges. Let all finishes cure before adding bedding or birds.
Check: The siding fits the openings, vent mesh is secure and flashing directs water outside.
Step 10 Fit the cleanout doors
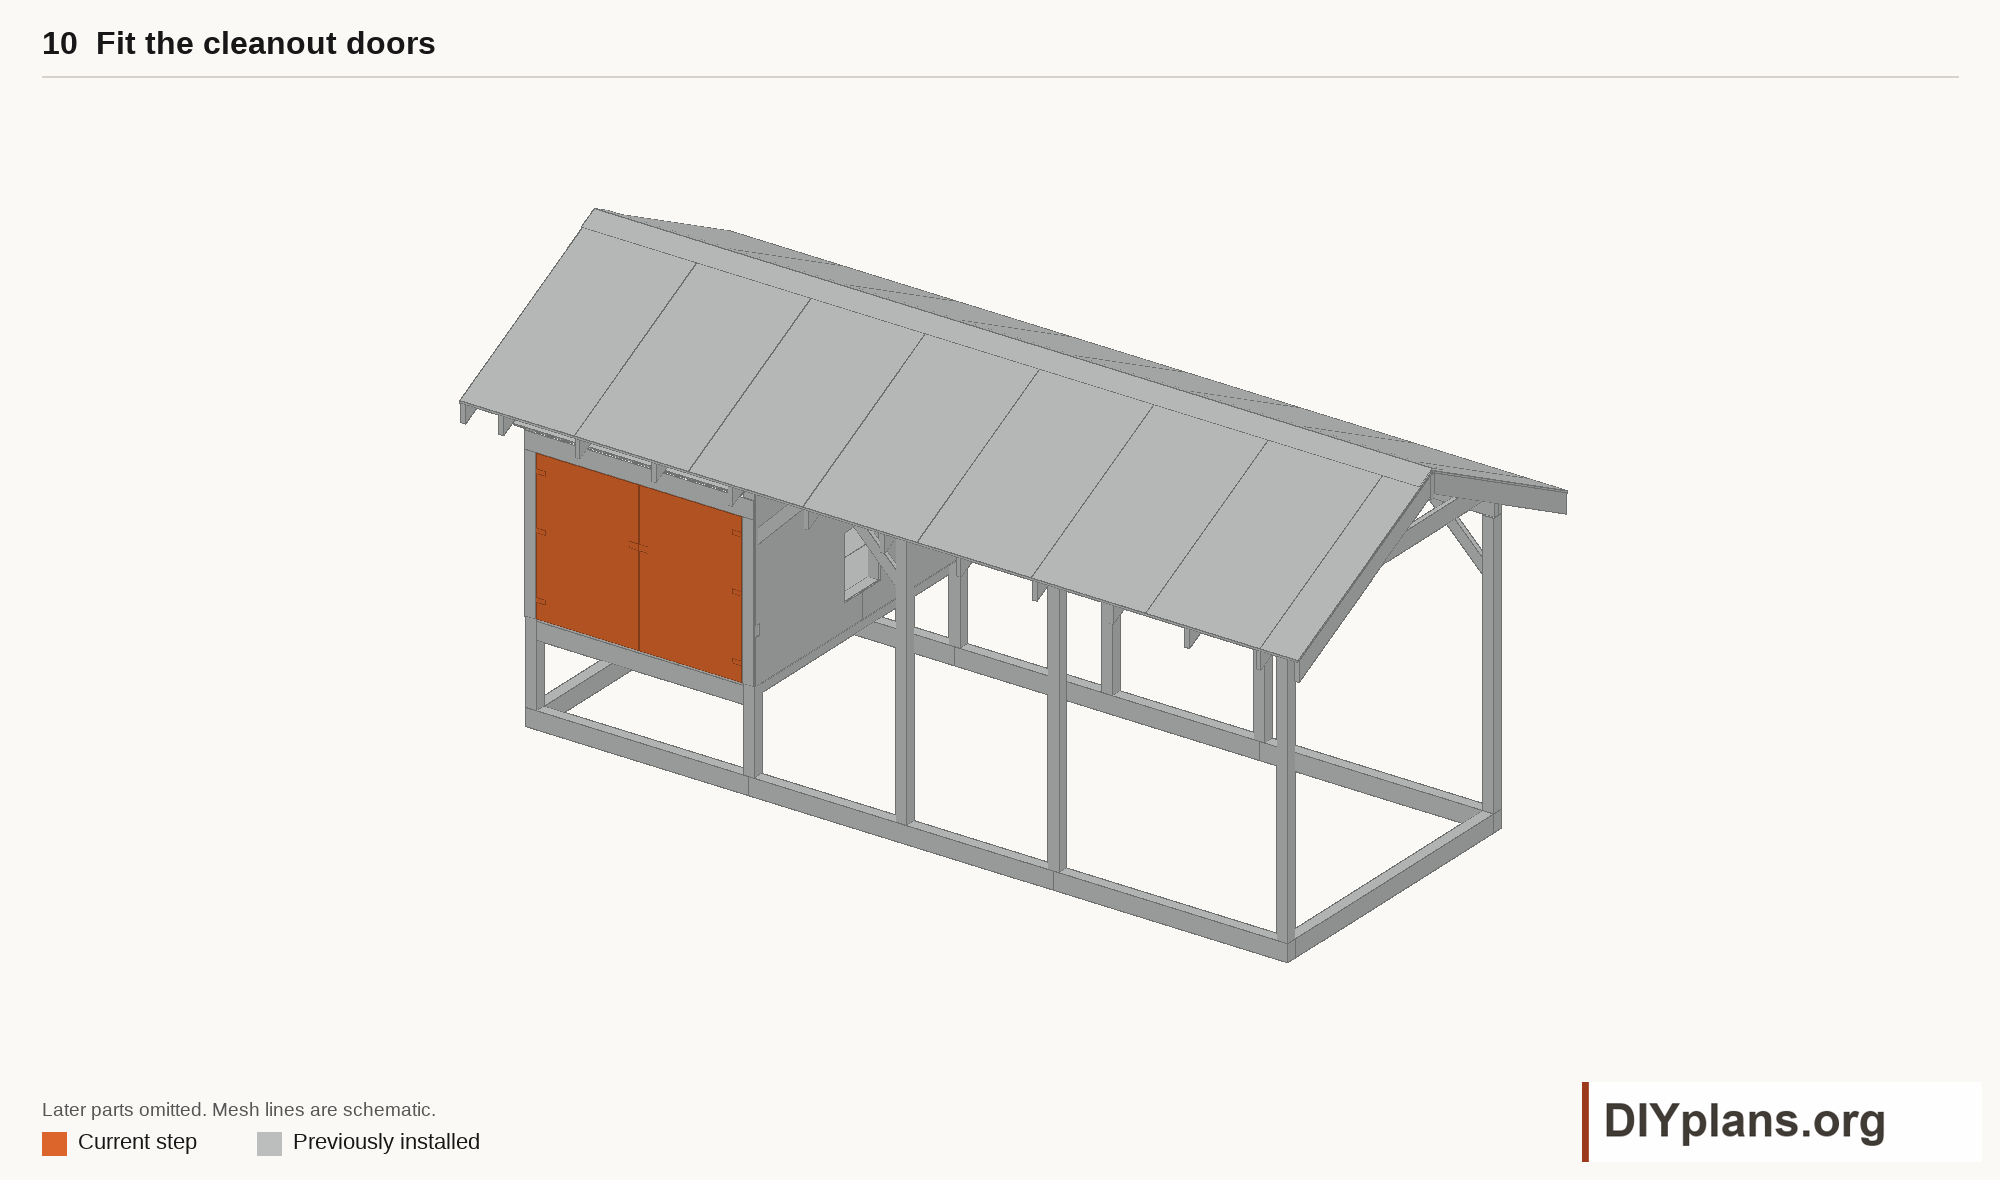
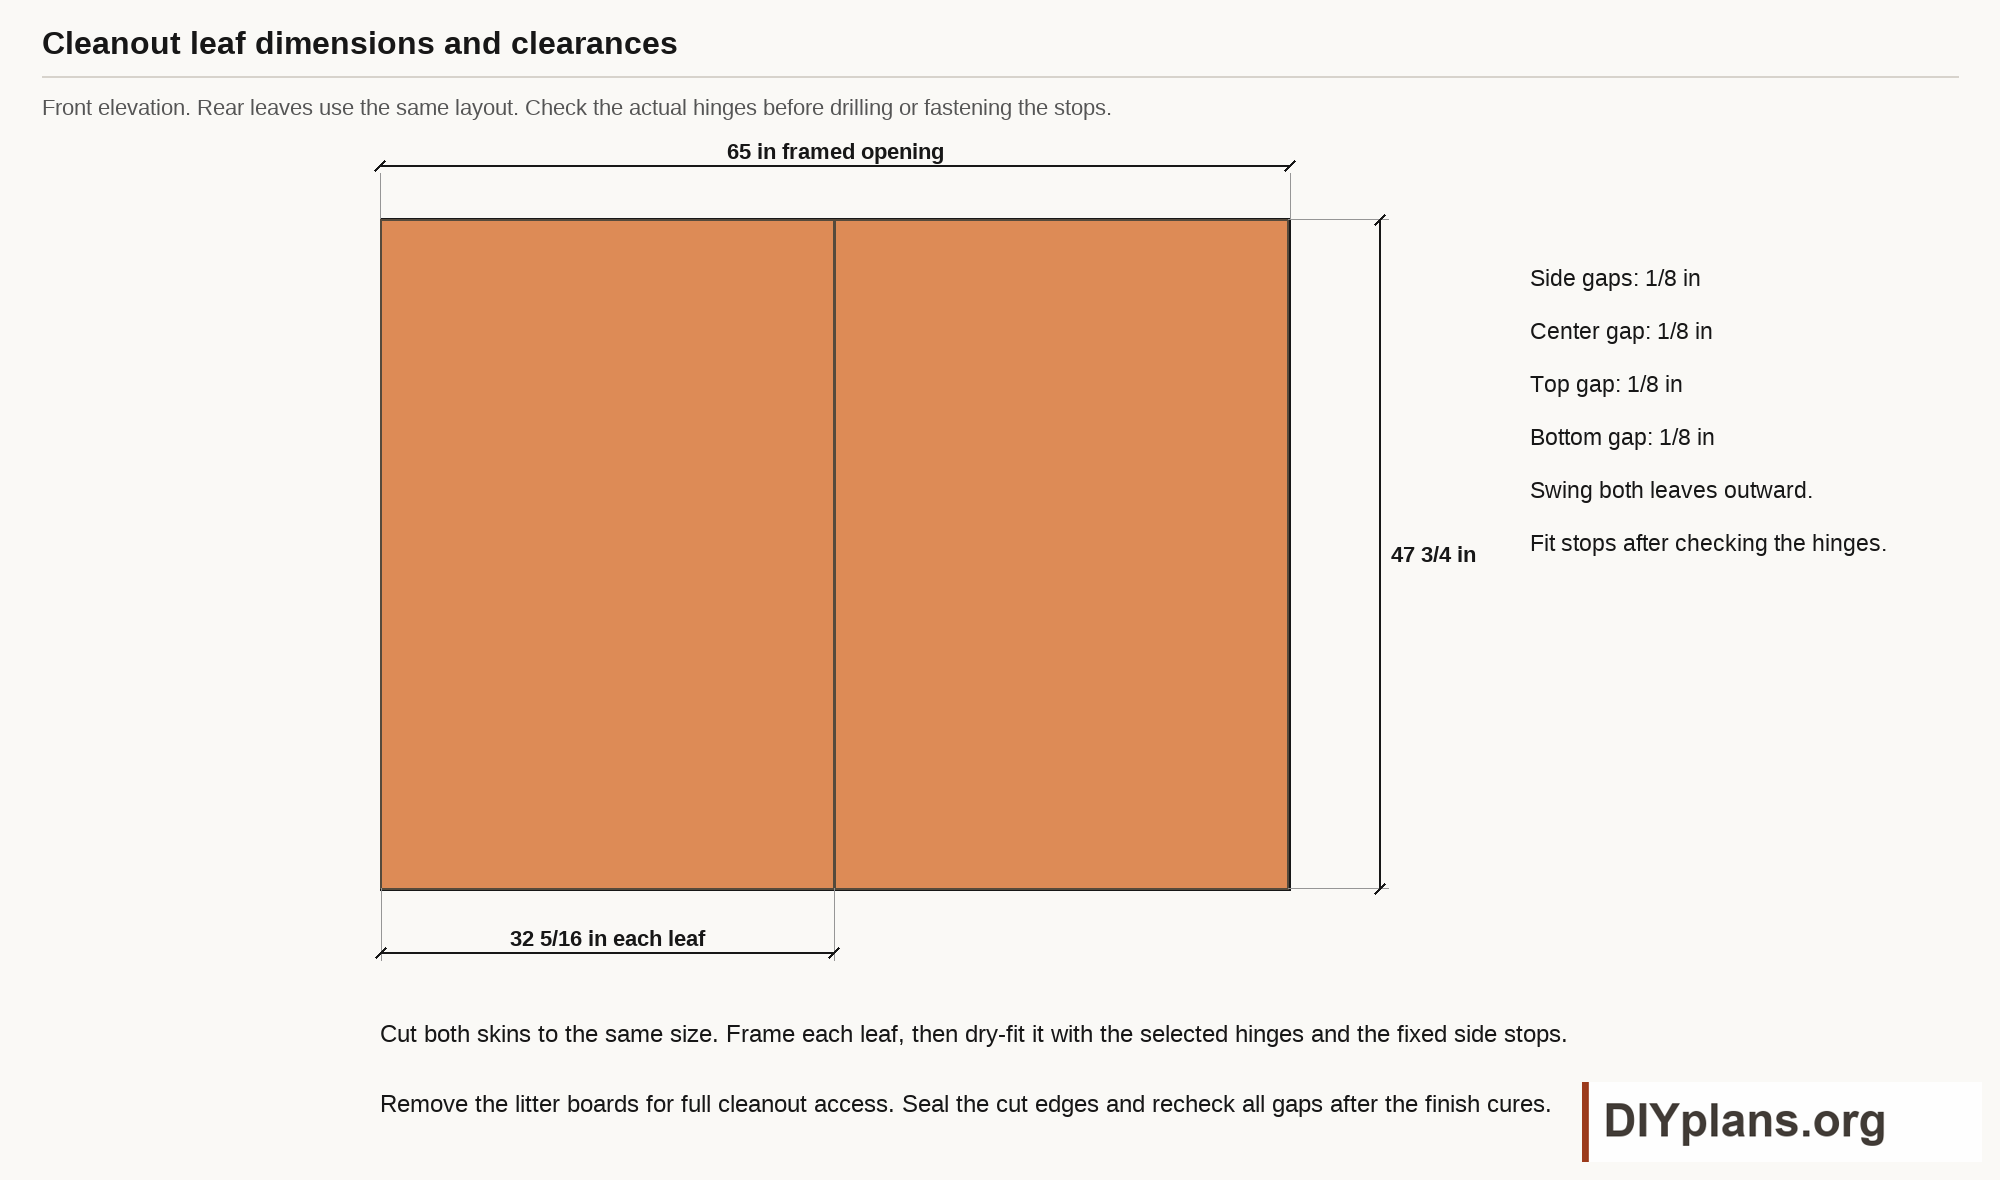
- Build the framed cleanout leaves and fit them to both long sides. Each skin is 32 5/16 in wide and 47 3/4 in high.
- Leave 1/8 in at the outside edges, top, bottom and between the paired leaves. Fit the fixed side stops without restricting movement.
- Choose exterior hinges that let each leaf swing outward clear of the siding and stops. Dry-fit the actual hinge positions before drilling.
- Fit secure latches and the removable litter-retaining boards. Provide an inside release for any latch that could trap a person.
- Open both leaves fully and remove the litter boards. Check that bedding and cleaning tools can reach the middle of the henhouse.
Check: Both pairs of cleanout leaves swing freely, latch securely and allow the litter boards to be removed.
Step 11 Build the external nests
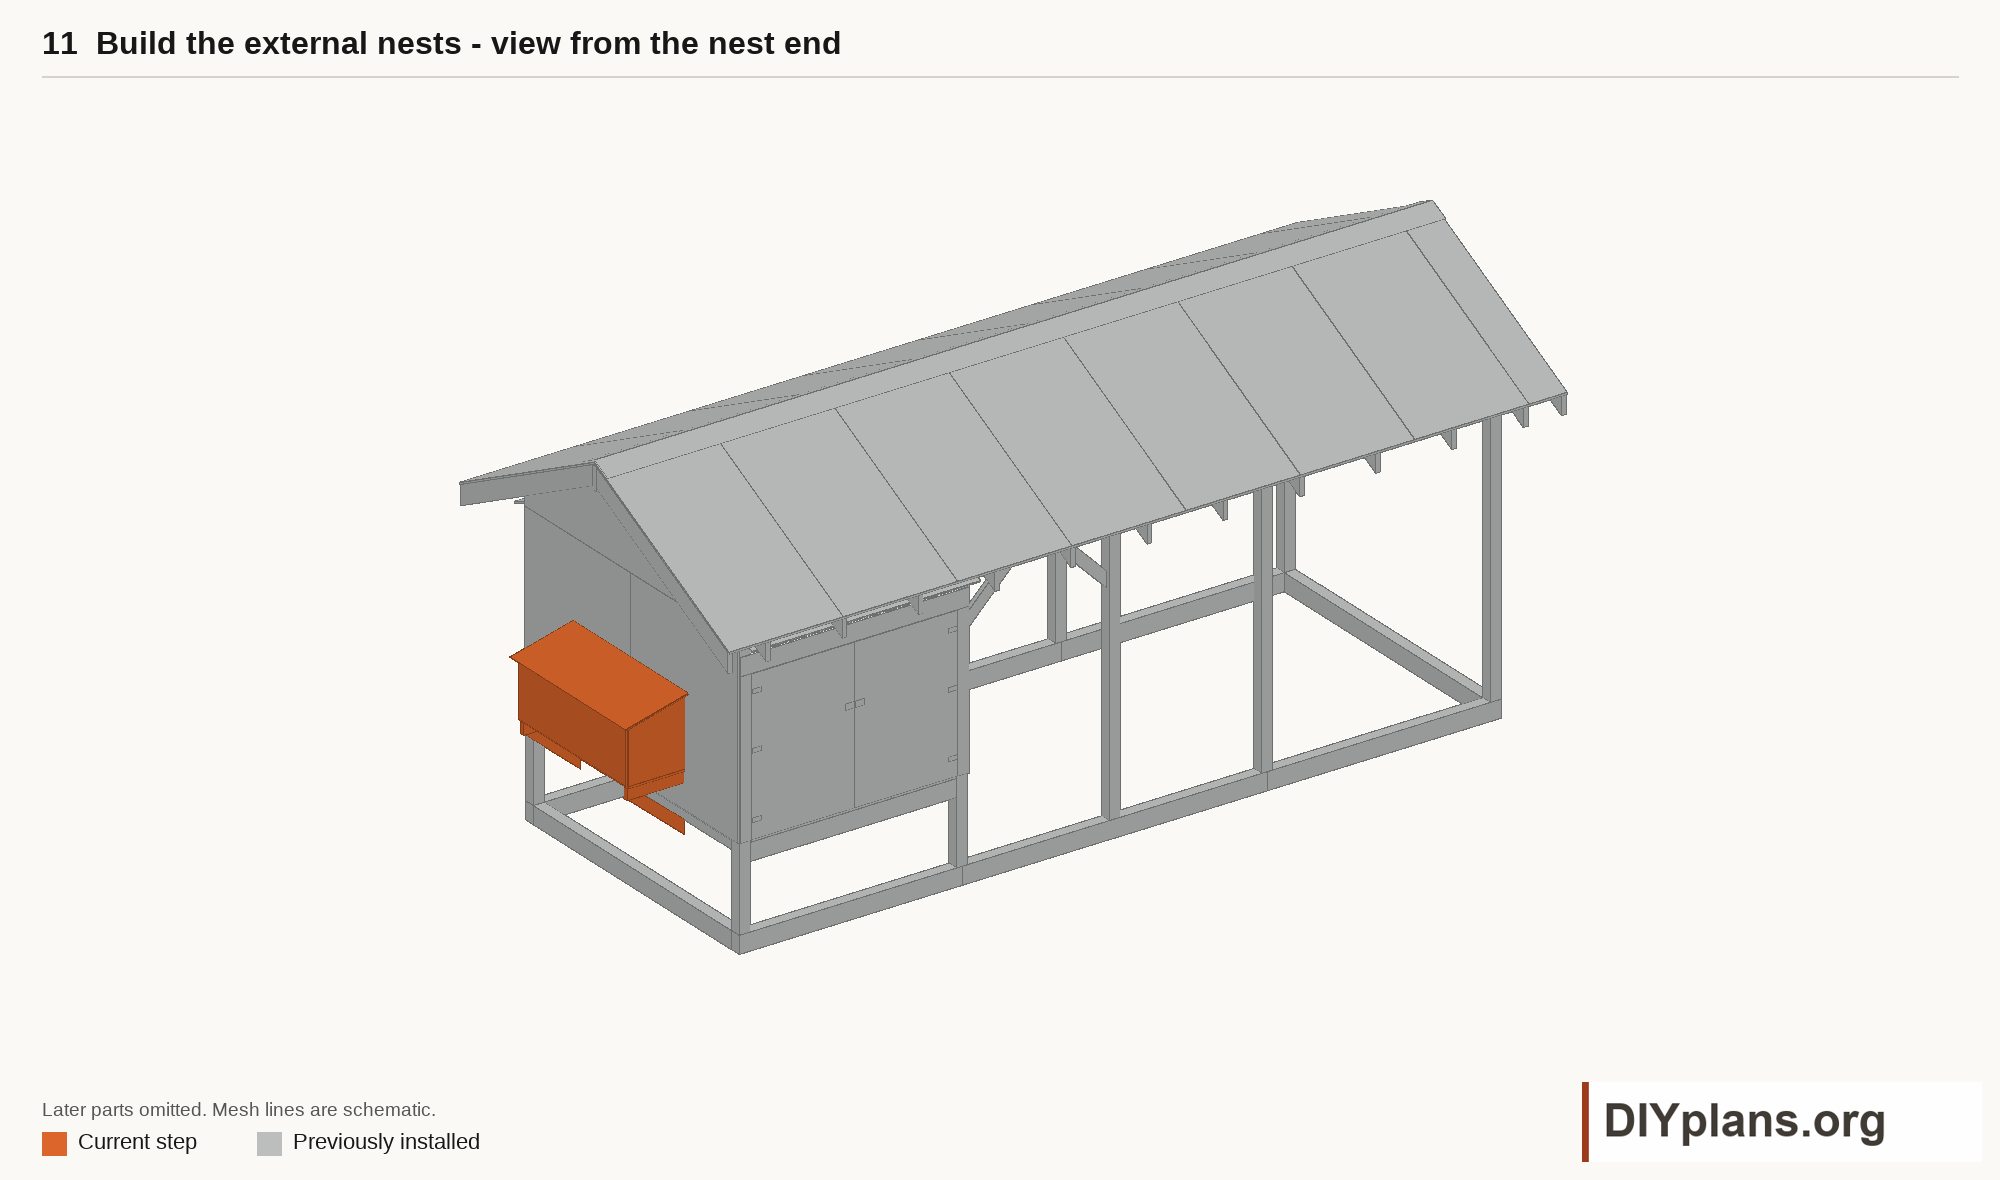
- Fit the nest support brackets and set the box floor at 44 in above grade. Check that the support faces are level before fixing the box.
- Fit the sides, front and two dividers to form three nest bays. Ease exposed edges and confirm access from the henhouse.
- Fit the sloped roof deck and weatherproof covering. Flash the lid-to-wall joint and direct runoff outside the box.
- Fit the outside access hatch, stops and secure latches. Check that the hatch opens freely and closes without a predator-access gap.
- Check every box joint and support connection before adding nesting material.
Check: The nest box is supported and weatherproofed, with clear henhouse access and a secure outside hatch.
Step 12 Fit the roosts and ramp
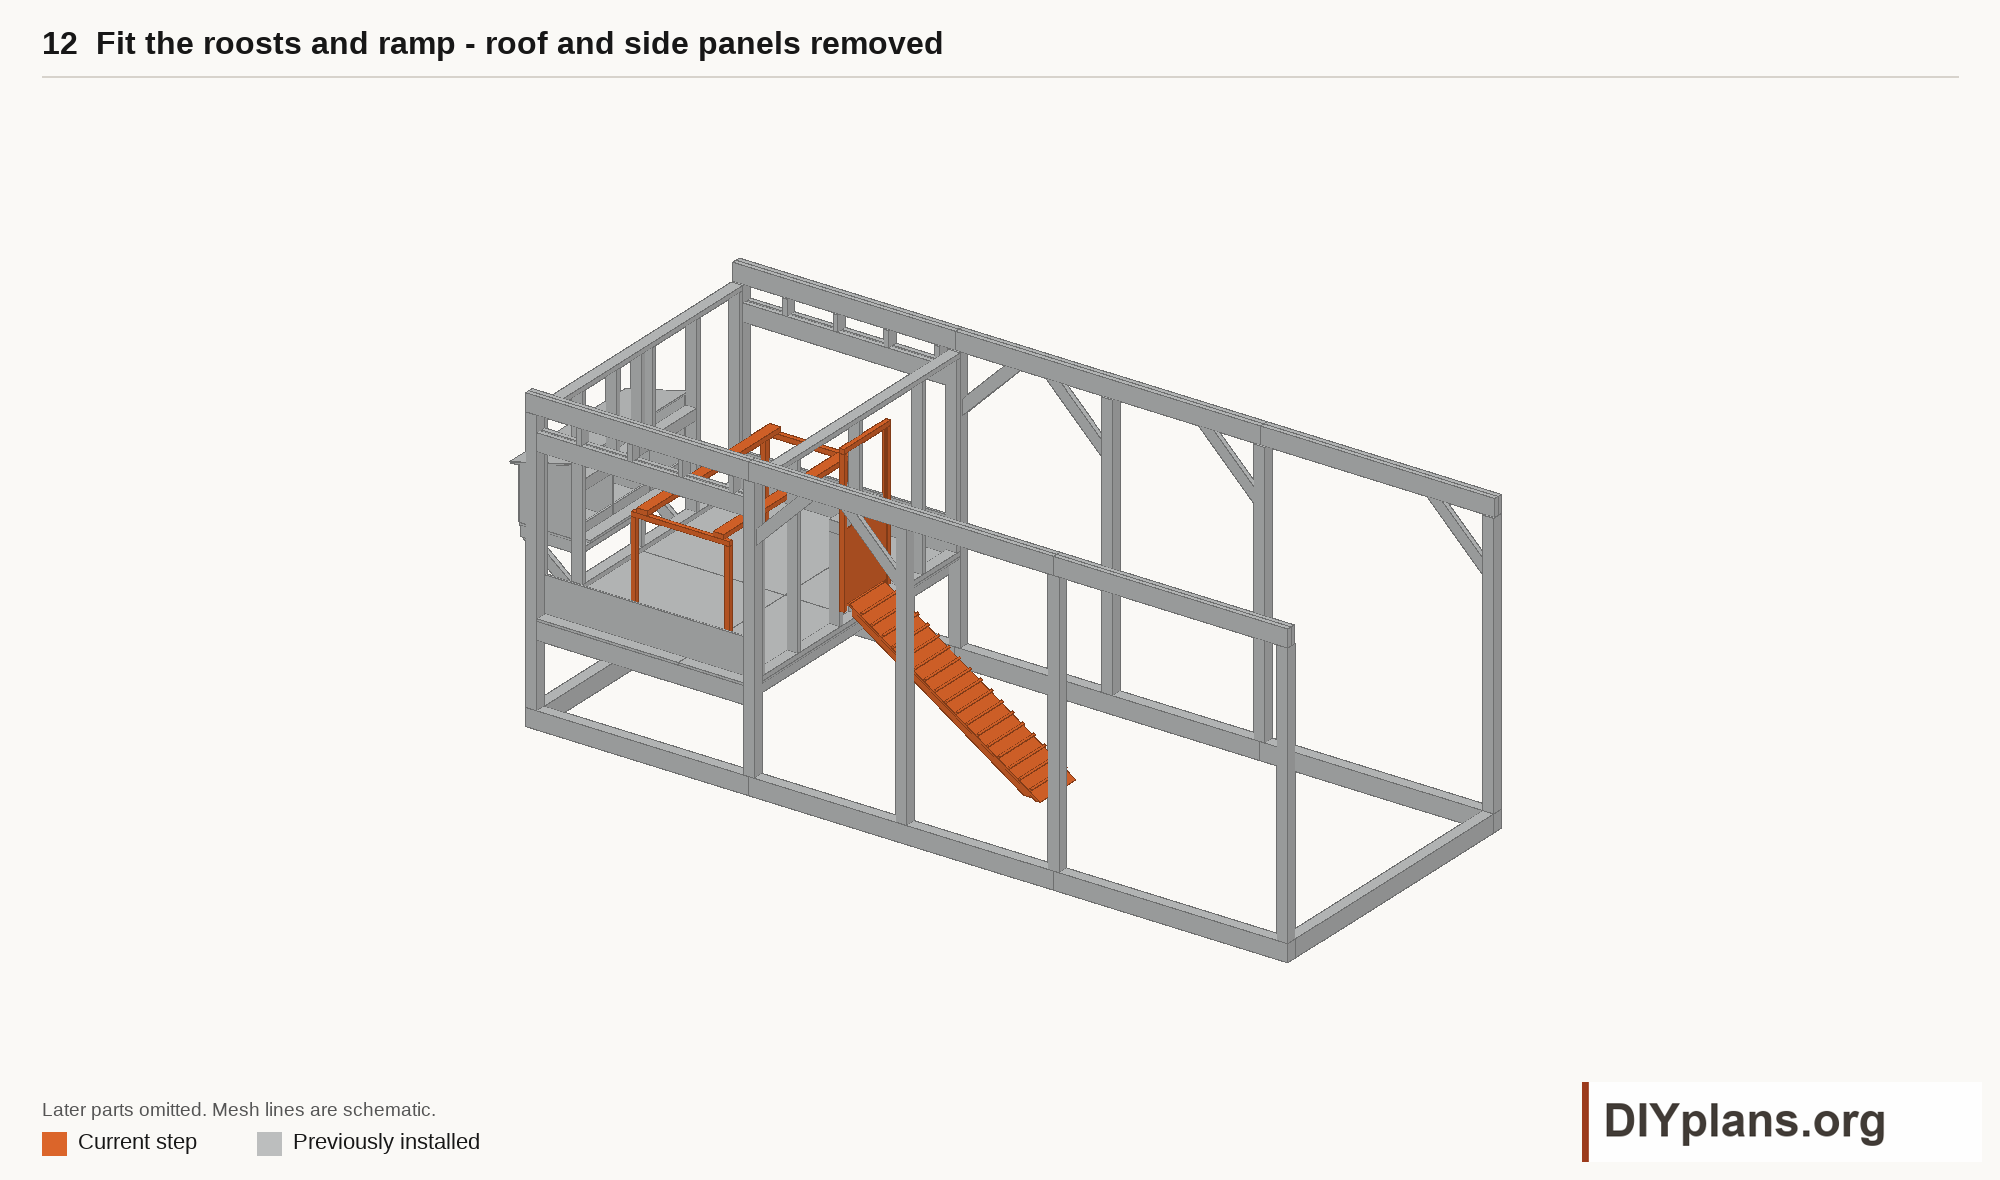
- Build the removable roost stand with two 60 in bars. Set both top surfaces 62 in above grade and ease their upper corners.
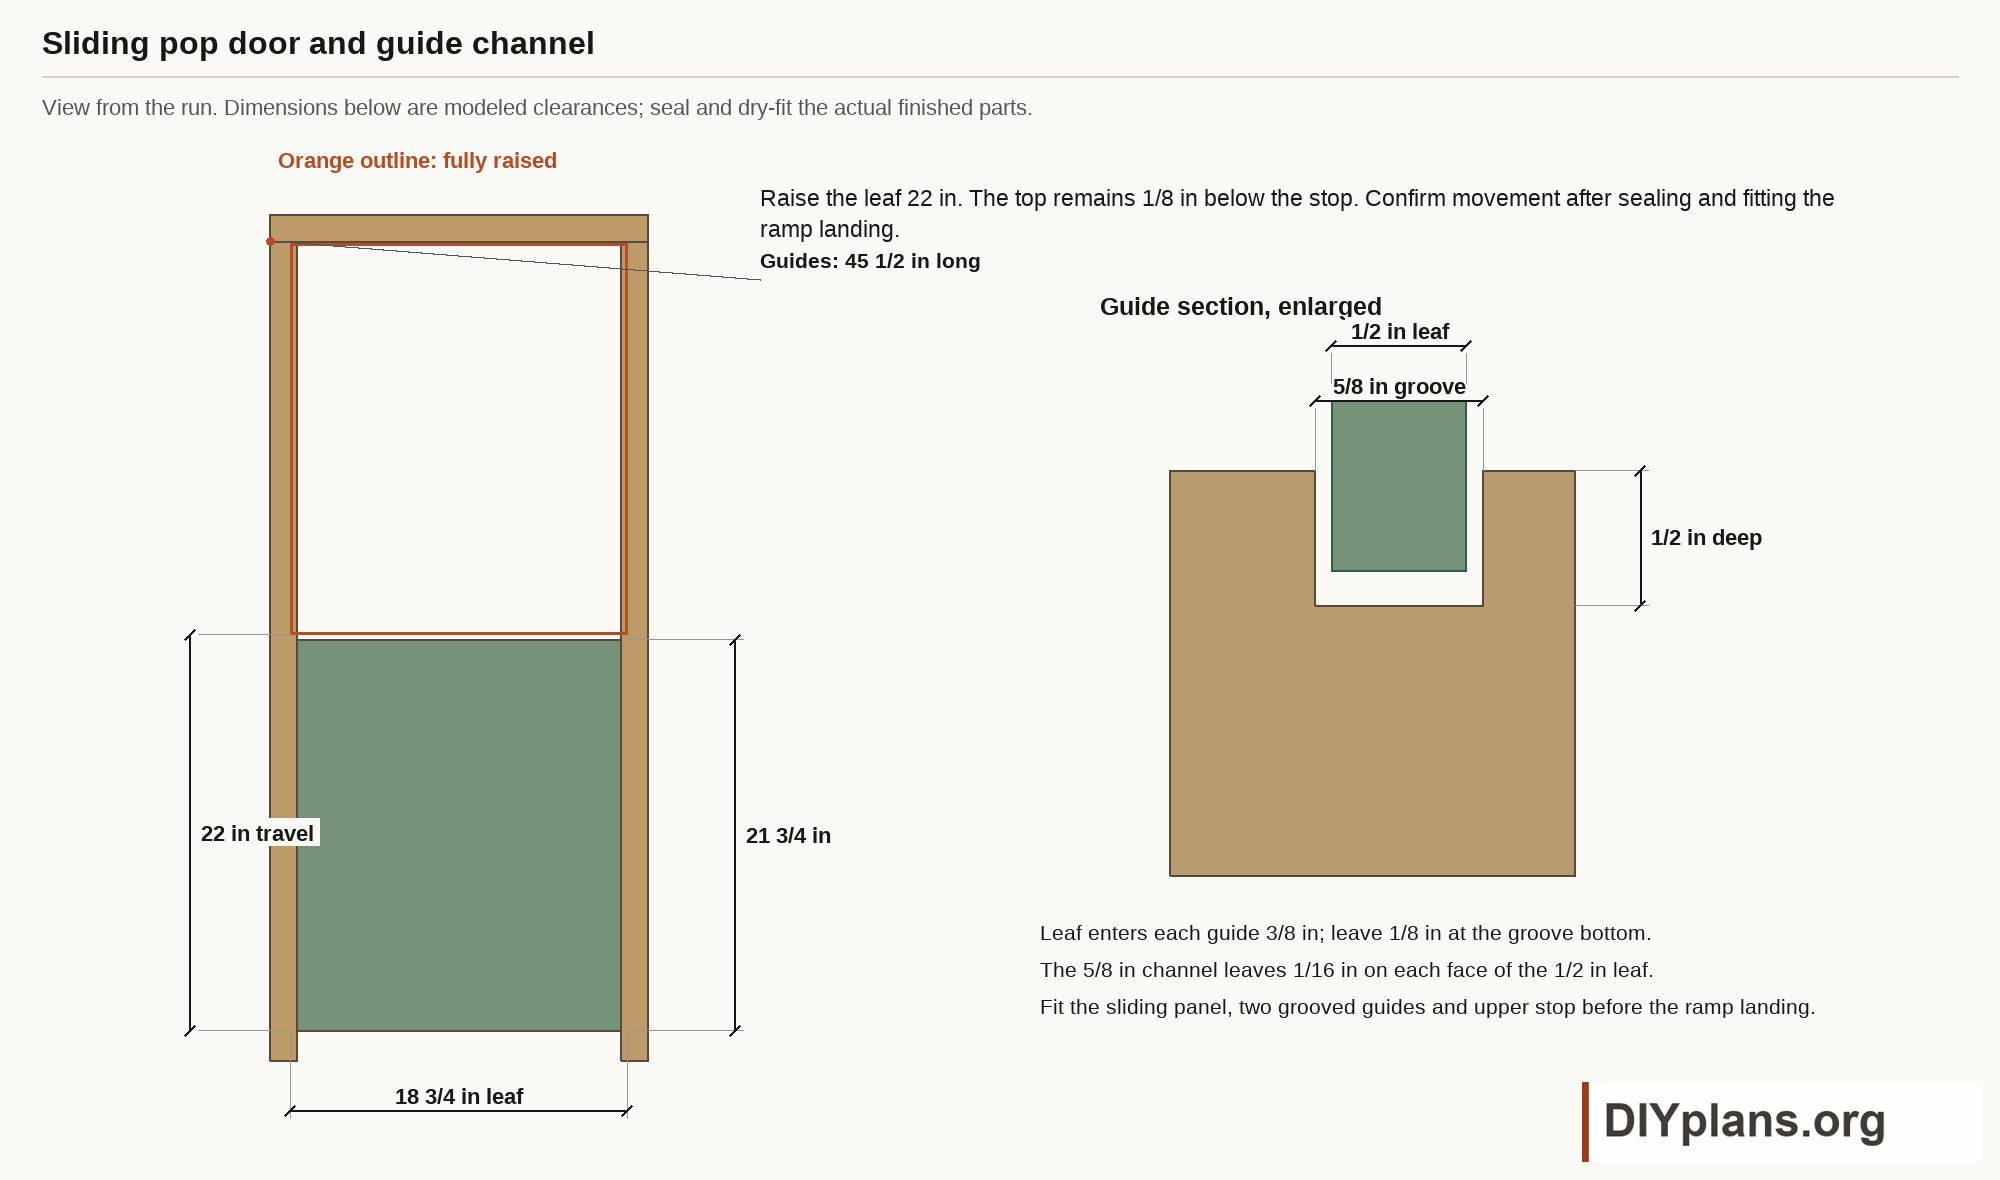
- Cut the pop-door guides with 5/8 in wide, 1/2 in deep channels. Fit the 1/2 in door with the clearances shown in the enlarged guide section.
- Raise the door through its full 22 in travel. Check that it clears the opening, remains in both guides and can be secured closed at night.
- Fit the short sill landing and 16 in wide ramp. Support the lower end so the ramp rises 40 in over a 60 in horizontal run.
- Fit traction cleats at 4 in centers measured along the slope. Check the ramp, landing, door travel and roost removal together.
Check: The roost stand can be removed, the pop door completes its 22 in travel, and the supported ramp meets the landing.
Step 13 Mesh the run and hang the gate
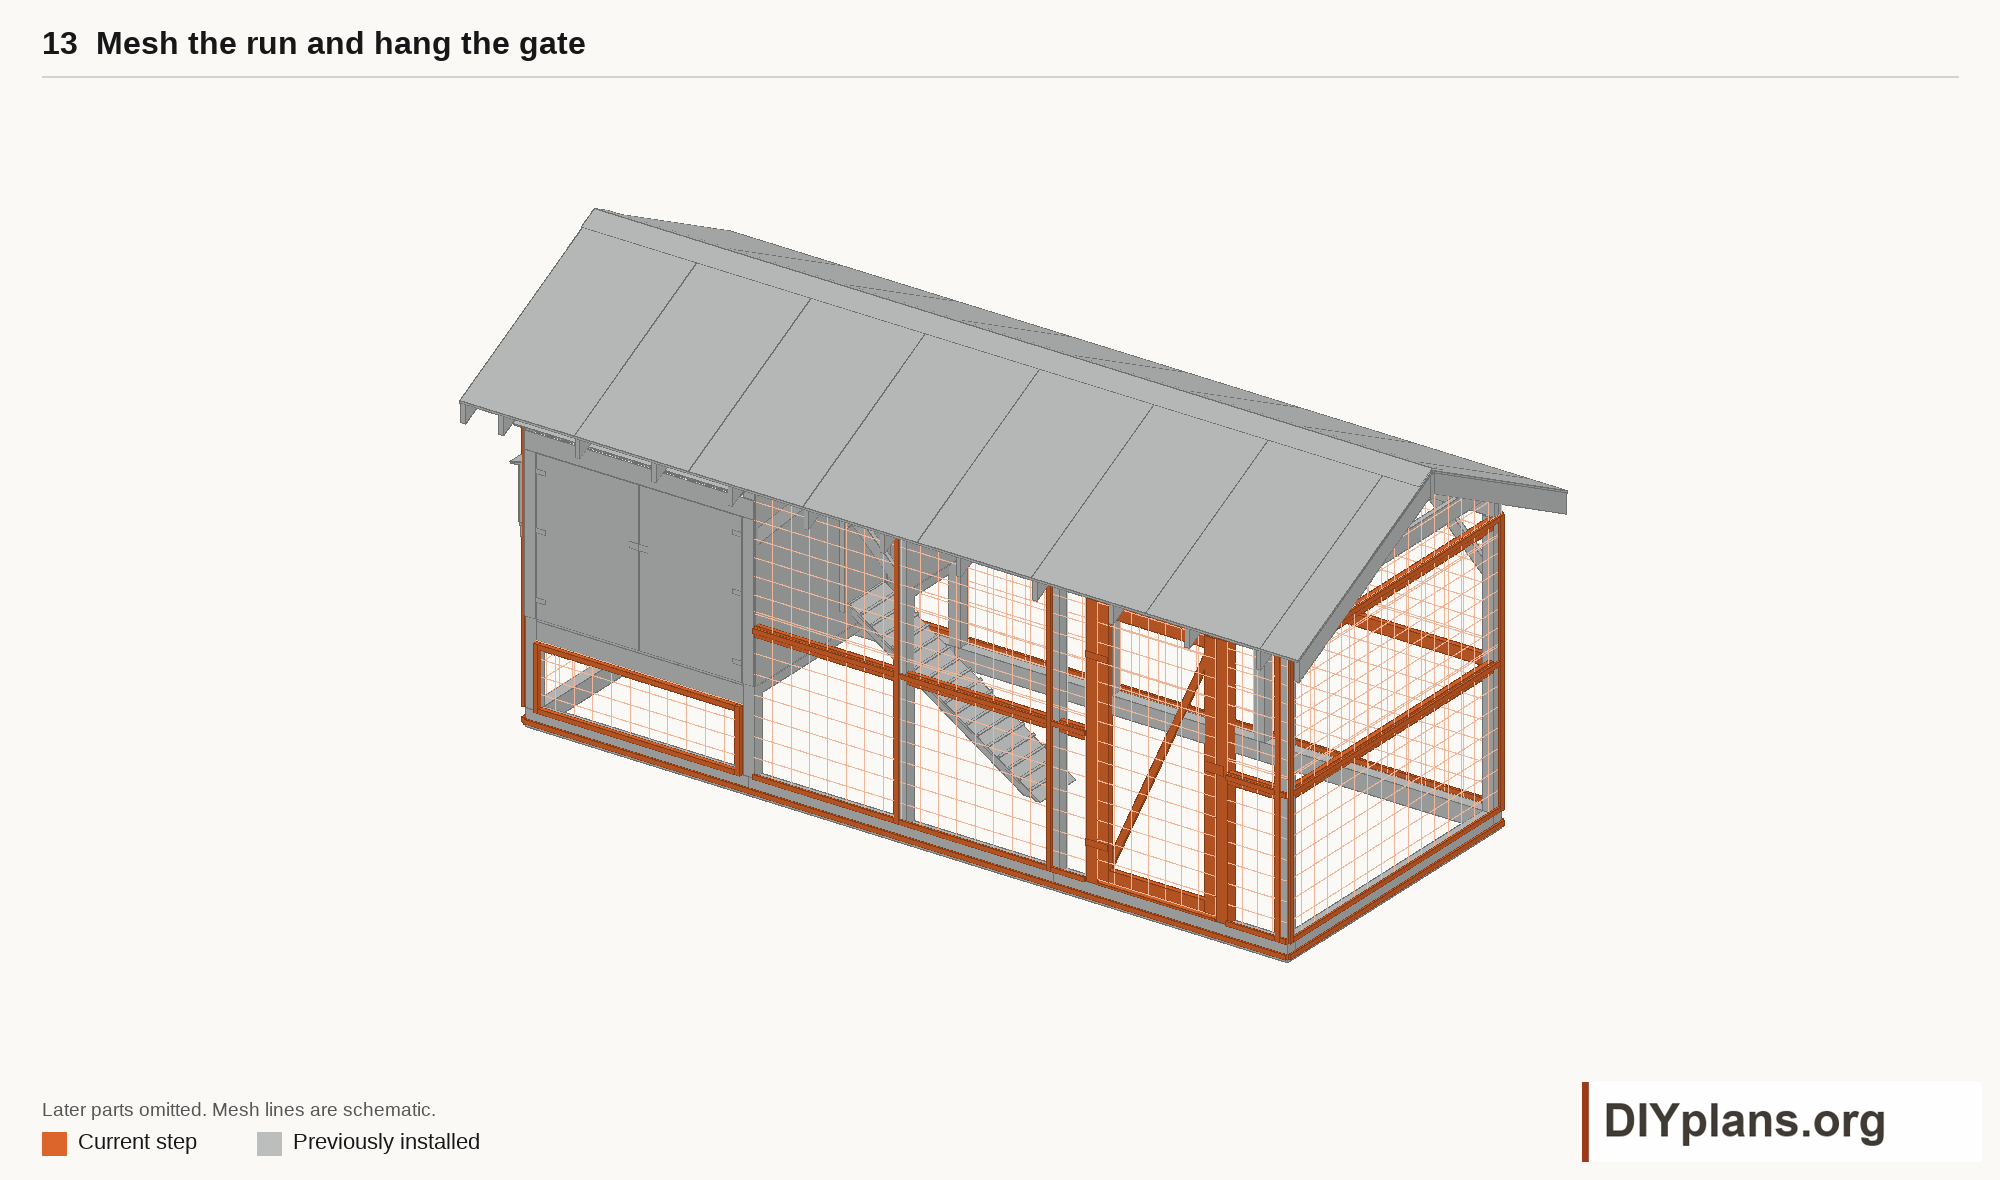
- Fit the run rails and 1/2 in hardware cloth. Clamp the perimeter edges, row overlaps and gable seams with the matching battens and backing.
- Join the lower enclosure to the buried barrier and fit the removable under-house panels. Close every corner and roof transition.
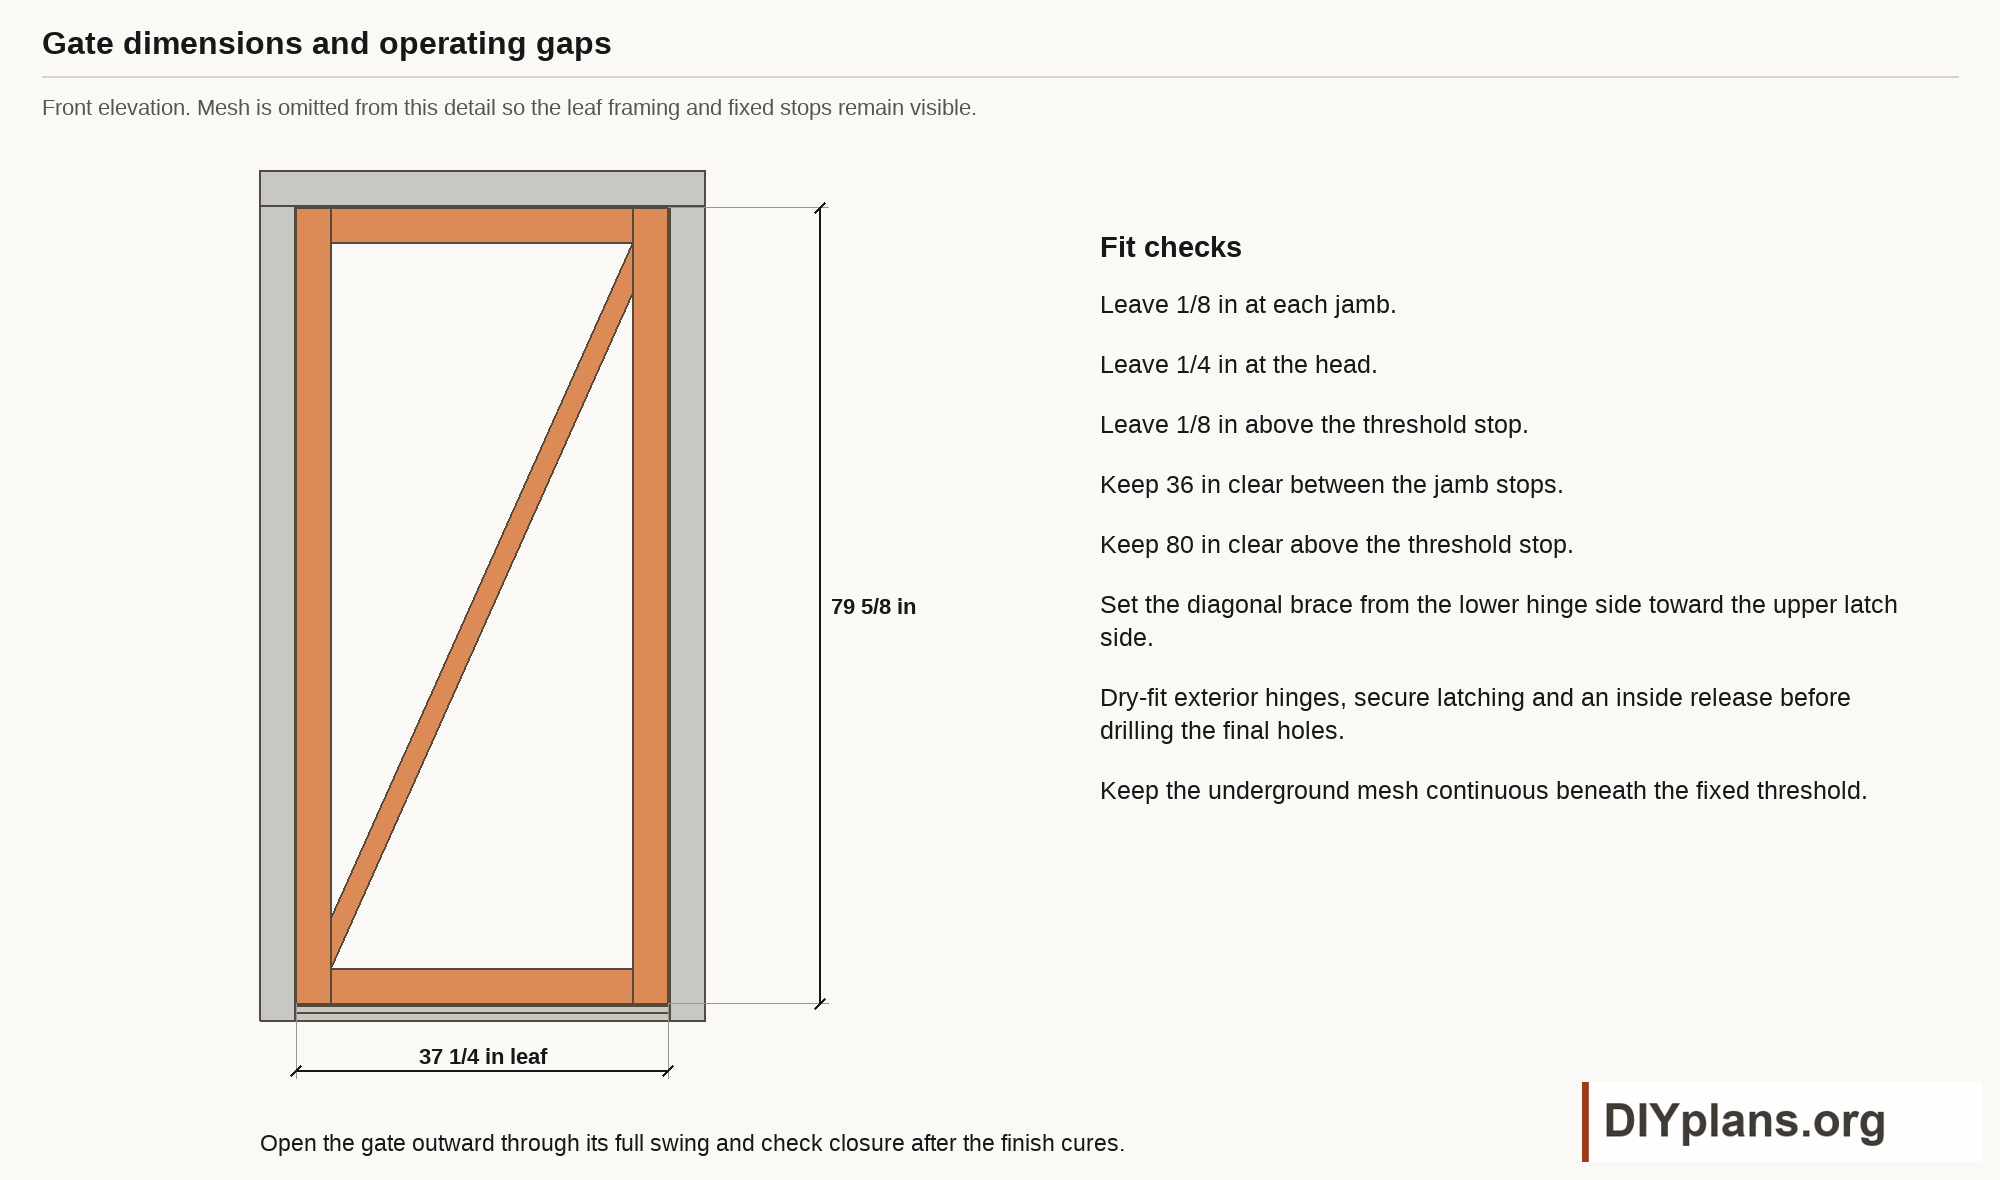
- Fit the fixed gate threshold and stops. The finished opening between stops is 36 in wide and 80 in high above the 7 in threshold stop.
- Hang the 37 1/4 x 79 5/8 in gate leaf to swing outward. Leave 1/8 in at each jamb and above the threshold stop, with 1/4 in at the head.
- Dry-fit hinges and the two-action latch with inside release. Confirm secure closure through the whole swing and keep the buried mesh undisturbed beneath the threshold.
Check: All mesh edges and seams are secured, and the outward-swinging gate closes and latches with the specified gaps.
Step 14 Inspect the complete coop
- Walk the entire enclosure and inspect every mesh edge, seam, corner, foundation interface and threshold. Repair openings or loose clamping before occupancy.
- Open and close the gate, cleanout leaves, nest hatch and pop door. Check latch engagement and inside releases.
- Remove sharp wire ends, exposed fastener points, offcuts and construction debris. Confirm that ventilation openings remain clear.
- Check roof runoff, ground drainage and the buried-barrier line after backfilling. Repair erosion or disturbed mesh before birds use the run.
- Size the flock for the usable floor and run space, breed and local climate. Inspect mesh, latches, corrosion and signs of burrowing regularly.
Check: The enclosure, moving parts, ventilation, drainage and sharp-edge checks are complete before occupancy.