Before you start
- Use standard nominal lumber. Walls and caps must be No. 2 or better Southern Pine structural dimension lumber; posts must be No. 2 or better Southern Pine structural timbers. Exclude Mixed Southern Pine, No. 2 Non-Dense, incised or fire-retardant-treated stock. Floorboards must be sound, straight Southern Pine. All wood must be tagged AWPA UC4A or higher with a modern residential copper-based treatment. Use new stock, free of decay, through-splits and loose knots; keep cap cuts and screw sites clear of defects.
- Keep the whole floor on a level, draining ground bed with an outlet above surrounding grade. This design does not bridge between blocks or joists. Use nonwoven sand-retaining drainage fabric, a removable cover and no more than 4 inches of play sand.
- Use the exact Type 316 stainless screws listed and the drilling details. Replace any split wood. Recheck the bed, gaps, bearing surfaces and fasteners before adding sand.
- For residential sand play with adult supervision. The corner design was checked analytically for one 300-pound static load spread over a 4 x 4-inch area on a cap, and a separate 100-pound horizontal push at the rim. These are calculation cases, not a tested product rating. No jumping or concentrated impact loads. The ground-resting box may rock or lift when empty; it is not anchored. Never lift or drag it with sand inside. Do not use the caps as lifting handles.
- The plans and models have been digitally checked and independently reviewed. No physical prototype testing or licensed engineer approval is claimed. Dimension edits require fresh cutting lists and connection review.
Dimensions and opening sizes
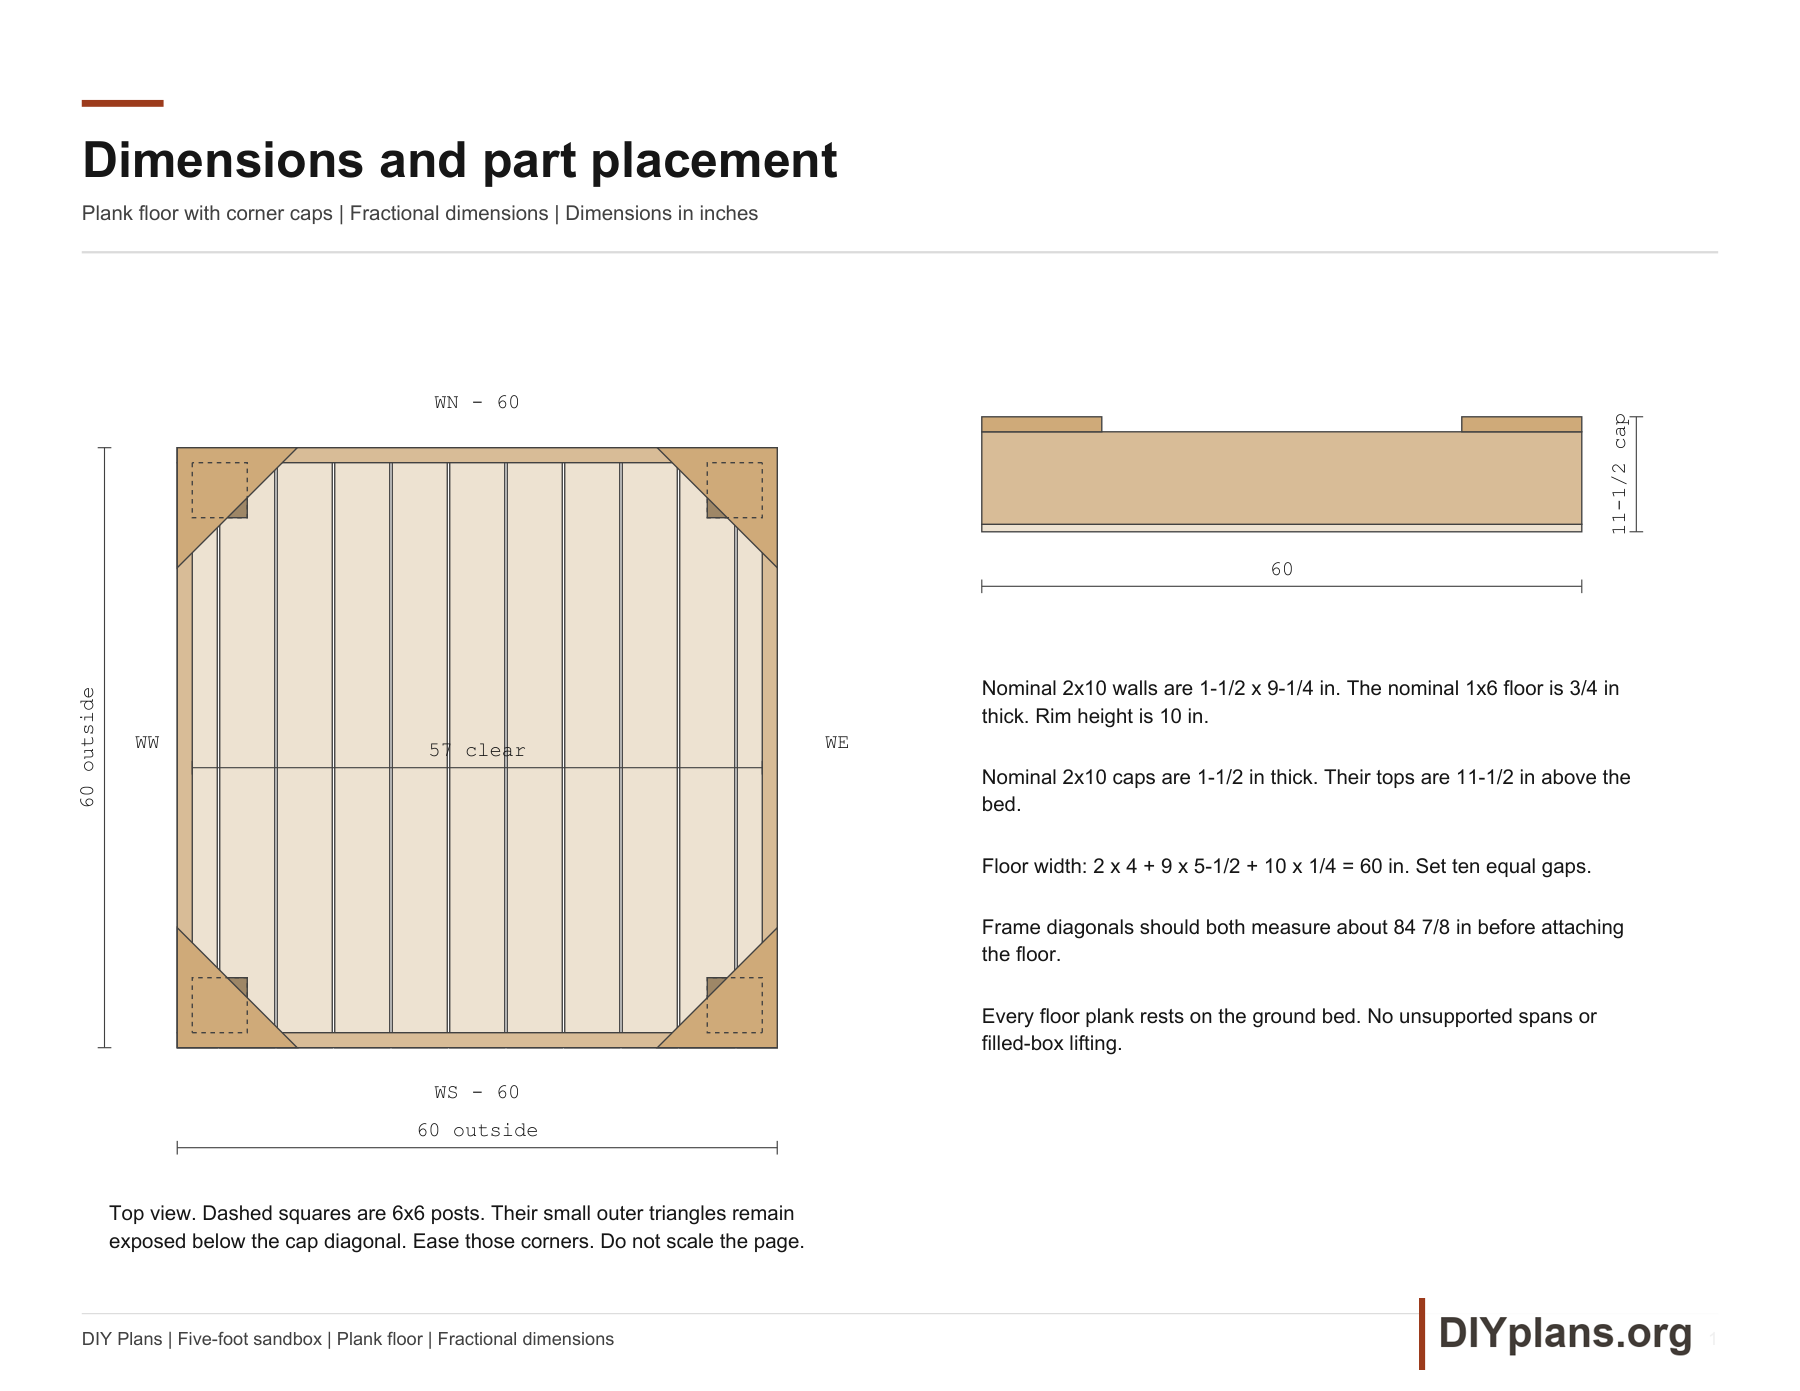
- Outside lengthOutside wall faces.
- 60 in
- Outside widthOutside wall faces.
- 60 in
- Box rim height9-1/4-in wall on 3/4-in floor.
- 10 in
- Cap heightNominal 2x10 cap over the rim.
- 11 1/2 in
- Clear interiorBetween walls, before corner posts.
- 57 in
- Wall heightFactory width of nominal 2x10.
- 9 1/4 in
- Floor thicknessNormal dressed nominal 1x6.
- 3/4 in
- Floor gapTen equal gaps.
- 1/4 in
- Cap legTwo equal triangle legs.
- 12 in
- Maximum sand depthApproximately 7.24 cu ft, net of square 6x6 posts.
- 4 in
Shopping list
| Buy | Material | Stock size |
|---|---|---|
| 6 boards | Southern Pine 1x6 ground-contact lumber | 12 ft |
| 2 boards | No. 2 Southern Pine 2x10 ground-contact lumber | 12 ft |
| 1 board | No.2 Southern Pine 2x10 ground-contact lumber | 8 ft |
| 1 post | No. 2 Southern Pine 6x6 ground-contact timber | 8 ft |
| 1 100-count box | Simpson Strong-Drive DWP WOOD SS screws | T12350WP; Type 316 stainless; #12 x 3-1/2 in; T27 |
| 1 100-count box | Simpson Strong-Drive DWP WOOD SS screws | T12300WP; Type 316 stainless; #12 x 3 in; T27 |
| 1 100-count box | Simpson Deck-Drive DWP WOOD SS screws | T08200WP; Type 316 stainless; #8 x 2 in; T20 |
| 1 piece | Nonwoven sand-retaining drainage geotextile | One piece at least 7 x 7 ft; Mirafi 140N or fabric with AOS no more than 0.212 mm and permittivity at least 1.7 per second |
| 1 box | Stainless steel exterior staples | 3/8-in leg; matched to stapler and liner |
| 17 bags | Play sand | 0.5 cu ft per bag |
| 1 | Removable sandbox cover | Fits 60 x 60-in outside box |
| 1 container | End-cut preservative compatible with the wood treatment | Product labeled for field treatment of residential ground-contact lumber |
| 9 cu ft allowance | Clean angular drainage aggregate with a level fine surface | 3-in compacted depth example |
Quantity notes
All wood is standard nominal stock. Counts allow 1/8-in kerfs and 1 in of stock-end trimming. One 60-in floor blank is spare.
- Southern Pine 1x6 ground-contact lumber, 12 ft: Five boards yield two 60-in planks each; the sixth yields one and a spare blank. Rip the two edge planks to 4 in.
- No. 2 Southern Pine 2x10 ground-contact lumber, 12 ft: Each yields one 60-in wall and one 57-in wall. Retain factory width.
- No.2 Southern Pine 2x10 ground-contact lumber, 8 ft: Four 17-1/2-in blanks, cut to triangles with 12-in equal legs.
- No. 2 Southern Pine 6x6 ground-contact timber, 8 ft: Four 9-1/4-in posts. Retain factory 5-1/2-in square section; ease exposed corners.
- Simpson Strong-Drive DWP WOOD SS screws, T12350WP; Type 316 stainless; #12 x 3-1/2 in; T27: Install 64 wall/post screws. Use the exact product and eight-hole pattern.
- Simpson Strong-Drive DWP WOOD SS screws, T12300WP; Type 316 stainless; #12 x 3 in; T27: Install 24 cap/wall screws, six per cap. Use the exact product and pattern.
- Simpson Deck-Drive DWP WOOD SS screws, T08200WP; Type 316 stainless; #8 x 2 in; T20: Install 44 floor/wall screws for empty-box assembly retention only.
- Nonwoven sand-retaining drainage geotextile, One piece at least 7 x 7 ft; Mirafi 140N or fabric with AOS no more than 0.212 mm and permittivity at least 1.7 per second: Fold up walls and around posts. Test retention with the chosen play sand. No impermeable plastic or unspecified weed cloth.
- Stainless steel exterior staples, 3/8-in leg; matched to stapler and liner: Secure fabric above the 4-in sand line. Set completely flush; no exposed sharp legs.
- Play sand, 0.5 cu ft per bag: 8.5 cu ft purchased for 7.24 cu ft net at 4-in fill, about 17 percent allowance. Buy by labeled volume.
- Removable sandbox cover, Fits 60 x 60-in outside box: Use its own attachment instructions; secure when unused and remove completely for play.
- End-cut preservative compatible with the wood treatment, Product labeled for field treatment of residential ground-contact lumber: Treat all new cuts and drilled holes as its label directs; let it dry before lining or play.
- Clean angular drainage aggregate with a level fine surface, 3-in compacted depth example: Example: 6 x 6-ft bed x 3 in = 9 cu ft compacted. Measure the actual bed and add the supplier's loose-volume compaction allowance. Keep the bed drained above surrounding grade.
Required installation supplies
- Select AWPA UC4A treatment suitable for residential use; match the end-cut treatment to it.
- Choose a sand-retaining permeable liner and a cover fitted to the 60-inch box.
- Ground preparation materials depend on the site; provide uniform support and positive drainage.
Tools & equipment
- Crosscut saw, table saw or guided circular saw for ripping and triangular cuts; sacrificial backing and clamps.
- Drill/driver, T27 bit for #12 screws, T20 bit for #8 screws; 7/64-in, 9/64-in, 11/64-in and 3/32-in bits; countersink and depth stops.
- Tape, square, pencil, level, 1/4-in spacers, sanding tools, eye and hearing protection.
- Shovel, rake, hand tamper, hose for the drainage test, exterior stapler, and enough adult helpers and supports to turn the heavy empty box under control.
BEFORE YOU BUILD
Use this work at your own risk
No person or organization makes any guarantee or warranty, express or implied, regarding this design, its documentation, digital files, or website views. They are not professional services and do not create an architect-client or other professional-client relationship. No promise is made about accuracy, completeness, reliability, code compliance, or fitness for your project.
Buildings and building projects are complex, and many things can go wrong. You are responsible for checking dimensions and site conditions, choosing suitable materials and methods, obtaining permits, following codes and manufacturer instructions, and getting qualified professional help when needed. To the fullest extent permitted by law, DIYPlans.org disclaims liability for damages resulting from use of this work. Read the FAQ about your responsibilities.
CC CC BY-NC-SA 4.0 InternationalShare and adapt this free design for noncommercial purposes with appropriate credit. Link to the license, indicate changes, and license adaptations under the same terms.
Instructions
01 Prepare the stock and ground
- Check the species, grade and treatment tags. Measure normal dressed sections: 1x6 is 3/4 x 5-1/2 in; 2x10 is 1-1/2 x 9-1/4 in; 6x6 is 5-1/2 in square. Reject cracked or warped parts. Store boards flat and spaced outdoors under cover for several days; wet floorboards before their final fit and reject persistent cupping.
- Choose a level site that drains after rain. Remove sod, roots and organic material. Prepare roughly 3 inches of compacted clean angular drainage aggregate with a level fine surface, extending past the box edges. Keep the bed edges at or above surrounding grade with an outlet for water. Every plank, wall and post needs uniform support. Relocate a ponding site; a stone-filled depression alone does not drain.
Check: The empty floor will have uniform ground support over its full area, and water can leave the bed.
02 Cut and label the 23 wood parts
- Cut eleven floor planks 60 in long. Rip F01 and F11 to 4 in width; keep F02-F10 at 5-1/2 in. Cut WS and WN 60 in long; cut WW and WE 57 in long. Cut P1-P4 from nominal 6x6, each 9-1/4 in long.
- Cut four 17-1/2-in blanks from nominal 2x10 for C1-C4. Mark the IDs from the cut list. Account for saw kerfs and trim damaged stock ends. Keep both wall widths and all wood thicknesses at their factory dimensions.
Check: All 23 parts are accounted for. The long walls are 60 in and the short walls are 57 in.
03 Lay out the triangular caps
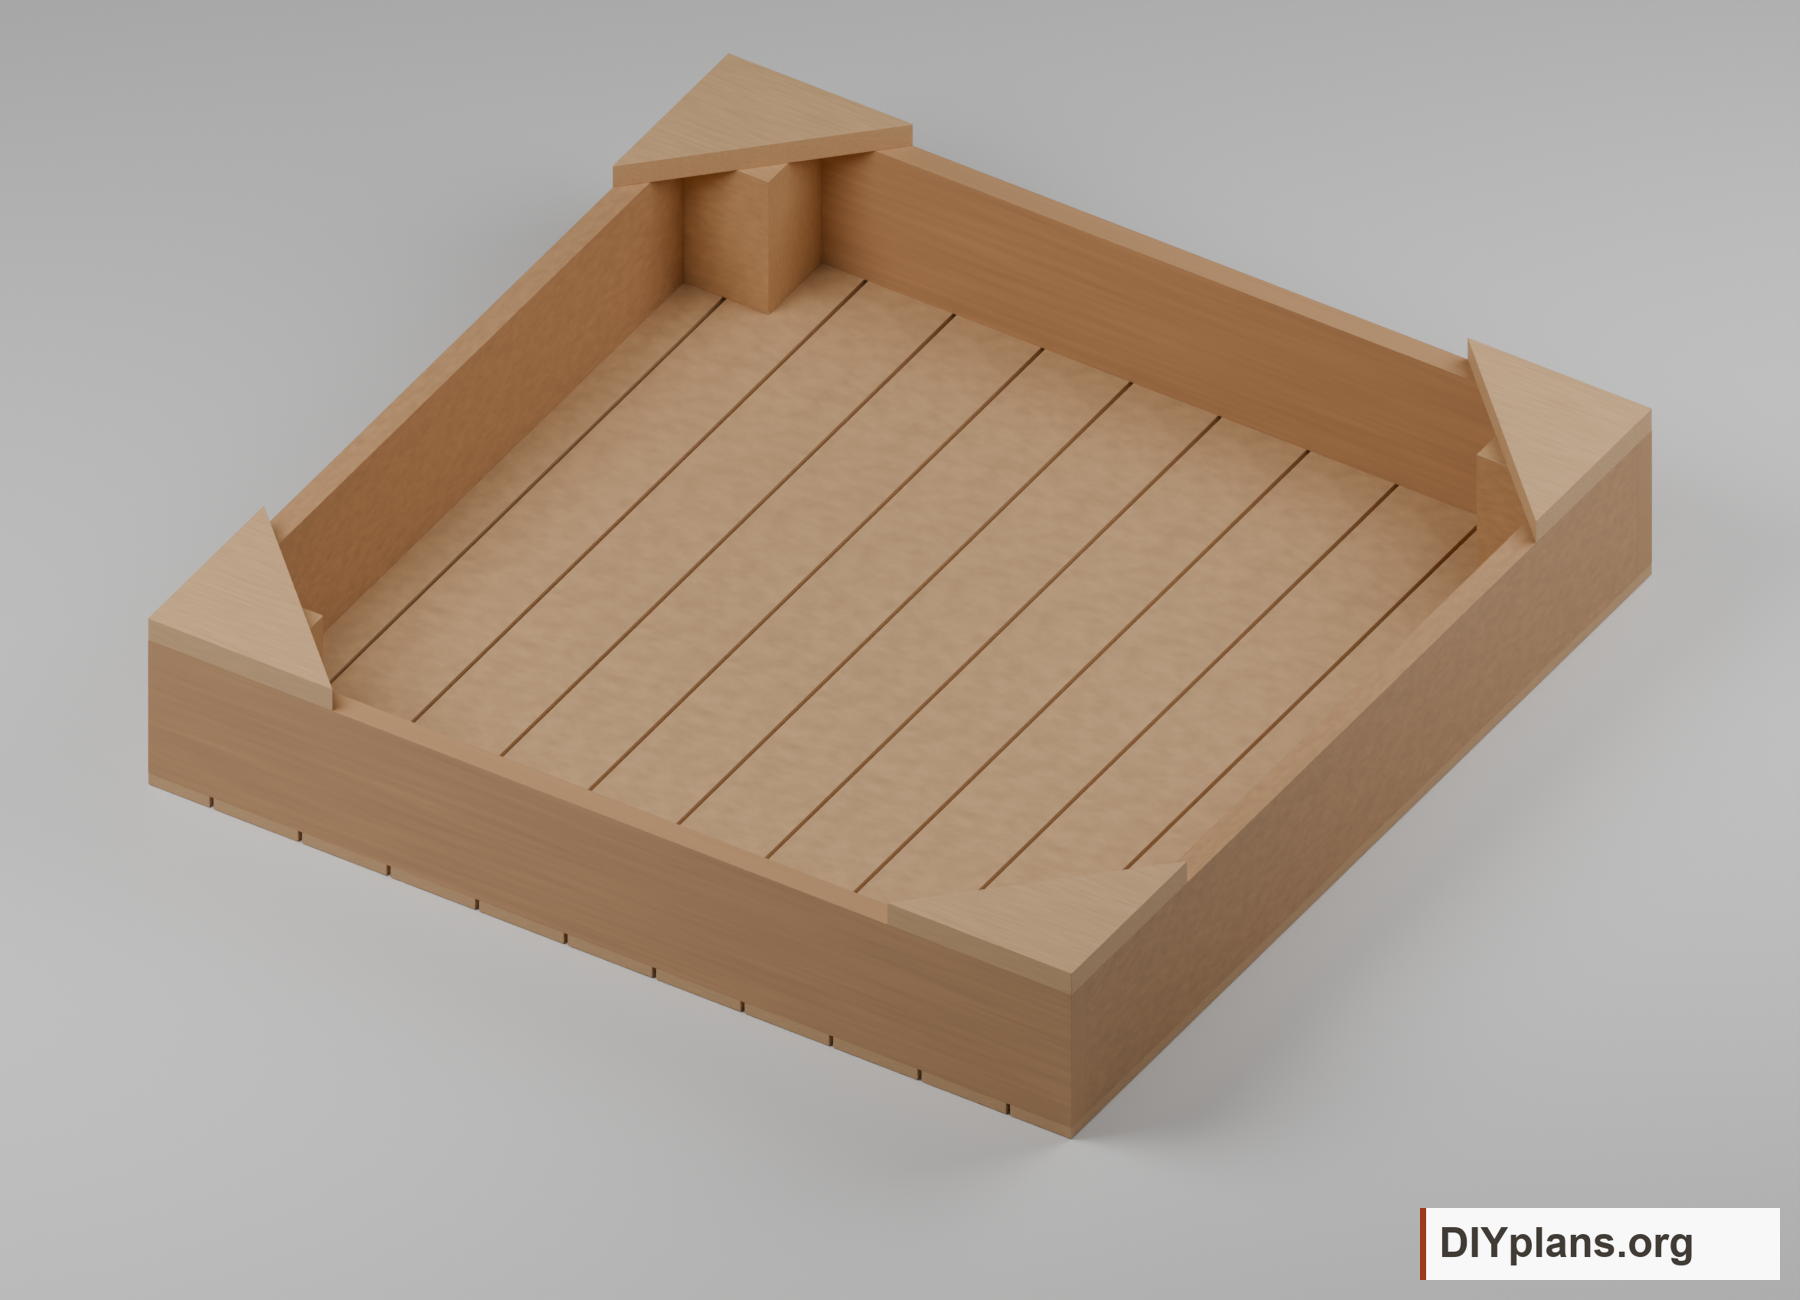
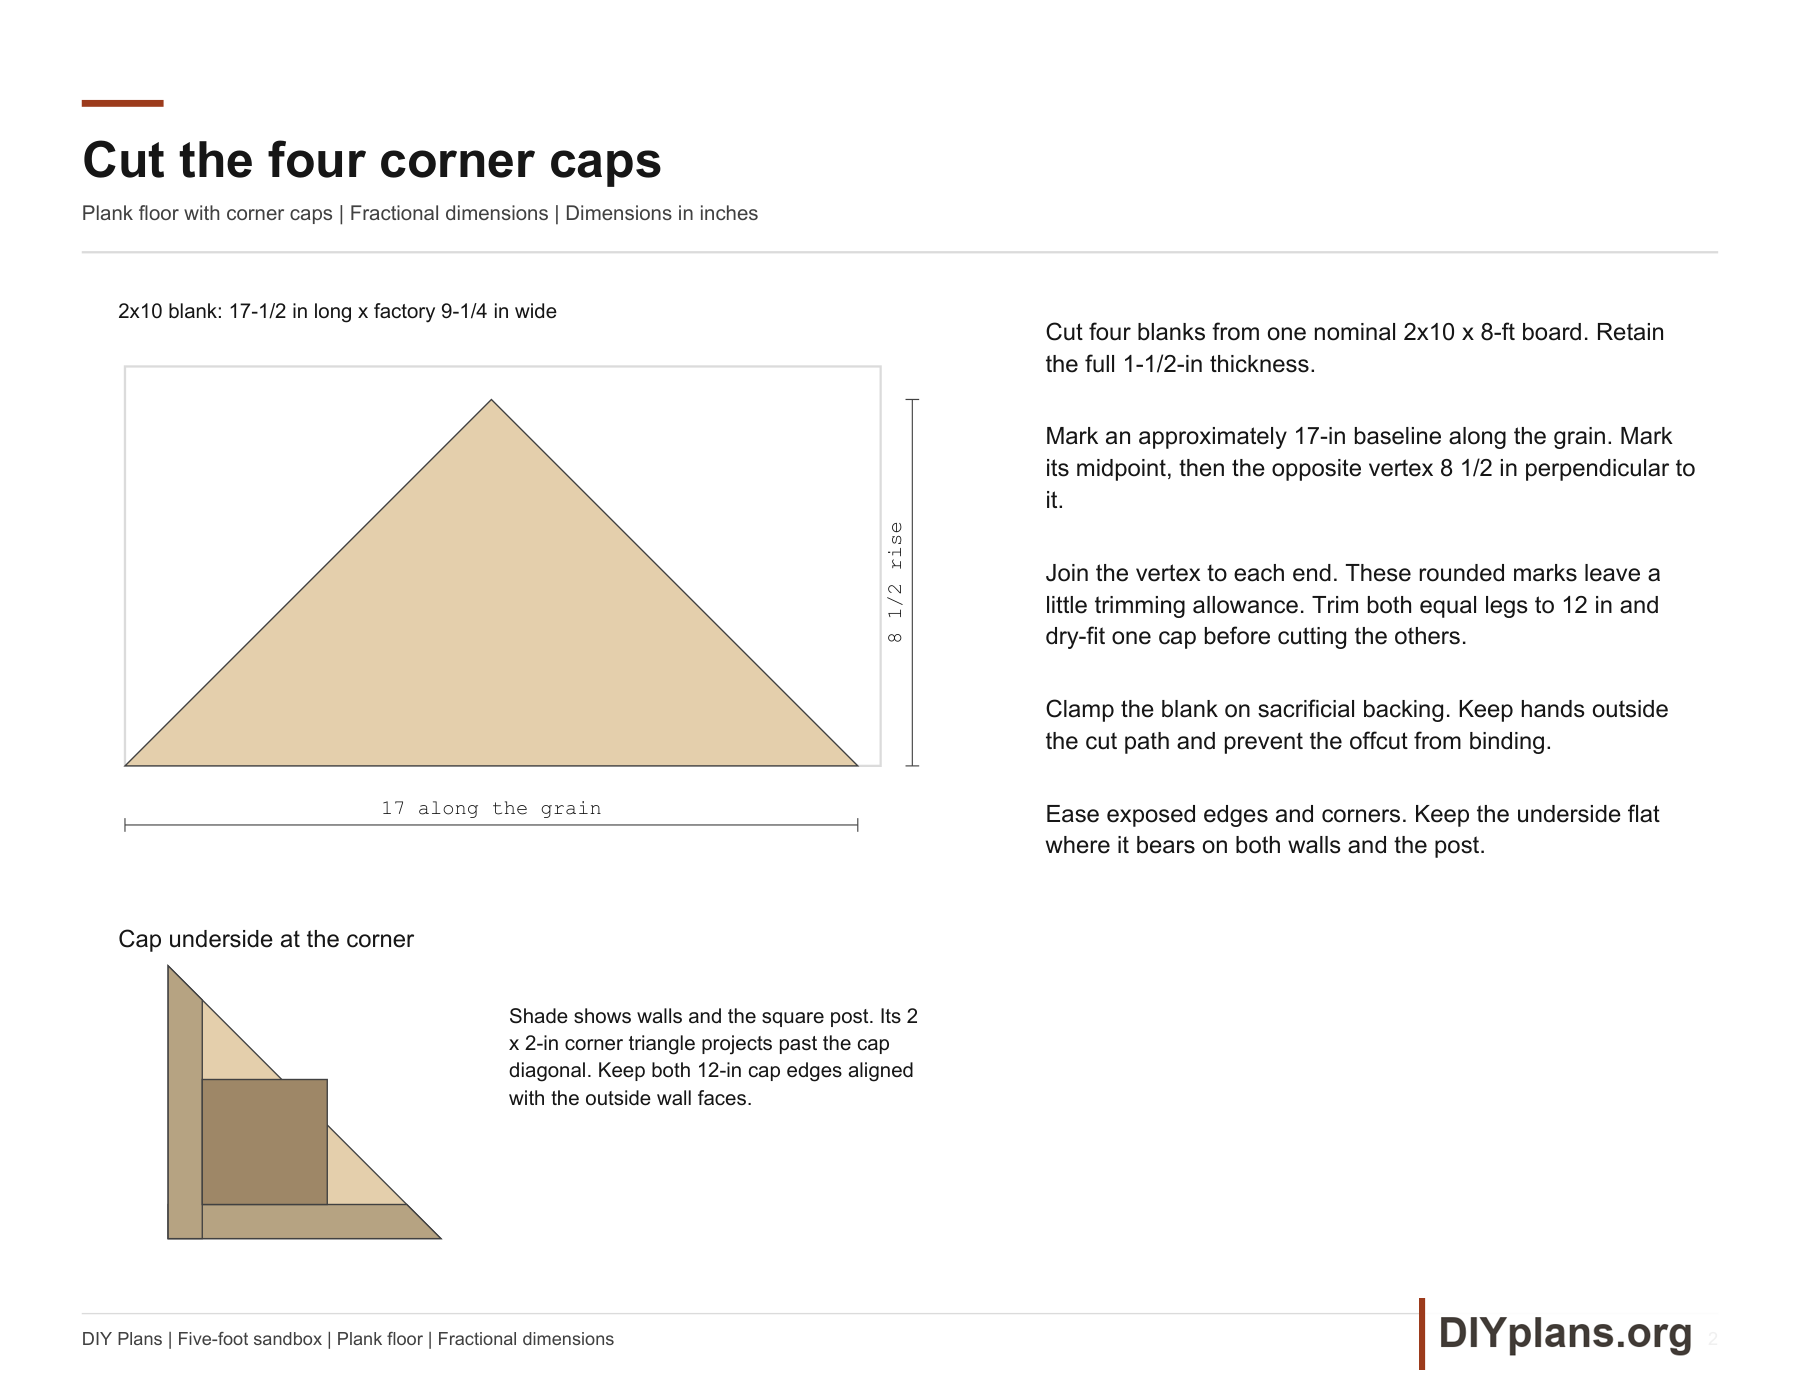
- On each cap blank, mark a 17-in baseline along the grain. Locate its midpoint 8 1/2 in from either end, and mark the opposite vertex 8 1/2 in perpendicular to it. Join the vertex to the baseline ends. Both equal legs must be 12 in.
- Clamp on sacrificial backing and cut safely. Test one cap on the frame before copying it. Round sharp exposed corners and ease edges while preserving flat wall/post bearing on the underside.
- The rounded 17-in baseline and 8-1/2-in rise leave a small trimming allowance. Check and trim both equal legs to 12 in, then dry-fit one cap before cutting the other three.
Check: Each cap has two 12-in equal legs, a 17-in diagonal, and its grain runs along that diagonal.
04 Join the walls and corner posts
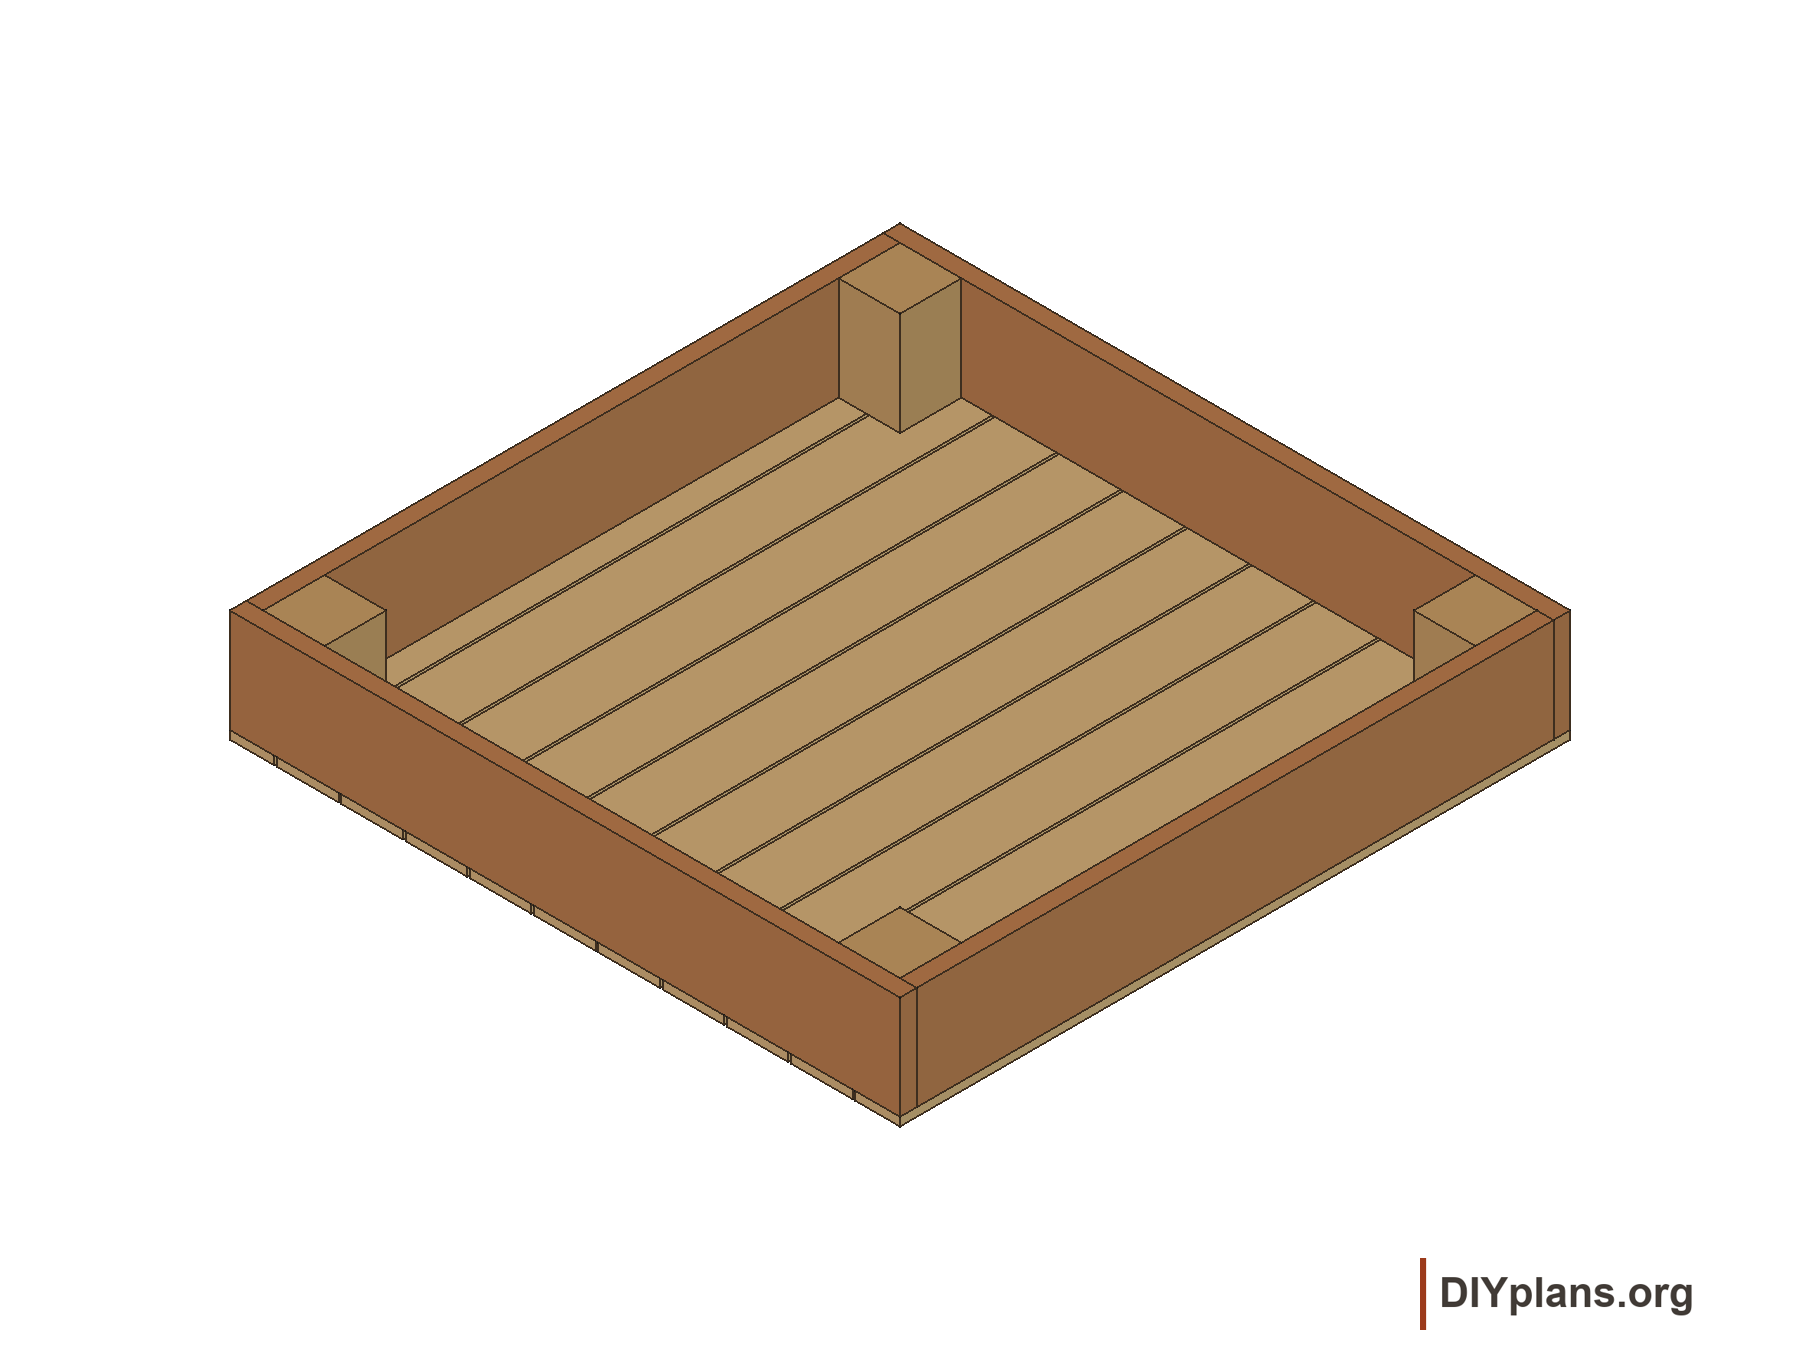
- Place WS and WN outside WW and WE to form a 60-in square. Place one uncut square 6x6 post inside each corner, flush with wall bottoms and tops. Clamp everything and compare diagonals, both about 84 7/8 in.
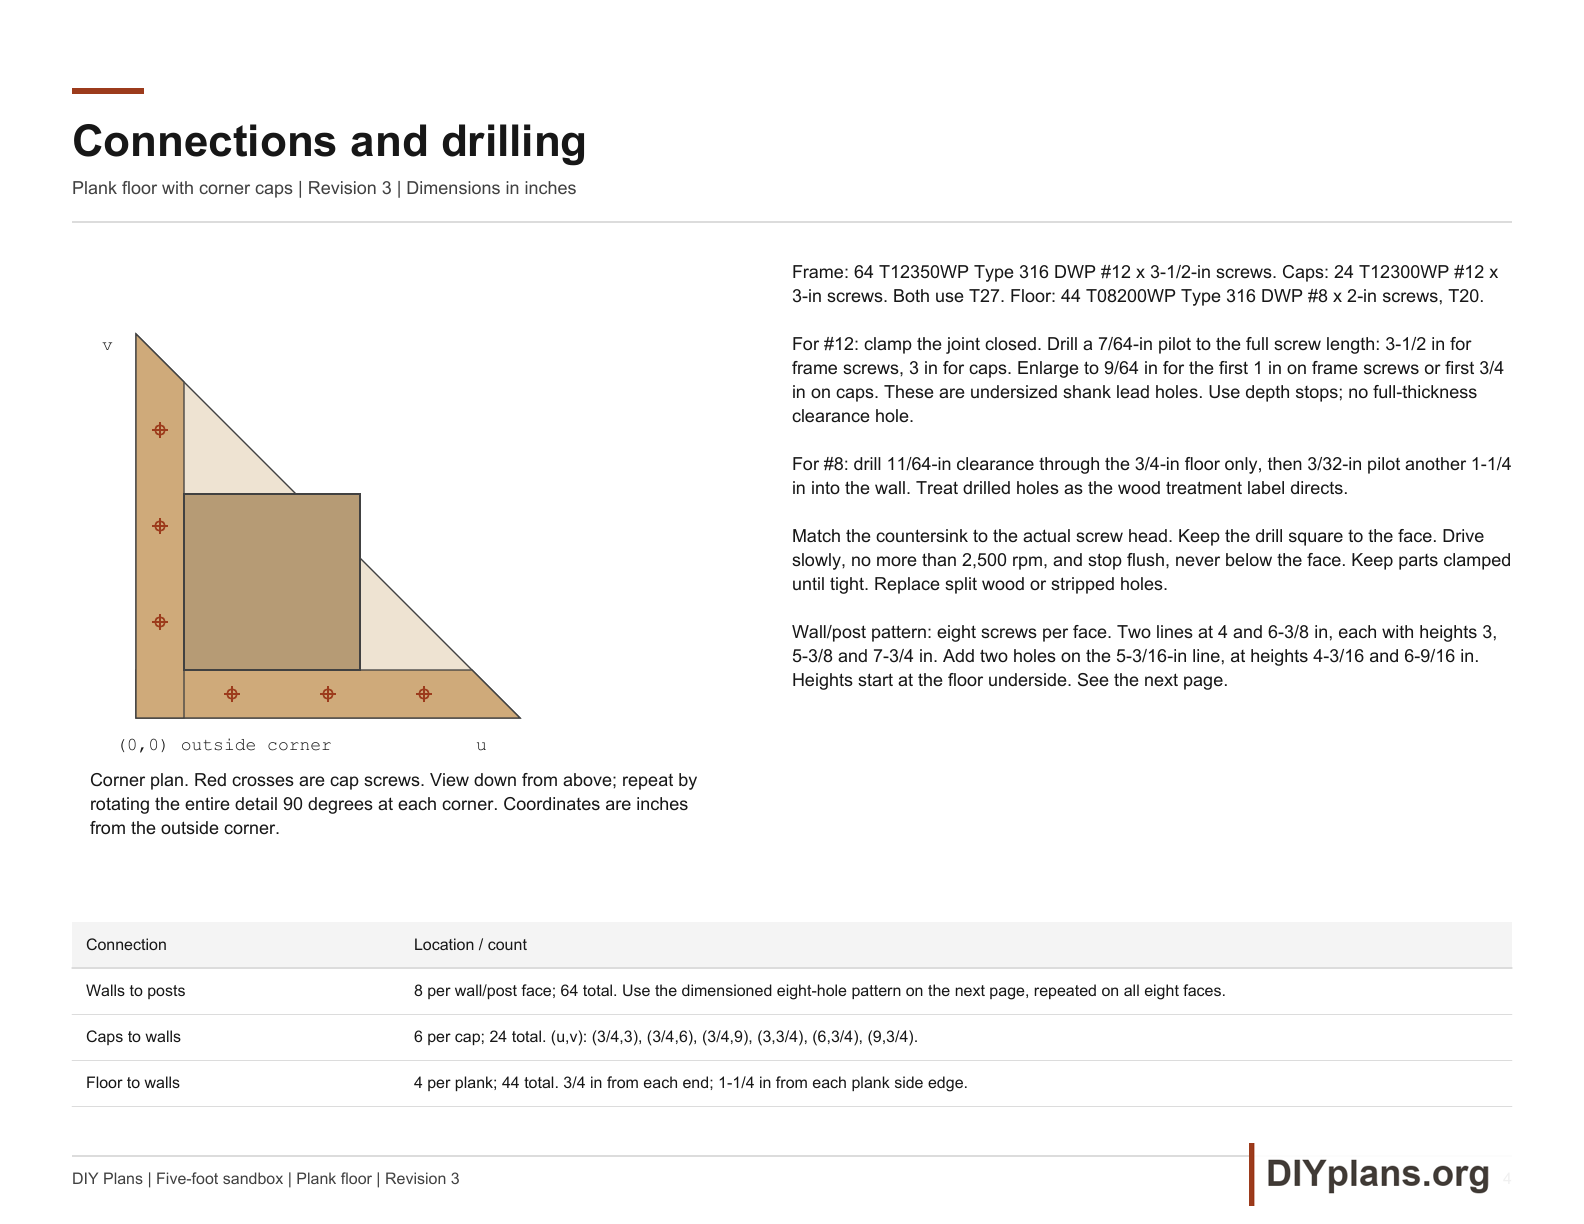
- Use eight T12350WP #12 x 3-1/2-in screws for each wall/post face. From the outside corner, mark lines at 4 and 6-3/8 in. On each, mark heights 3, 5-3/8 and 7-3/4 in above the floor underside. Add two holes on a 5-3/16-in line, at heights 4-3/16 and 6-9/16 in. For measurements from the wall bottom instead, subtract 3/4 in from each height. Follow the fastener layout drawing on this page. Install 64 total and recheck square.
Check: Posts touch both walls, no splits appear, all heads are flush, and the two frame diagonals agree.
05 Attach the floor
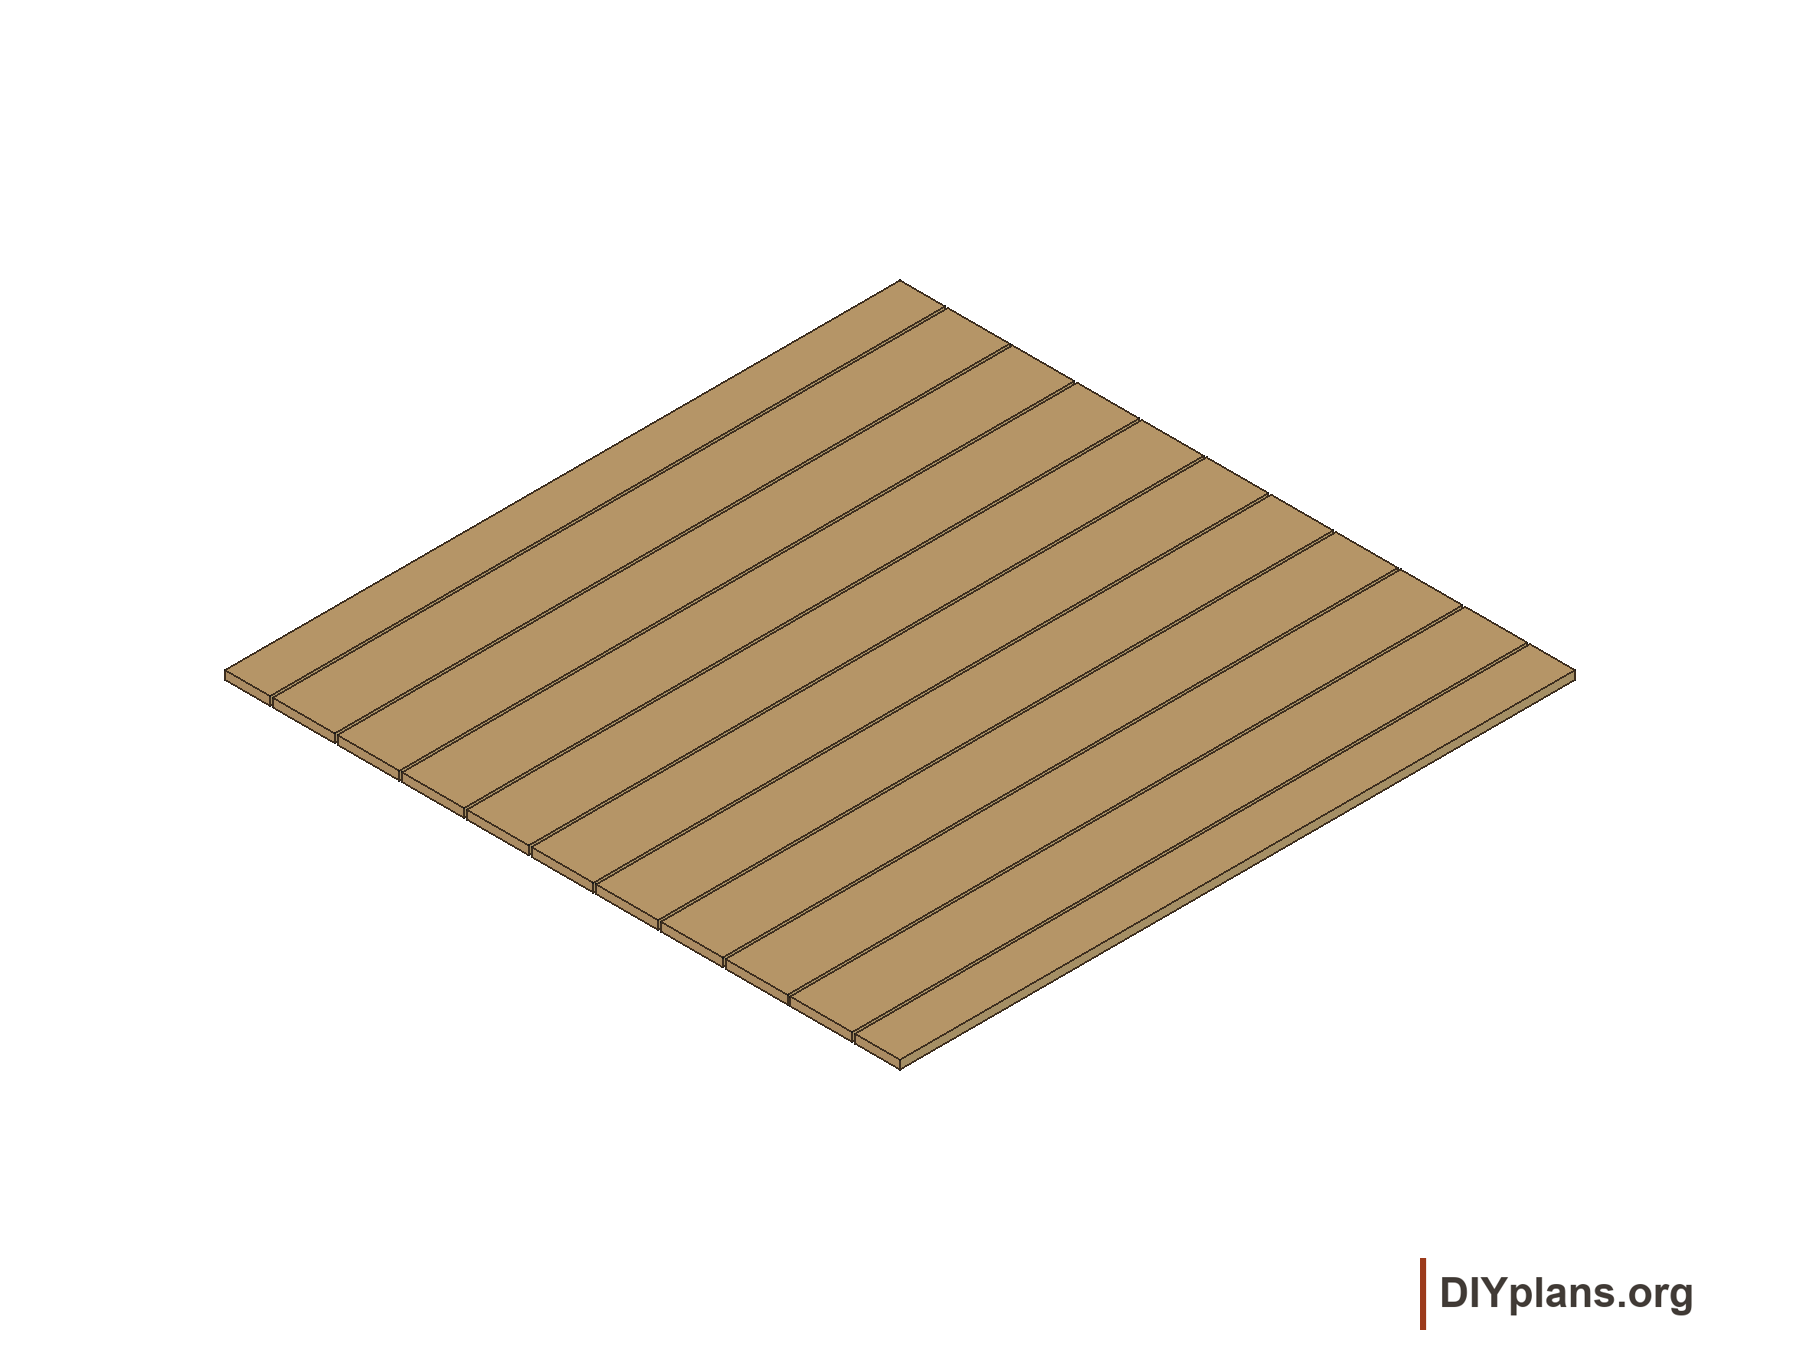
- With enough adult helpers, support the heavy empty frame upside down on stable supports. Lay F01 and F11 at the outside edges and the other nine planks between. Use ten 1/4-in spacers. Align every plank end to the outside faces of WS and WN.
- Install four T08200WP #8 x 2-in screws per plank, 44 total. Each pair is 1-1/4 in from the plank side edges, on a line 3/4 in from its end. Drill 11/64-in clearance through the floor only, then 3/32-in pilot another 1-1/4 in into the wall. Countersink shallowly and set heads flush with a T20 bit. These hold the empty assembly together; never lift it filled.
Check: The floor is 60 in wide, all ten gaps are 1/4 in, and every screw enters a wall without splitting a plank end.
06 Treat cuts and place the empty box
- Sand all touch surfaces, corners and cut edges. Treat new cuts and drilled holes with the compatible end-cut product, following its label. Allow it to dry fully. Apply an optional exterior finish only as its manufacturer directs.
- Turn the heavy empty box upright with enough adult helpers and place it on the prepared bed. Check for rocking and voids under planks; correct the bed. Wet the floor thoroughly and recheck that every drainage gap remains open after the boards have swollen.
Check: The floor bears evenly, cut treatment is dry, and water drains through open gaps without collecting in the box.
07 Fit and test the liner
- Lay a single 7 x 7-ft sheet of permeable sand-retaining geotextile over the floor. Fold it up the walls and around the posts without cutting the corners. Keep it smooth; trim below the rim.
- Staple only above the intended 4-in sand line, with all staples fully seated. Test a small quantity of the chosen play sand on the fabric with water before filling. The fabric must retain the sand while letting water pass. Hose the lined box and repeat with a shallow layer of actual sand. Water must leave the fabric, plank gaps and bed without persistent pooling or steady sand loss. Fix any failure before filling.
Check: The fabric covers the whole floor, retains sand in the trial, drains freely and has no exposed staple points.
08 Fasten the four corner caps
- Set each cap flat on both wall tops and its post, with the 12-in legs aligned to the outside wall faces. A small triangular corner of the square 6x6 post remains visible beyond the cap diagonal, 1-1/2 in below the cap top. Ease and treat that exposed corner; keep the full square post section. Correct any rocking before fastening.
- Use six T12300WP #12 x 3-in screws per cap. Local (u,v) positions are (3/4,3), (3/4,6), (3/4,9), (3,3/4), (6,3/4), (9,3/4), inches from the outside corner. Every screw enters wall sidegrain. Clamp the cap down, drill the pilot and shank lead hole as shown on the connection page, and set heads flush using T27. Install 24 total.
Check: All four caps bear firmly on walls and posts. Heads are flush and no screw tips or splits are exposed.
09 Add the play sand
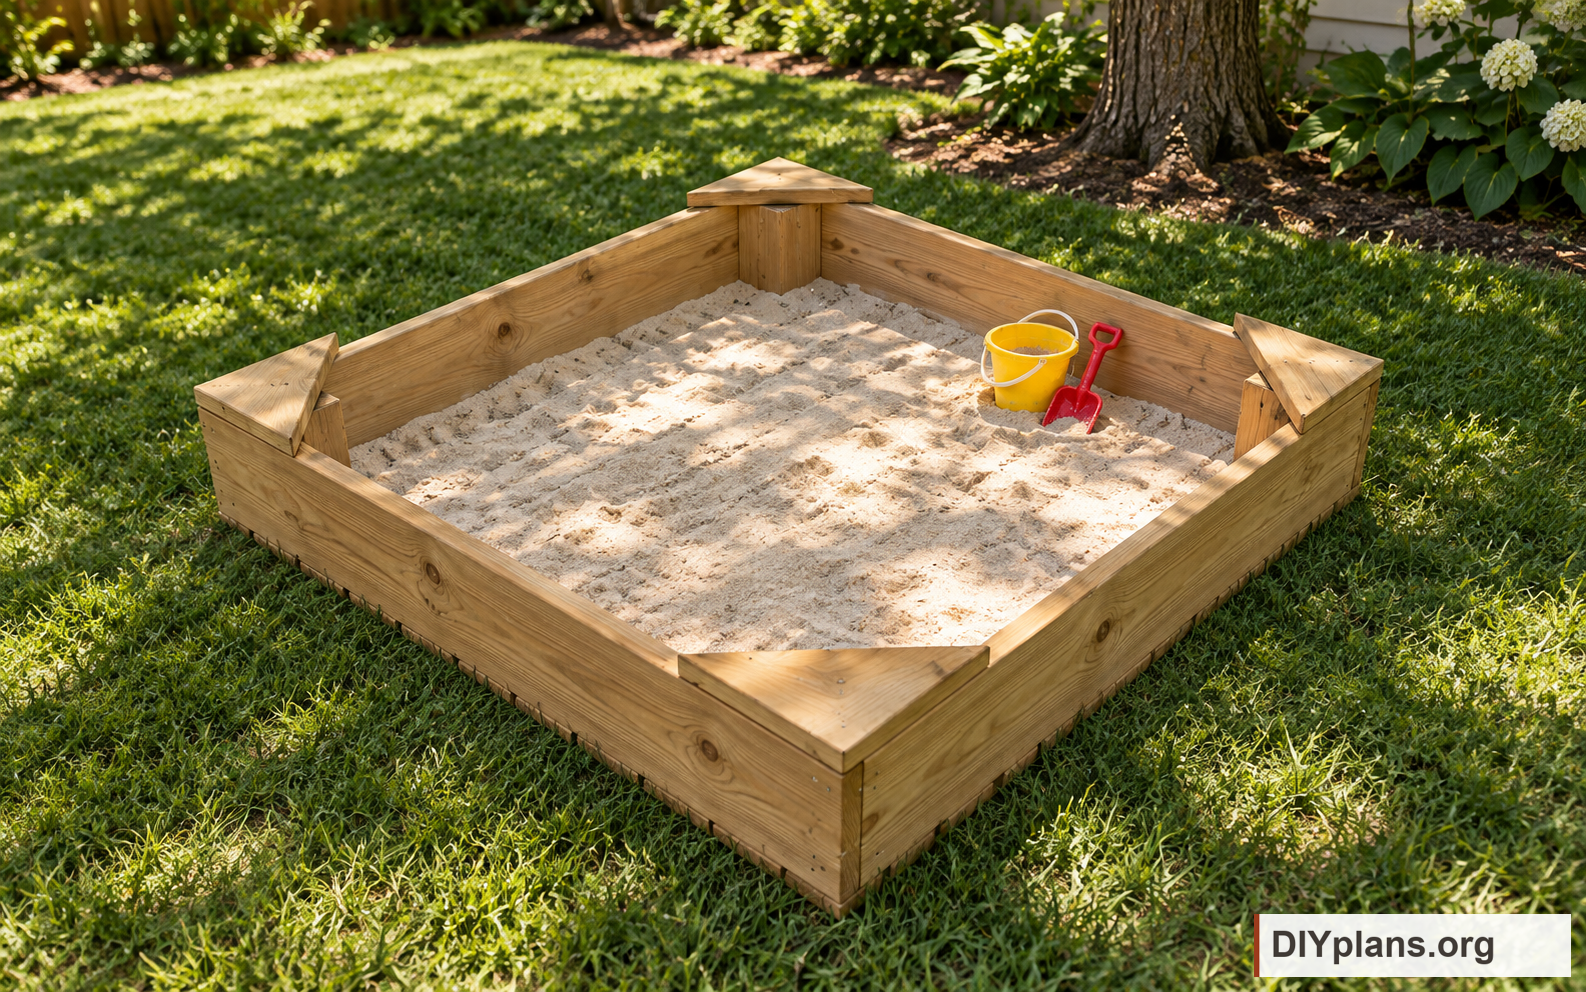
- Mark a 4-in depth above the floor, 5-1/4 in below the rim. Fill gradually with sand sold for children's play. The net volume is 7.24 cu ft after subtracting posts; 17 half-cubic-foot bags provide 8.5 cu ft, about 17 percent allowance.
- Stop at the depth line rather than using every bag. Watch for wall movement, leakage and trapped water as you fill. Correct drainage or loose parts before use.
Check: The sand is no deeper than 4 in, walls remain straight and the box is stable on its bed.
10 Cover and inspect before play
- Fit a removable cover for the 60-in square and secure it as its maker directs. Remove it completely for play. Keep the box covered when unused to limit animals and debris.
- Before each use, check for loose screws, splits, splinters, contamination and standing water. Repair damage and replace contaminated sand. Recheck after heavy rain and seasonal swelling. Supervise play, keep jumping off the caps out of use, and empty the sand before moving the box. Lift only the empty frame, never by its caps.
Check: The cover is removed for play, touch surfaces are smooth and tight, and the sand is clean and drained.