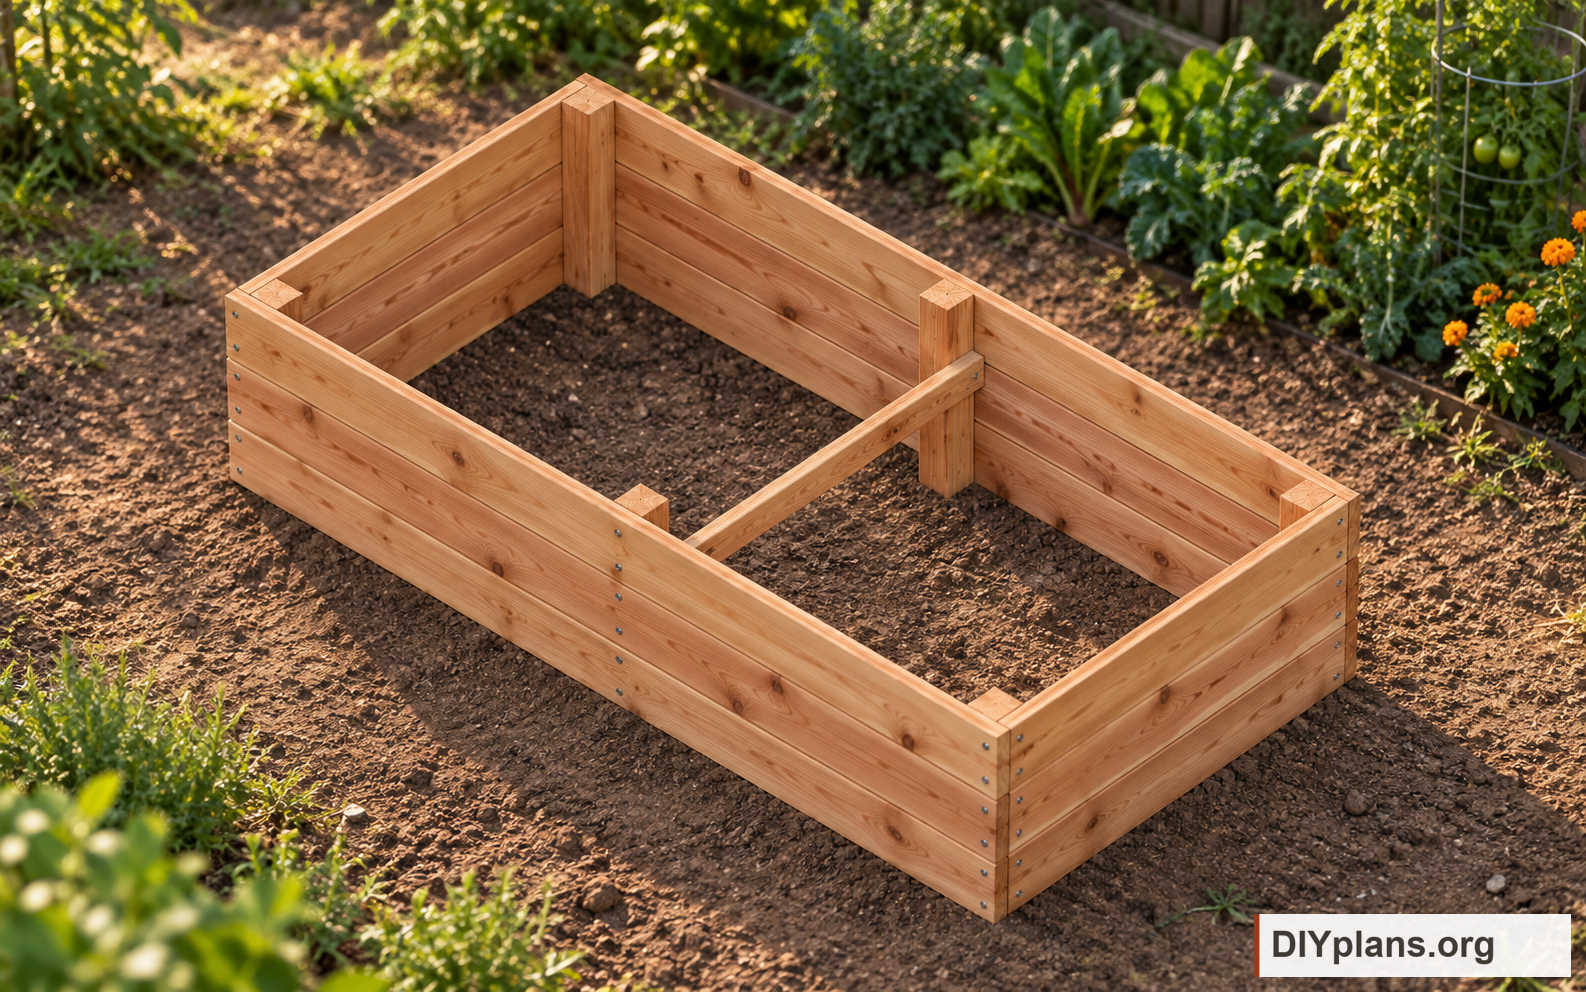
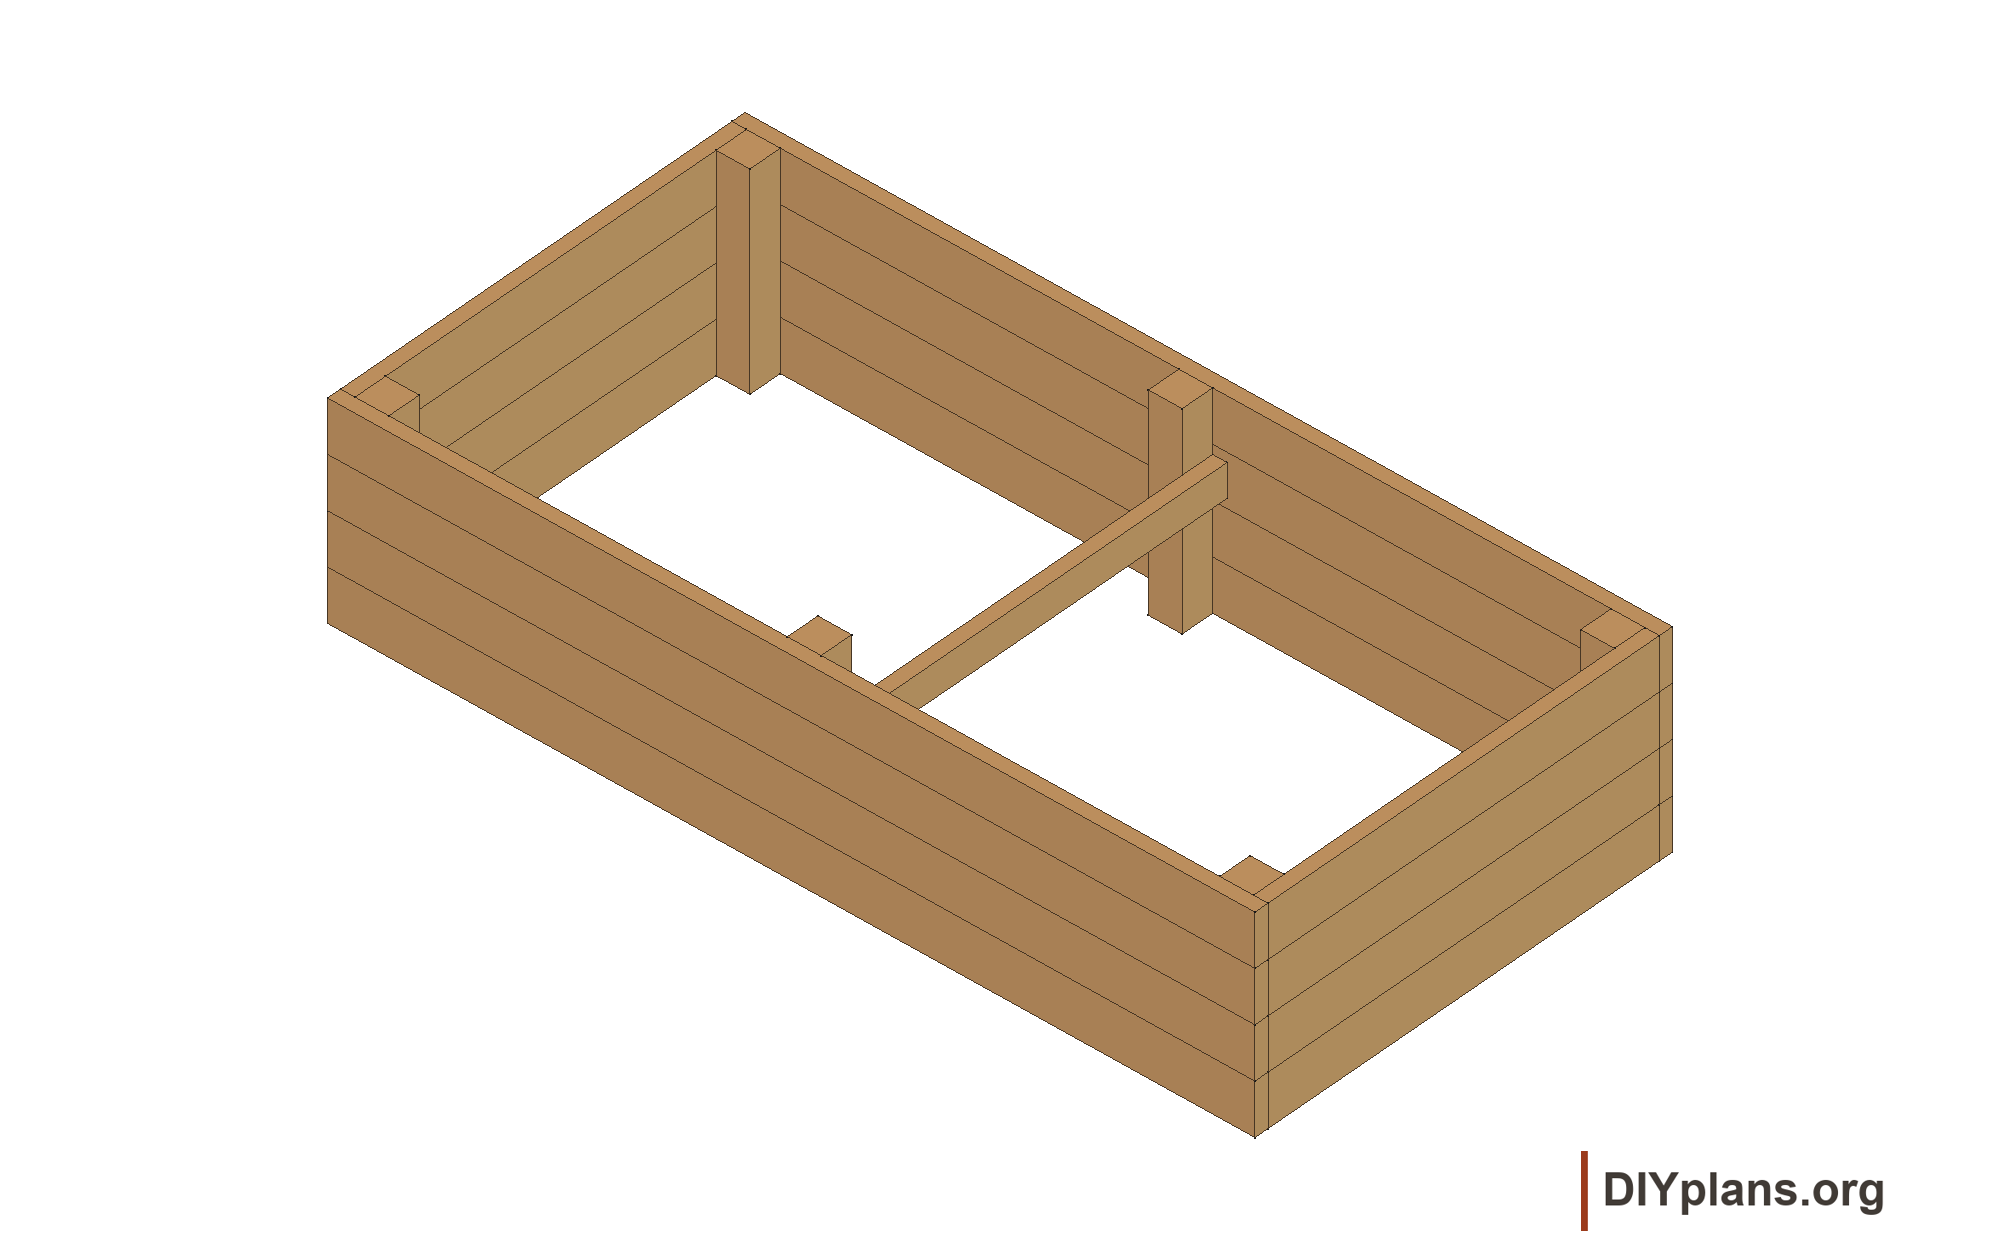
BEFORE YOU BUILD
Use this work at your own risk
These files have not been checked for accuracy, safety, structural adequacy, or building-code compliance. They may contain serious errors and are not construction-ready. Obtain independent qualified design and review before building.
No person or organization makes any guarantee or warranty, express or implied, regarding this design, its documentation, digital files, or website views. They are not professional services and do not create an architect-client or other professional-client relationship. No promise is made about accuracy, completeness, reliability, code compliance, or fitness for your project.
Buildings and building projects are complex, and many things can go wrong. You are responsible for checking dimensions and site conditions, choosing suitable materials and methods, obtaining permits, following codes and manufacturer instructions, and getting qualified professional help when needed. To the fullest extent permitted by law, DIYPlans.org disclaims liability for damages resulting from use of this work. Read the FAQ about your responsibilities.
Instructions
Step 1 Level the site
- Choose firm, well-drained ground with access along both long sides. Keep the bed clear of building walls and buried services.
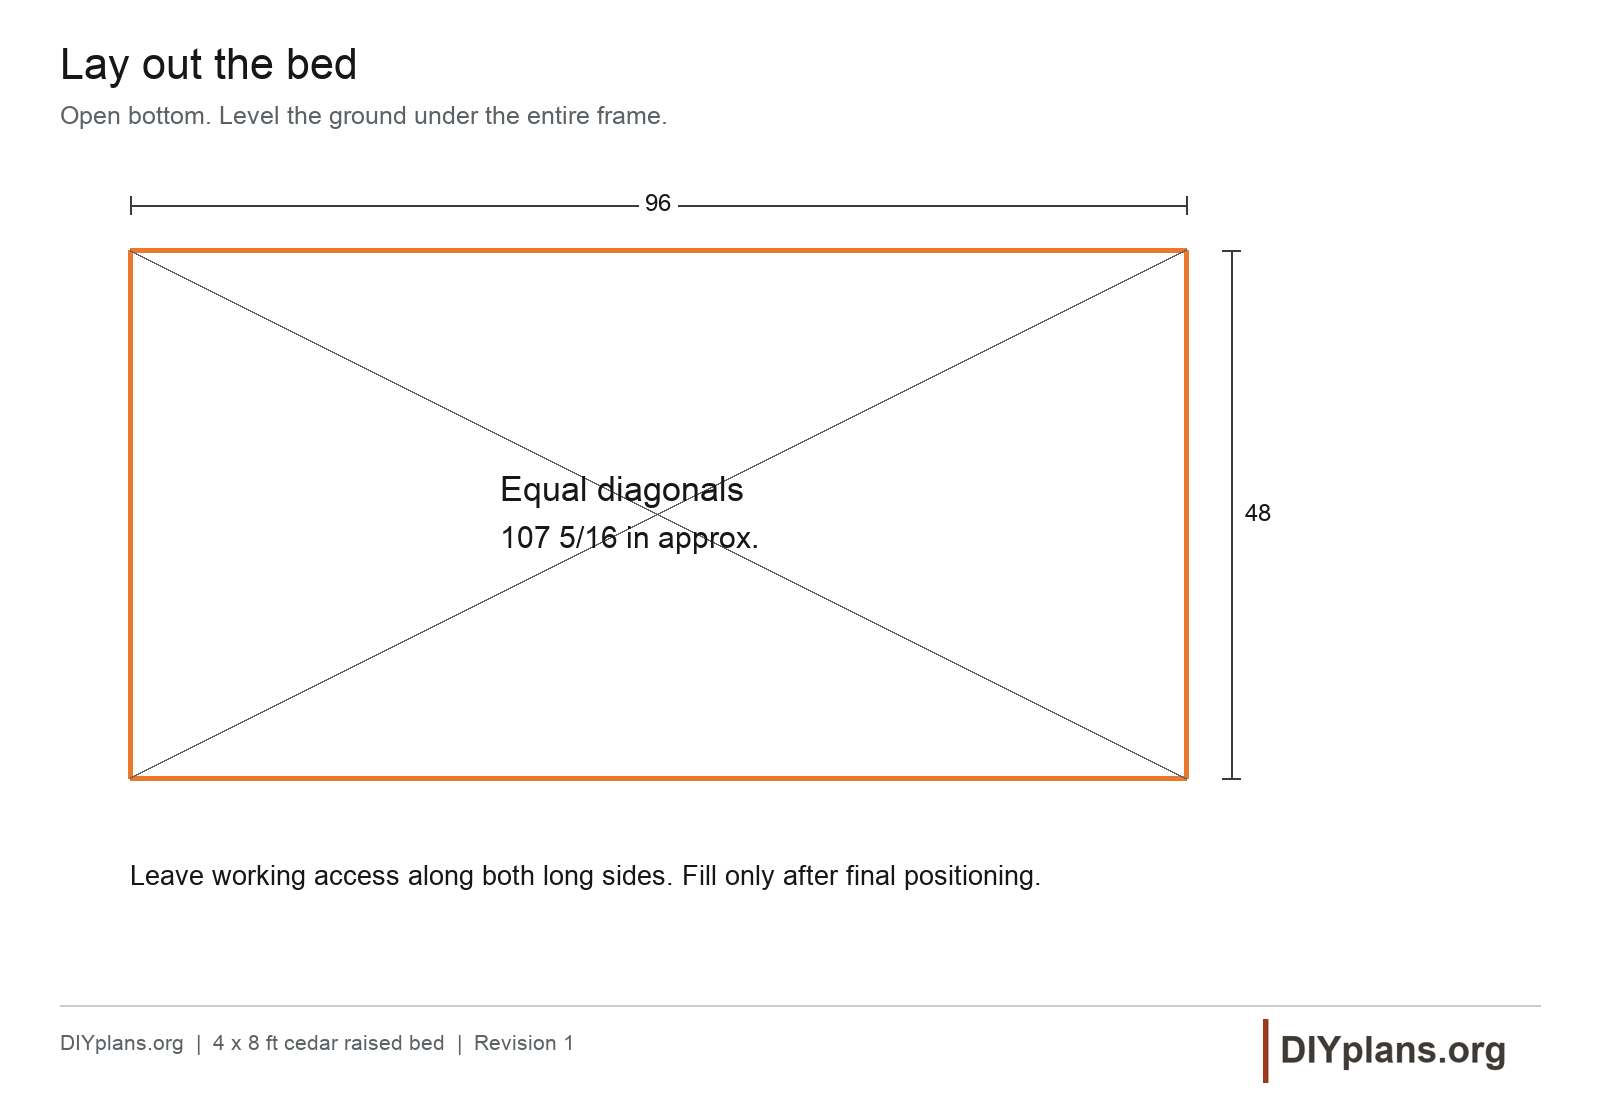
- Remove vegetation and level the entire 96 x 48 in footprint. Keep the bottom open to the soil.
- Mark the outside corners. Measure both diagonals; each should be about 107 5/16 in.
Check: The support surface is level and both diagonals match.
Step 2 Cut the boards and posts
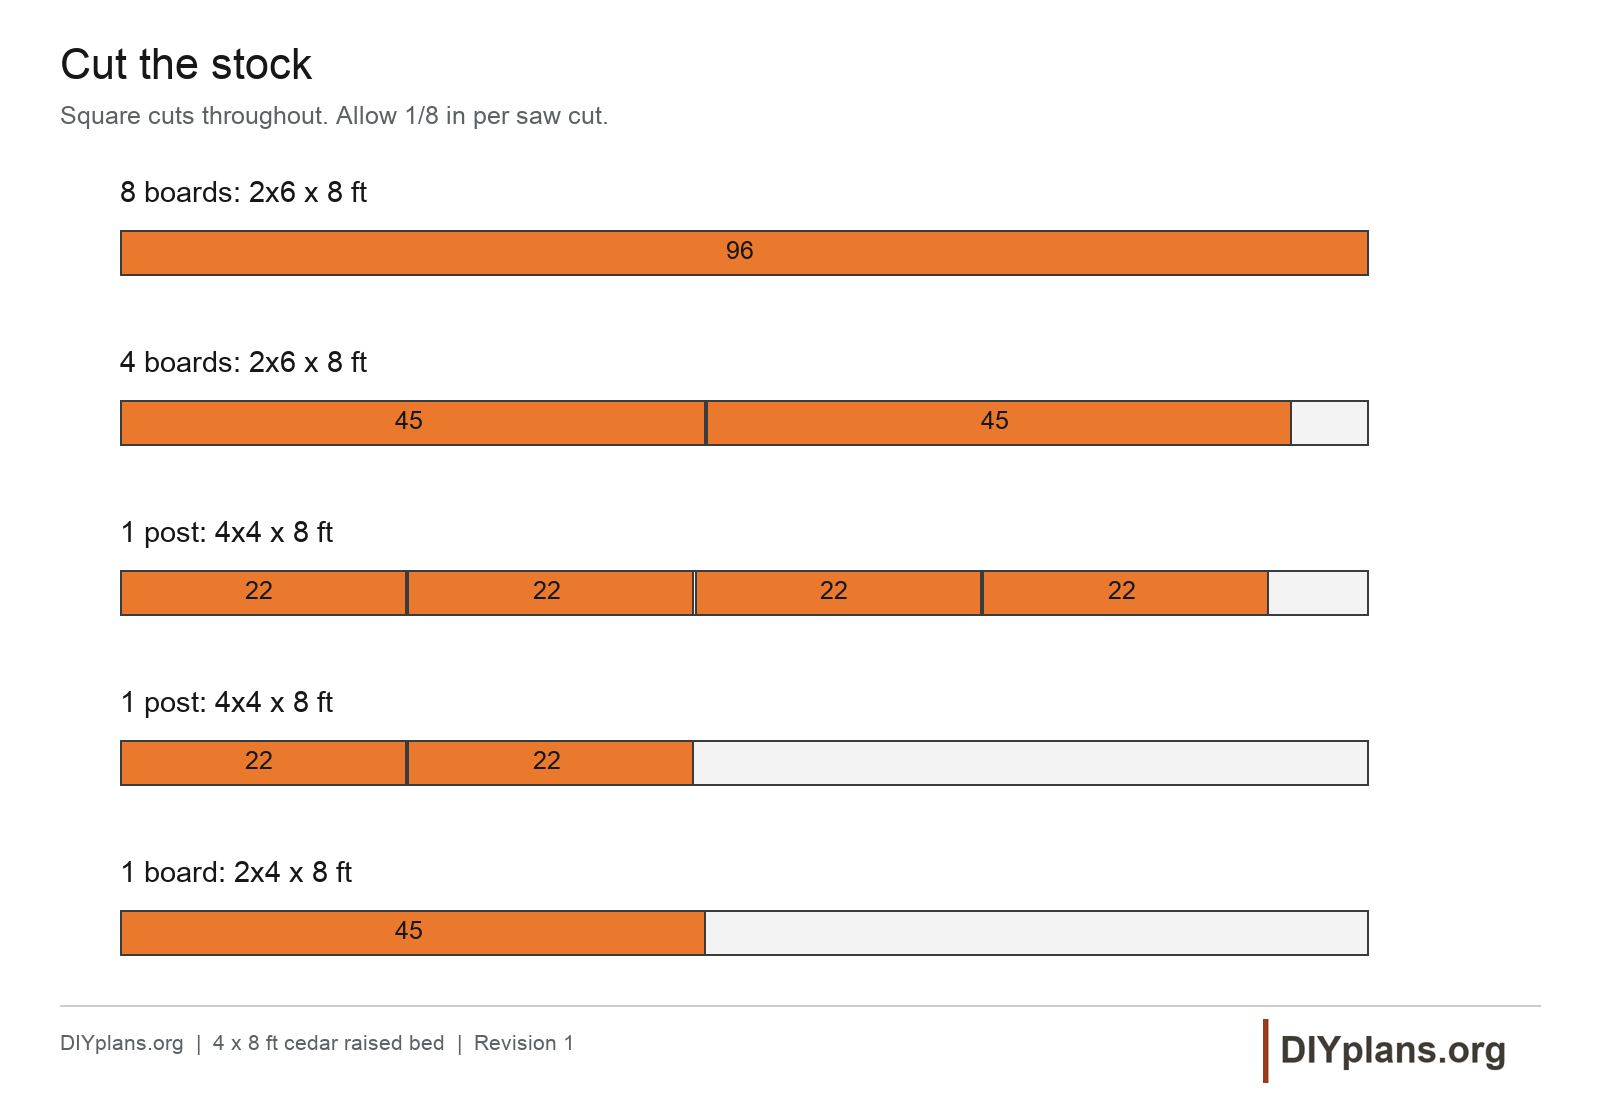
- Set aside eight sound 2x6 boards with a full 96 in usable length. Use longer stock if damaged ends need trimming.
- Cut eight 45 in end boards from four 8 ft 2x6 boards. Cut two ends from each board.
- Cut six 22 in posts from two 8 ft 4x4s. Cut four posts from one and two from the other.
- Cut one 45 in center tie from a 2x4. Sand sharp edges and label the parts.
Check: You have 8 long sides, 8 ends, 6 posts and 1 tie.
Step 3 Mark the screw centers
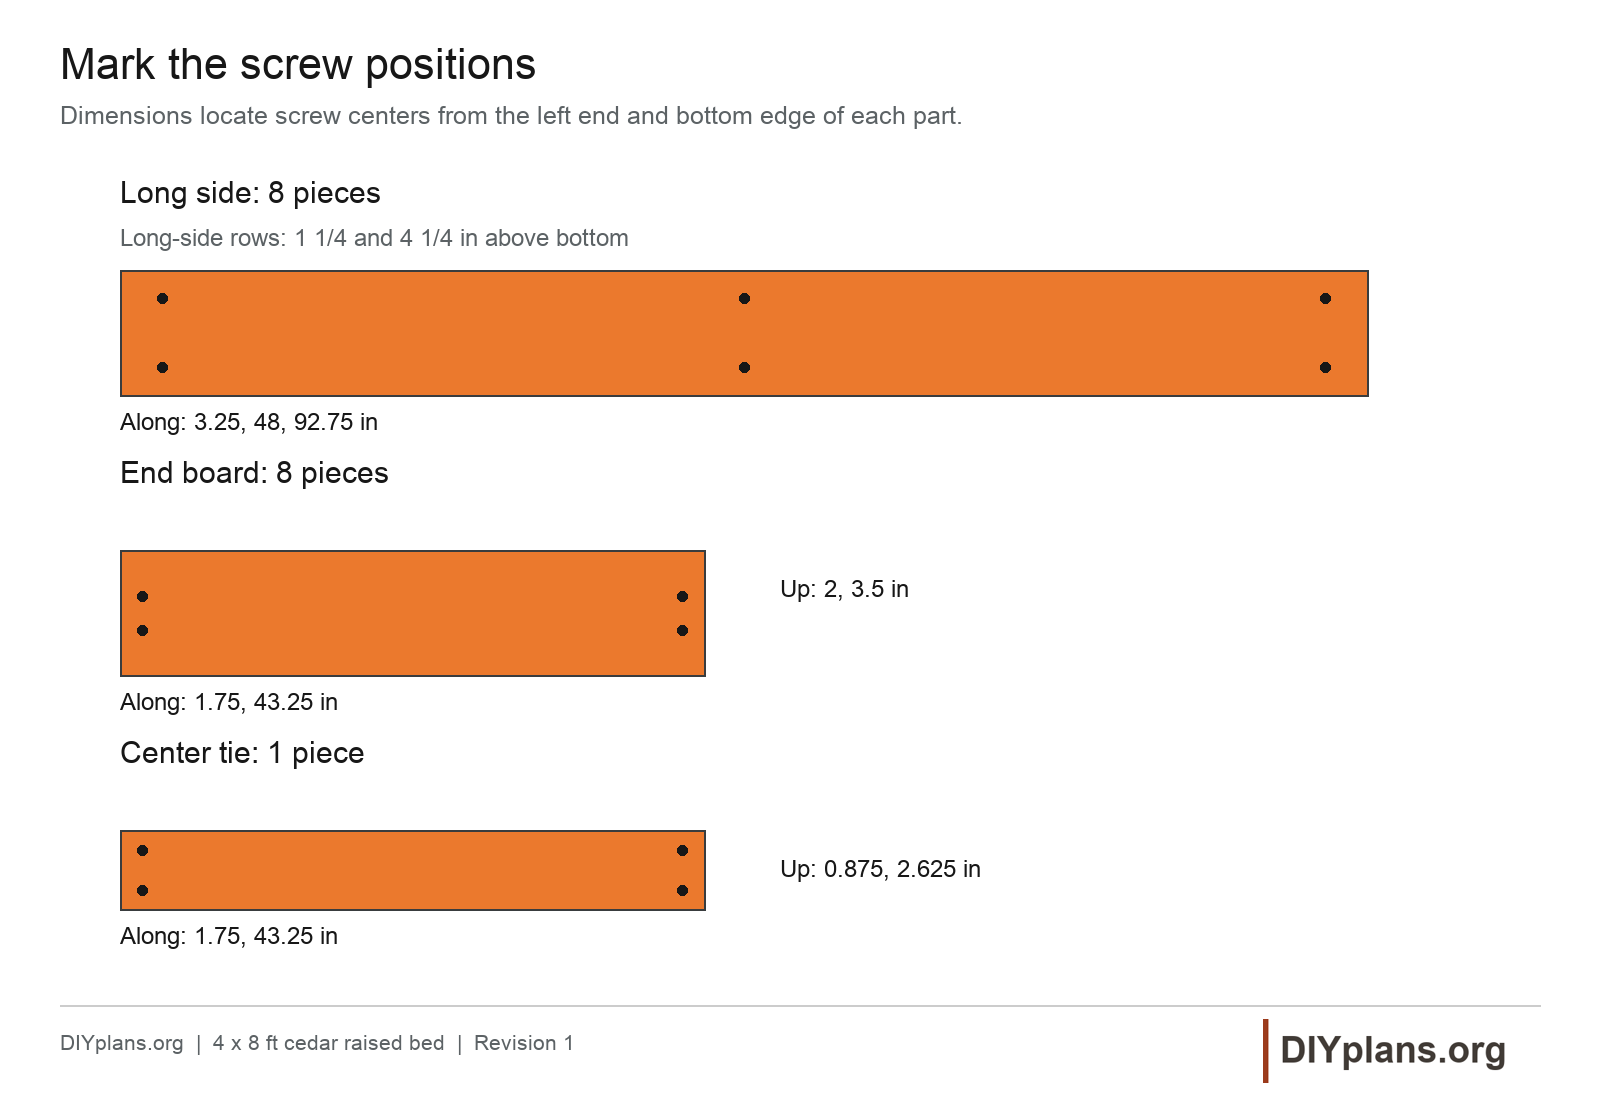
- Mark the long boards at 3 1/4, 48 and 92 3/4 in from one end. At each mark, locate screws 1 1/4 and 4 1/4 in above the bottom edge.
- Mark the end boards at 1 3/4 and 43 1/4 in from one end. Locate screws 2 and 3 1/2 in above the bottom edge.
- Mark the tie at 1 3/4 and 43 1/4 in from one end. Locate screws 7/8 and 2 5/8 in above its bottom edge.
- Use the screw maker's pilot and clearance-hole guidance for cedar. Clamp each joint before drilling into the post.
Check: Corner screw rows are staggered so the two directions do not collide.
Step 4 Attach the lower side boards
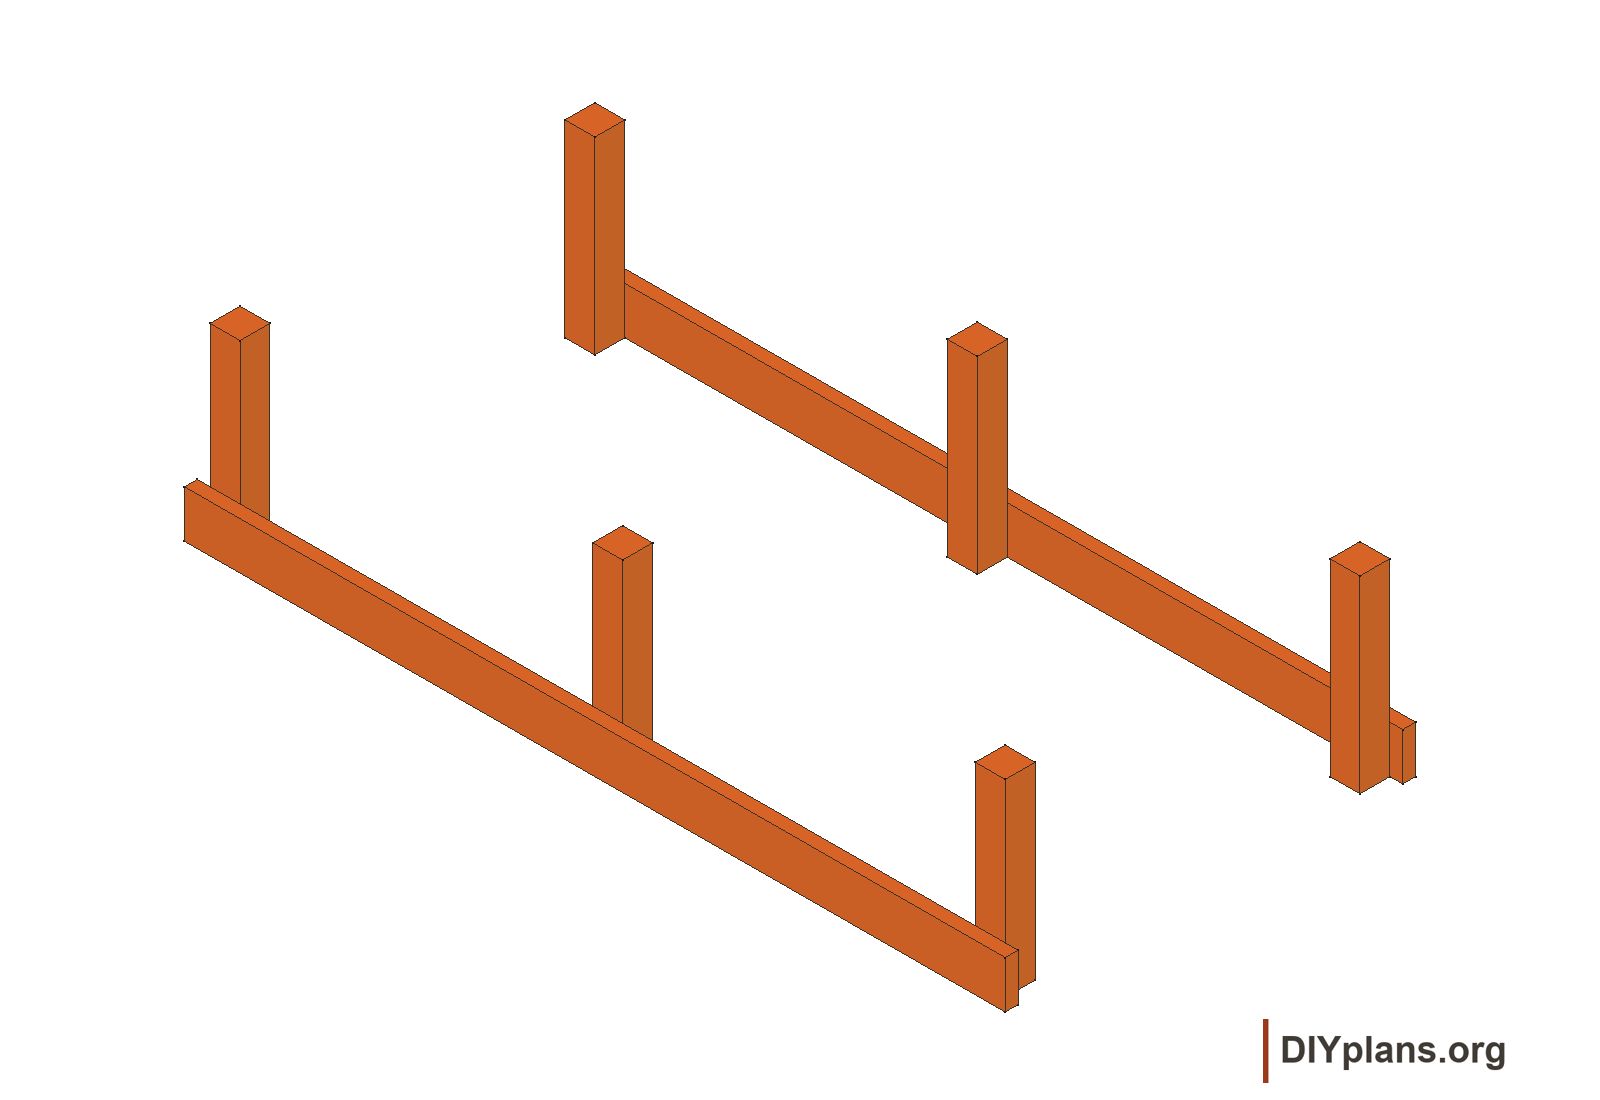
- Clamp three posts against the inside face of each bottom long board. Align all bottom edges.
- Set the corner posts 1 1/2 in from the board ends. Center the middle post at the 48 in mark.
- Support both assemblies upright on the prepared site. Drive two screws at each post, 12 screws across both sides. Keep temporary supports in place until the first course is closed.
Check: All six posts point upward and sit inside the footprint.
Step 5 Close and square the first course
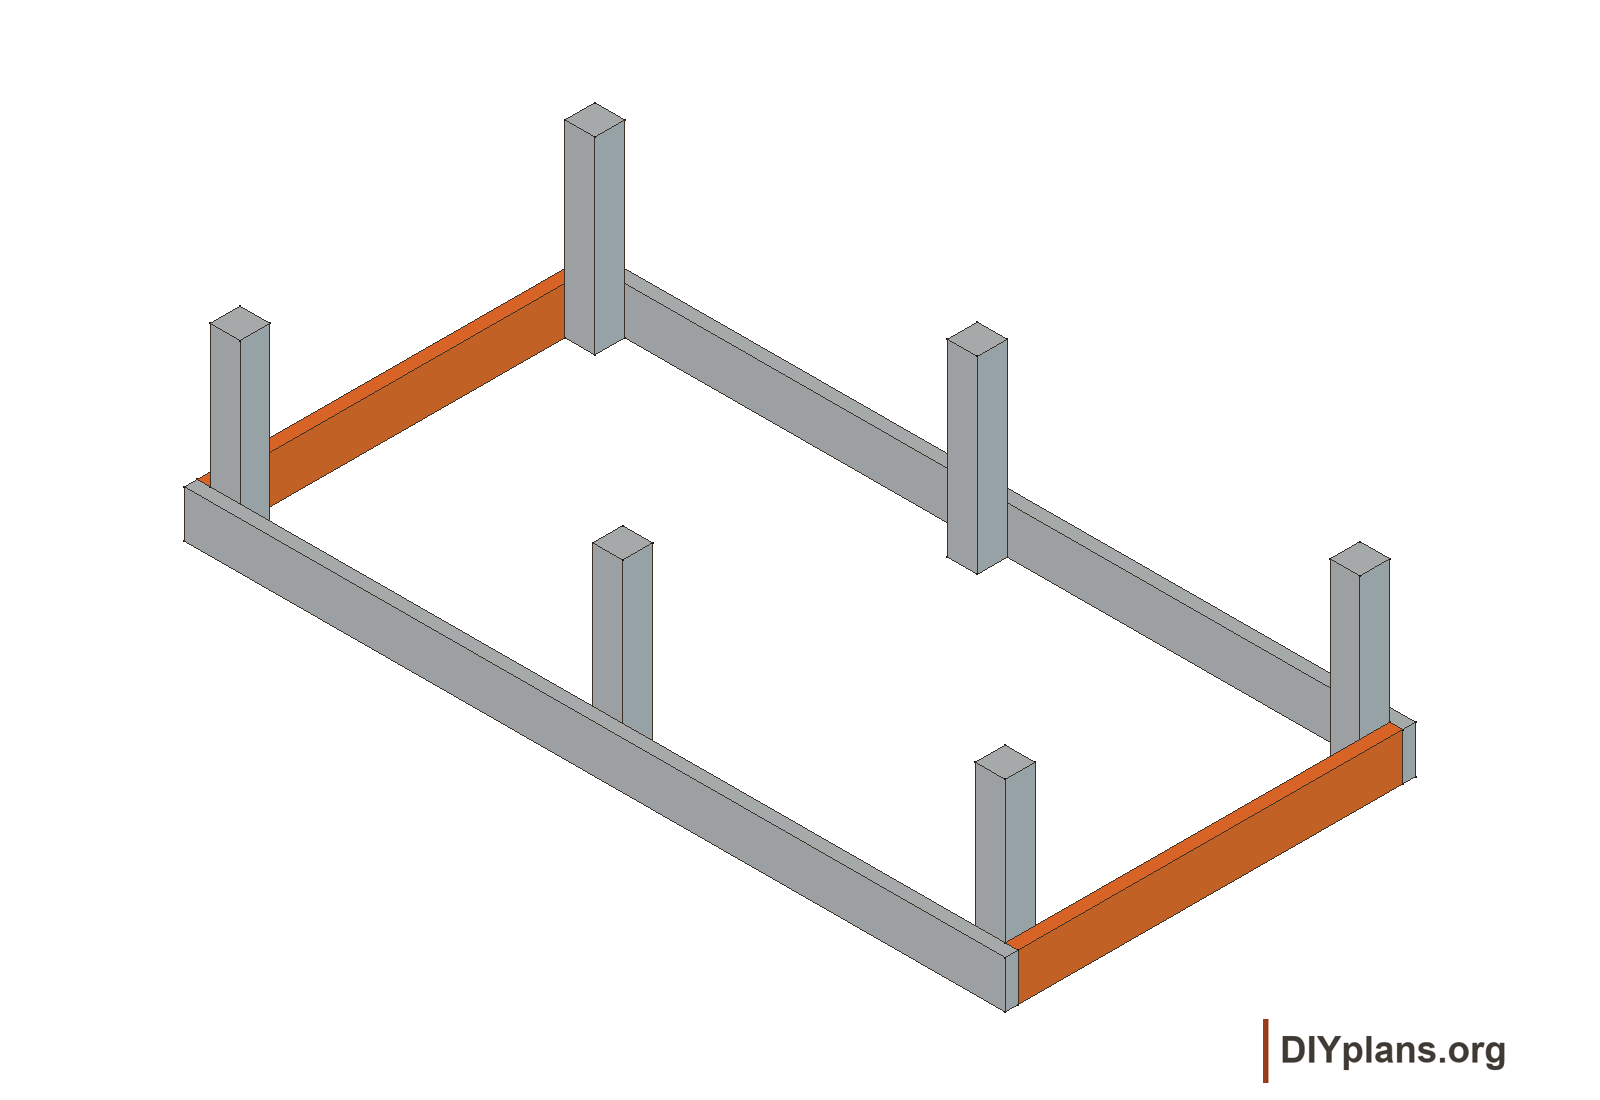
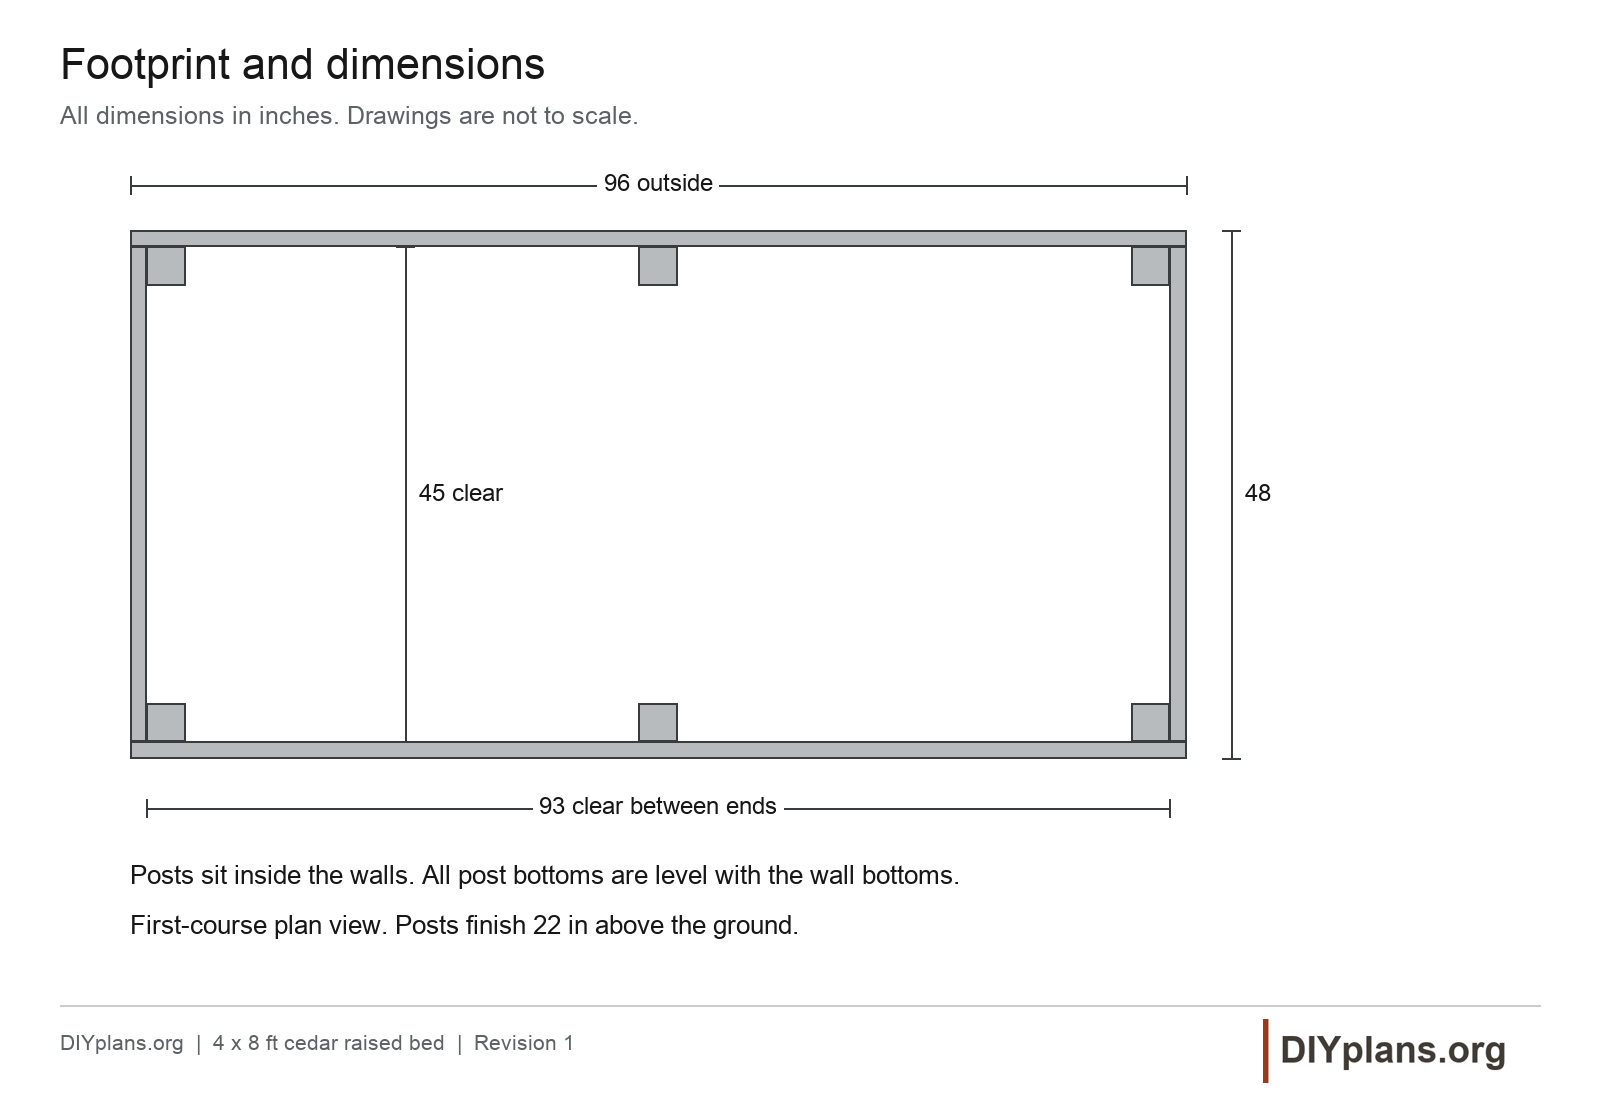
- Fit one 45 in end board between the long sides at each end. Keep the end boards flush with the long-board ends.
- Clamp the corners. Check the 96 x 48 in outside dimensions and equal diagonals.
- Drive two screws through each end board into each corner post, 8 screws total. Recheck level before removing temporary supports.
Check: The inside opening is 93 x 45 in, with the posts inside its corners and sides.
Step 6 Add the next two courses
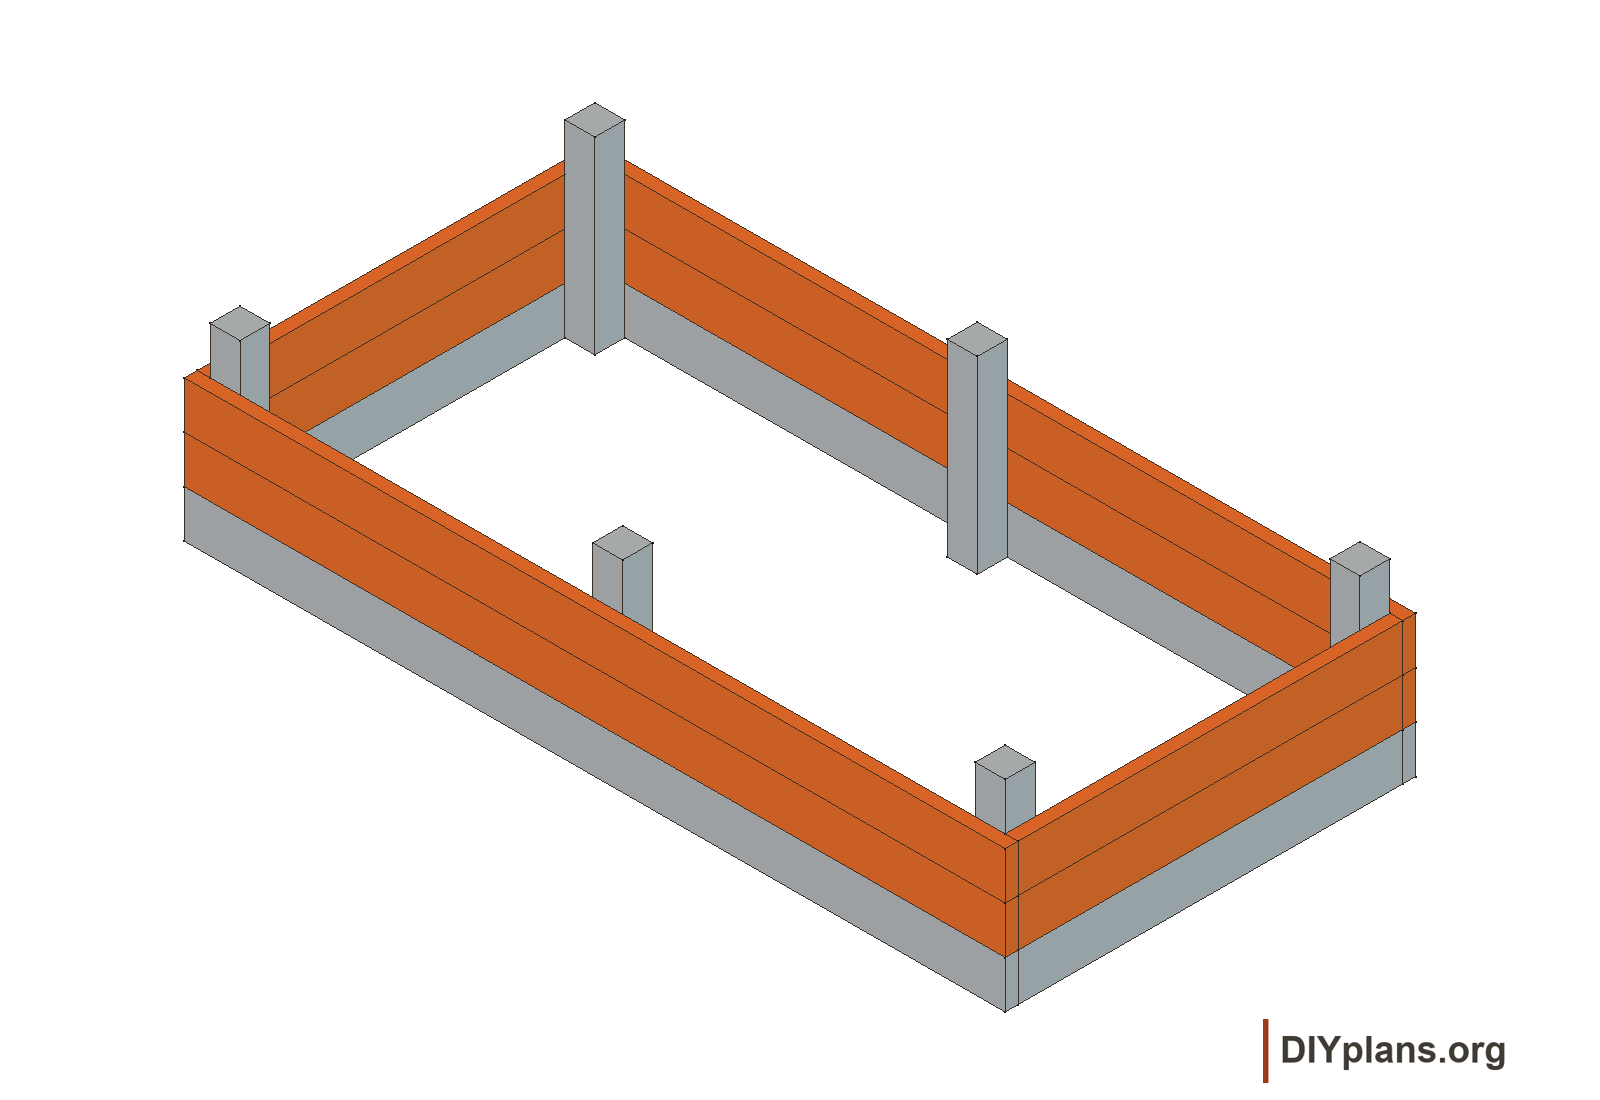
- Stack the second course directly on the first. Align the square corner joints and fasten each long board at all three posts.
- Fasten the two end boards to the corner posts. Use 20 screws for the complete course.
- Repeat for the third course. Keep the upper post faces clear for the tie.
Check: Three courses reach 16 1/2 in above the ground.
Step 7 Attach the center tie
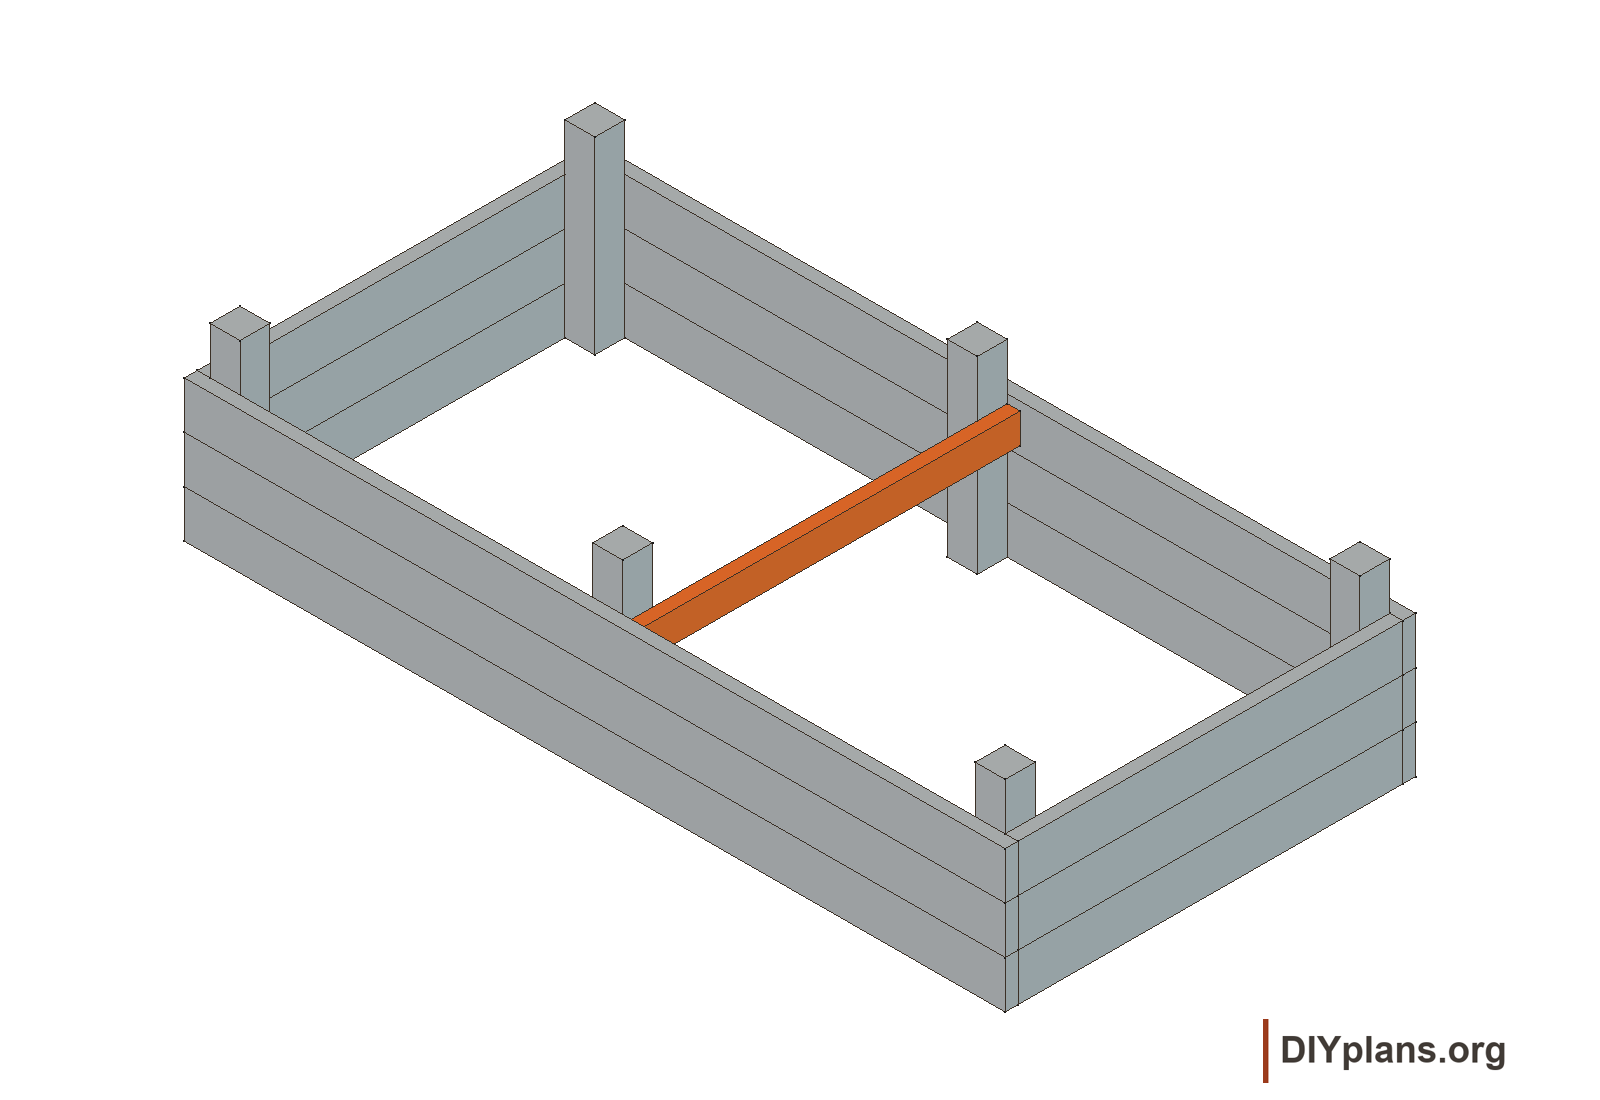
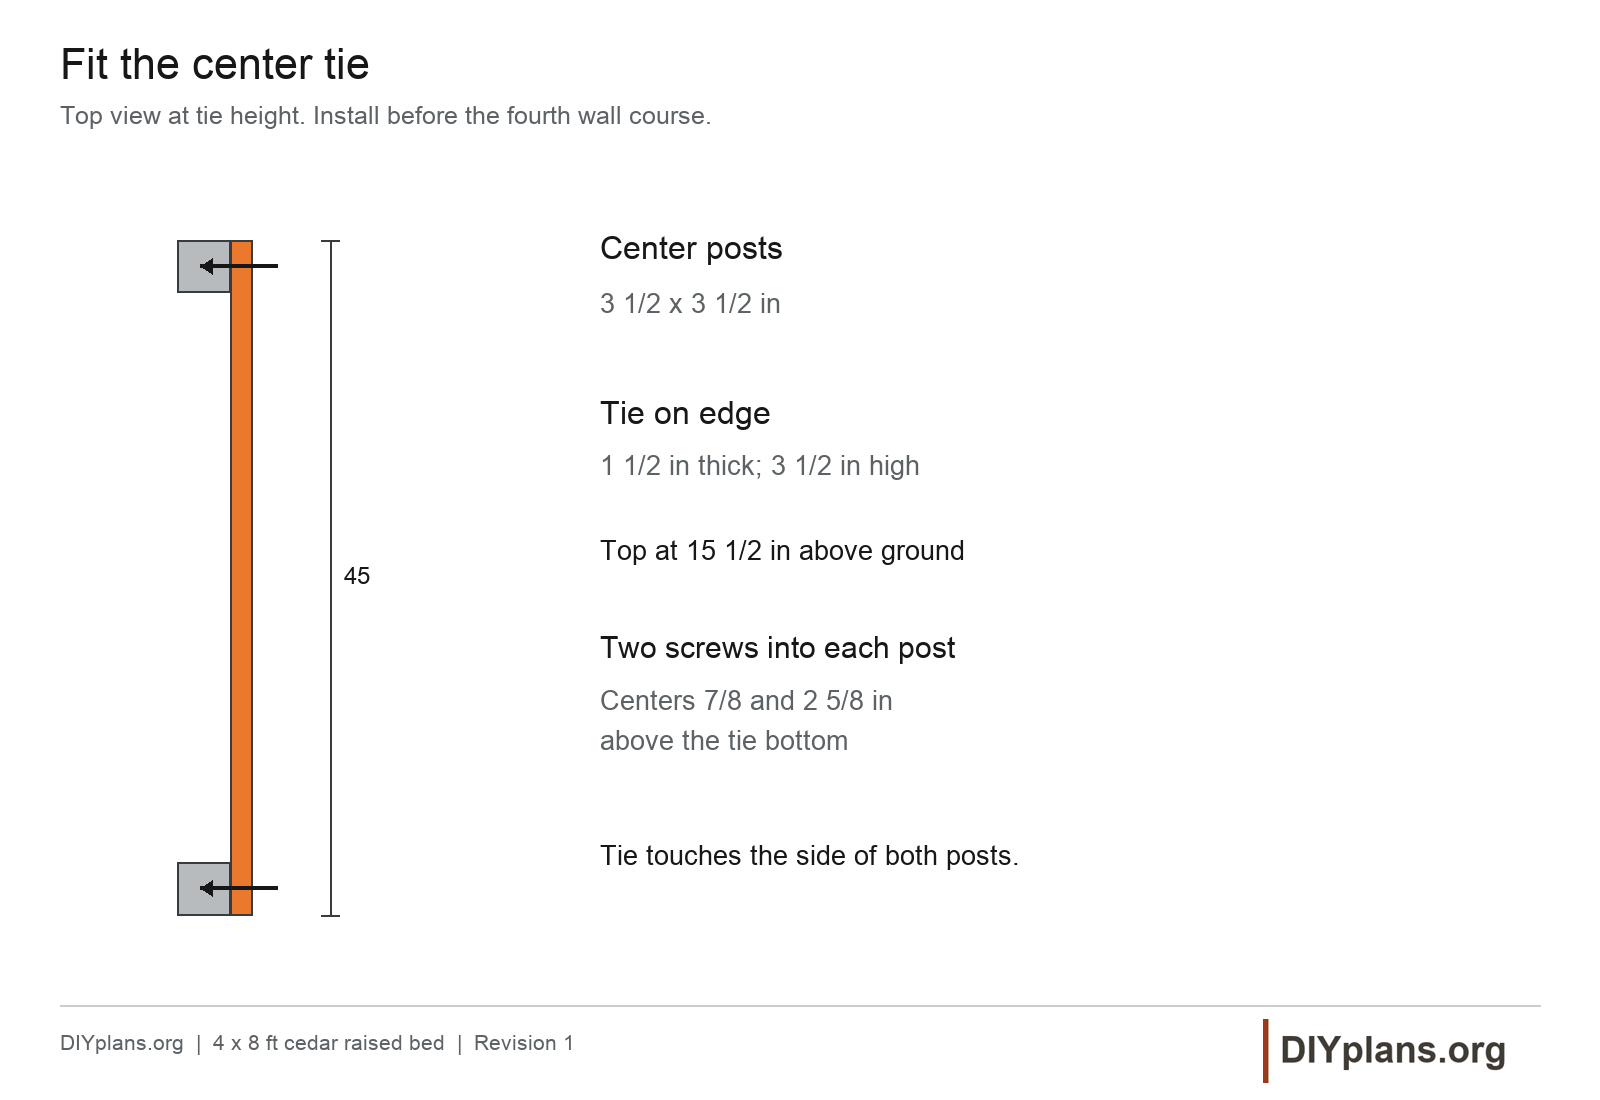
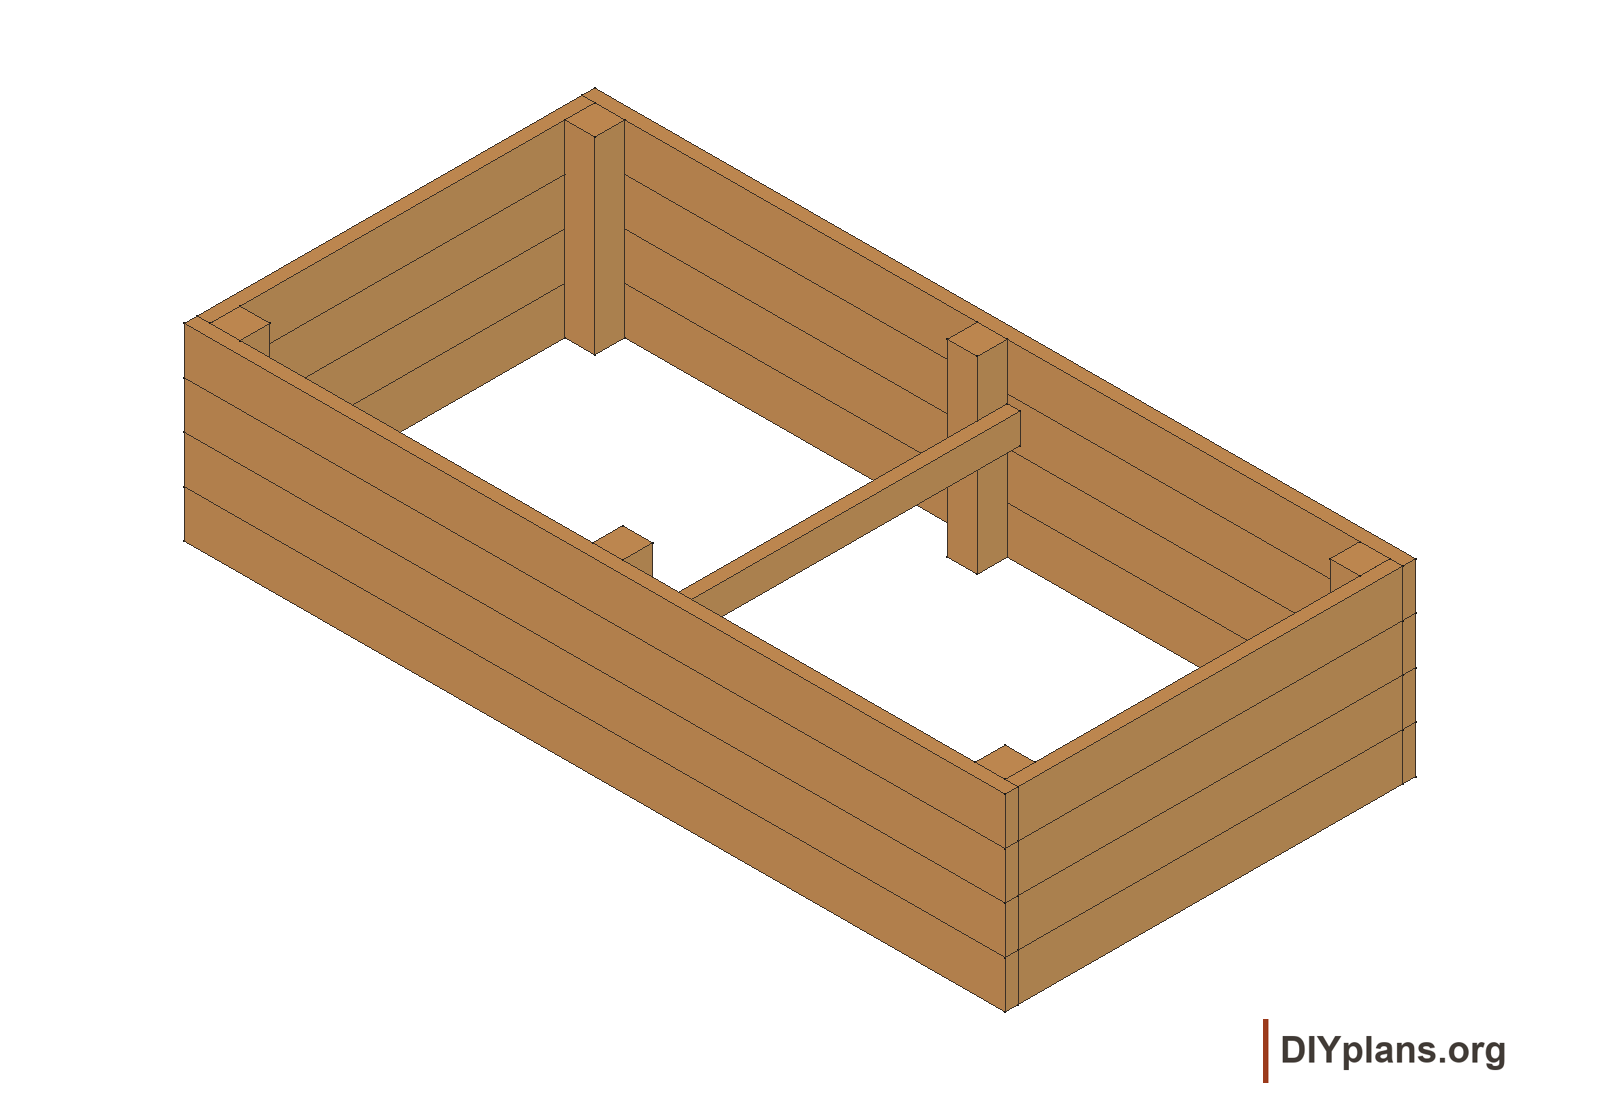
- Set the 45 in tie on edge beside the two middle posts. Place it on the same side of both posts so it spans straight across the bed.
- Clamp the tie with its top 15 1/2 in above the ground. Its ends touch the inside faces of the long walls.
- Drive two screws through the tie into each middle post, 4 screws total. Keep the screw heads flush.
Check: The tie sits against both middle posts and below the third-course top.
Step 8 Complete the top course
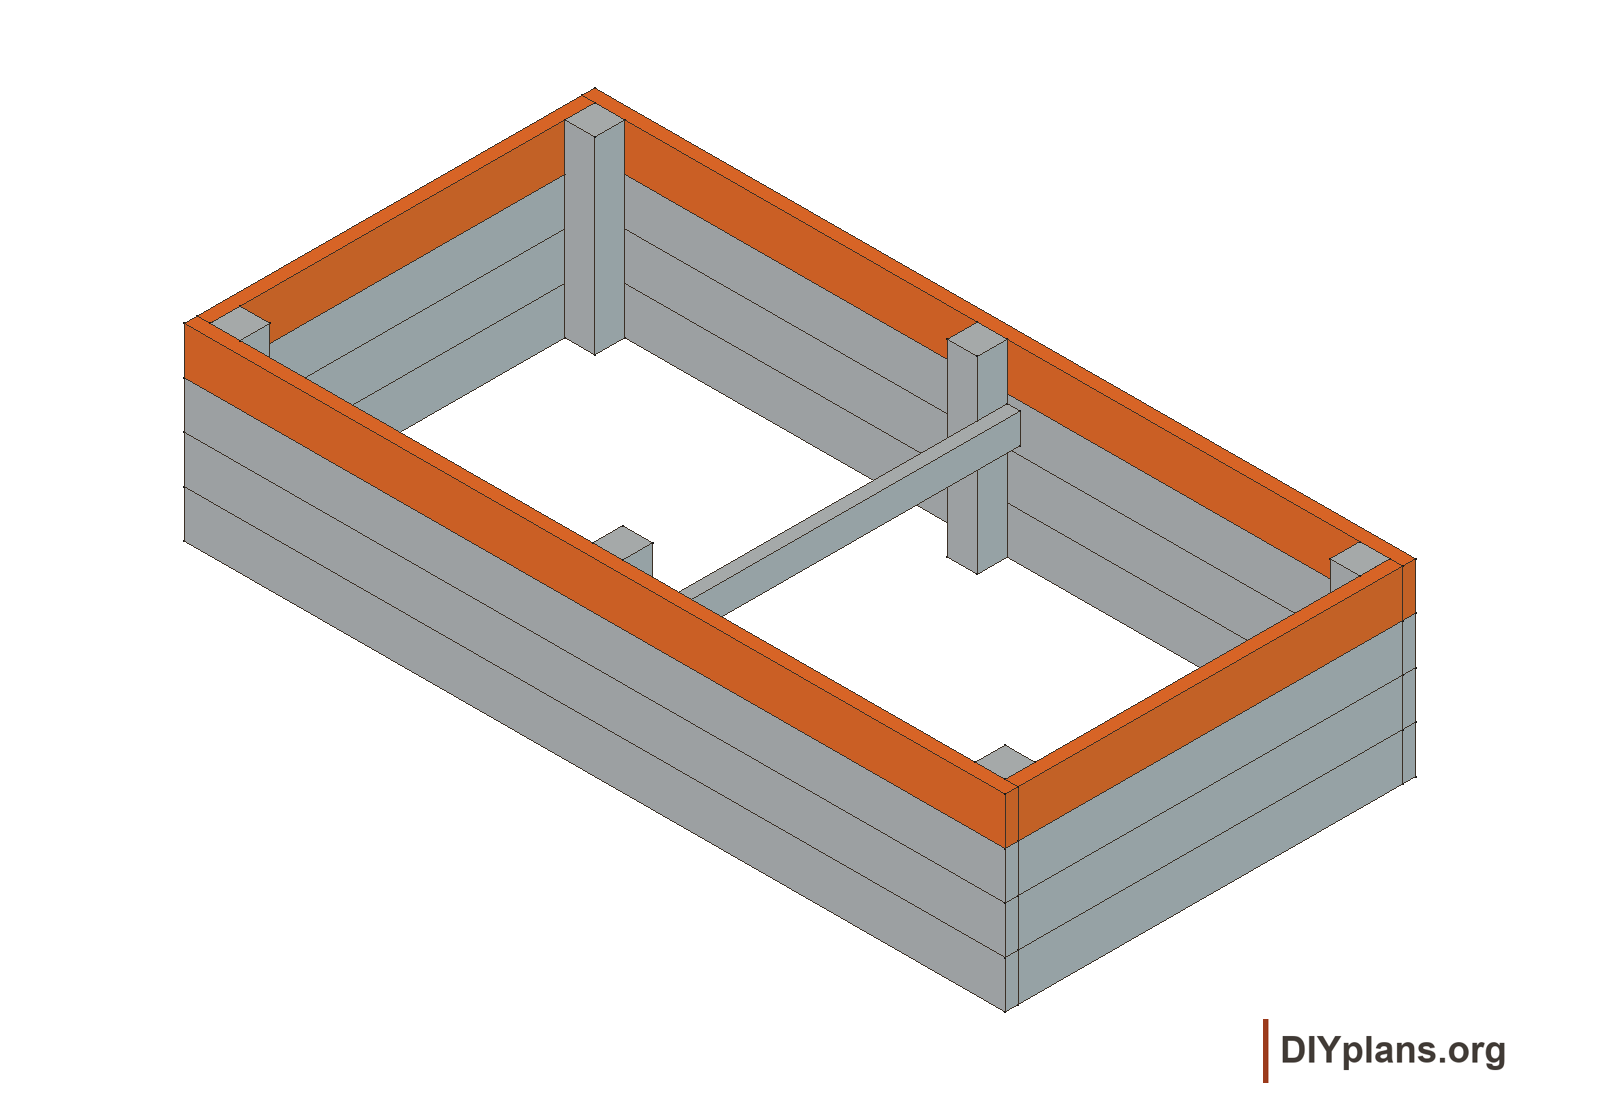
- Install the fourth pair of long boards and both end boards, using 20 screws.
- Check that the wall tops and all six posts finish at 22 in.
- Check for protruding screw tips, loose joints and sharp edges. Confirm the completed frame remains level.
Check: The bed is square, with four continuous courses and 84 screws installed.
Step 9 Fill and check drainage
- Loosen compacted soil inside the frame without undermining its support. Keep the bottom open; do not add a sealed liner or gravel reservoir.
- Place the bed in its final position before filling. Add suitable raised-bed soil evenly in shallow layers on both sides of the tie.
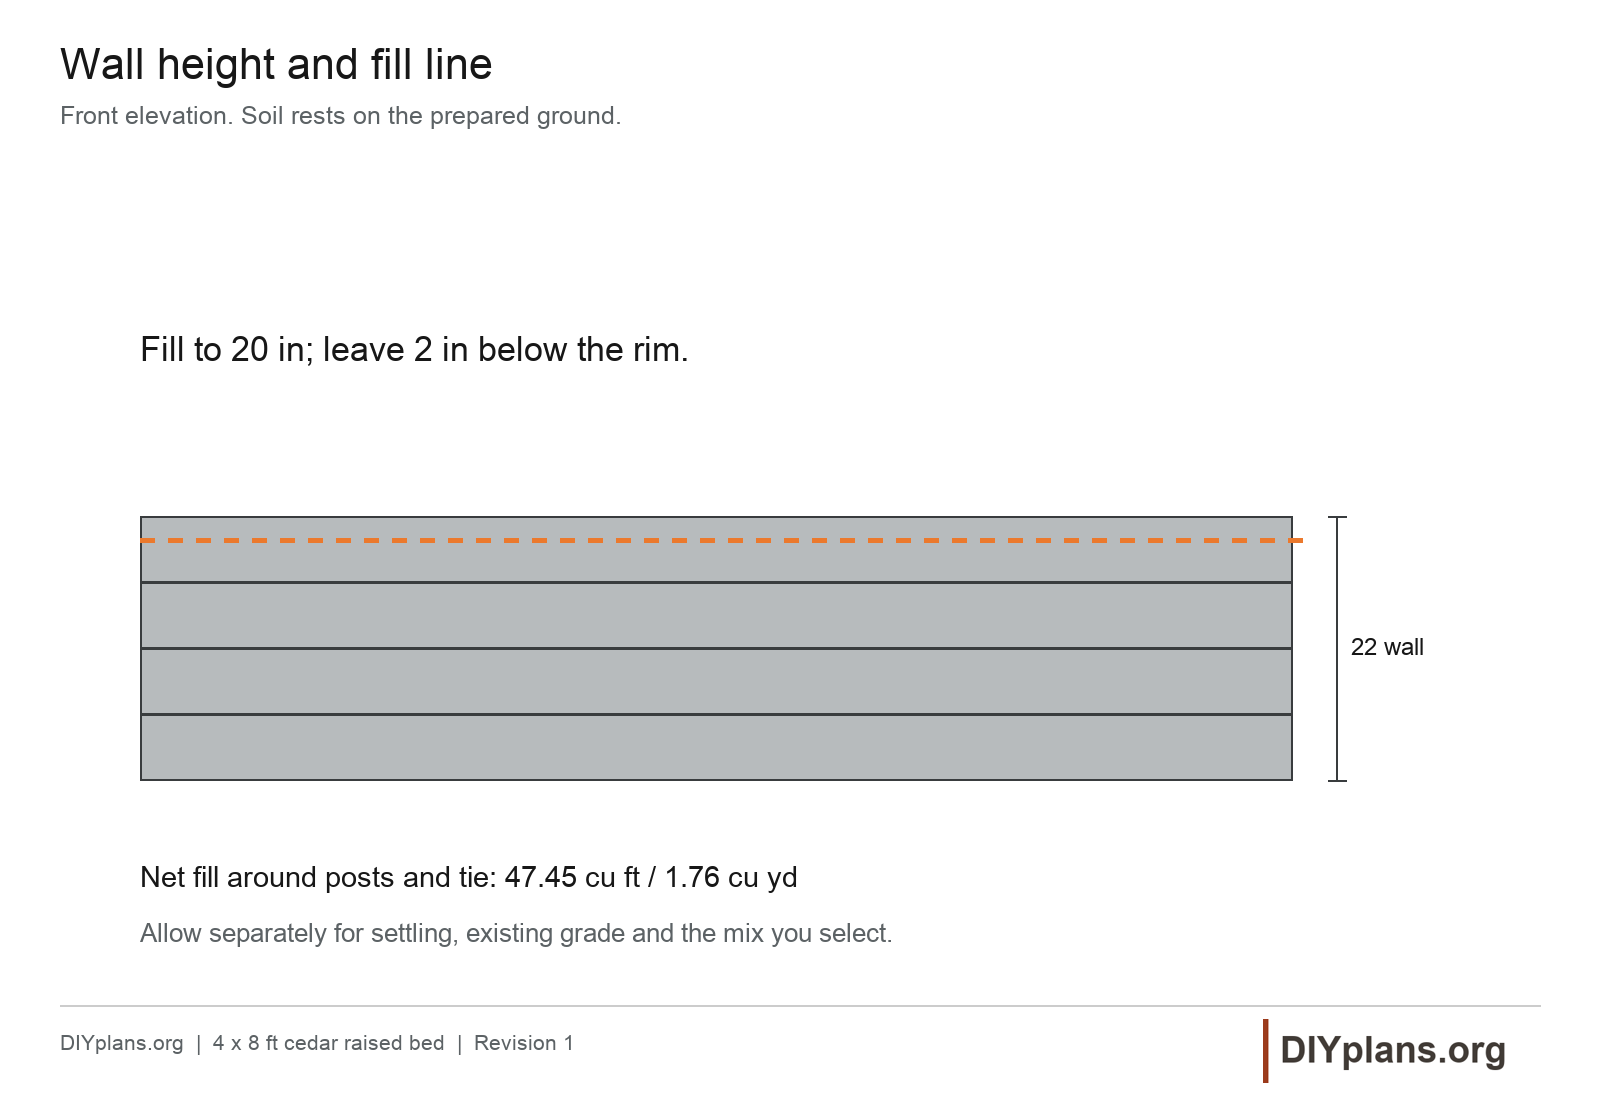
- Stop at 20 in above the base, 2 in below the rim. The modeled space needs about 47.45 cu ft, or 1.76 cu yd, before settling and site adjustments.
- Water lightly and watch for standing water, wall bowing or loose connections. Stop adding soil and correct any movement or drainage problem.
Check: Water drains into the ground and the walls remain straight. Do not sit or stand on the rim.