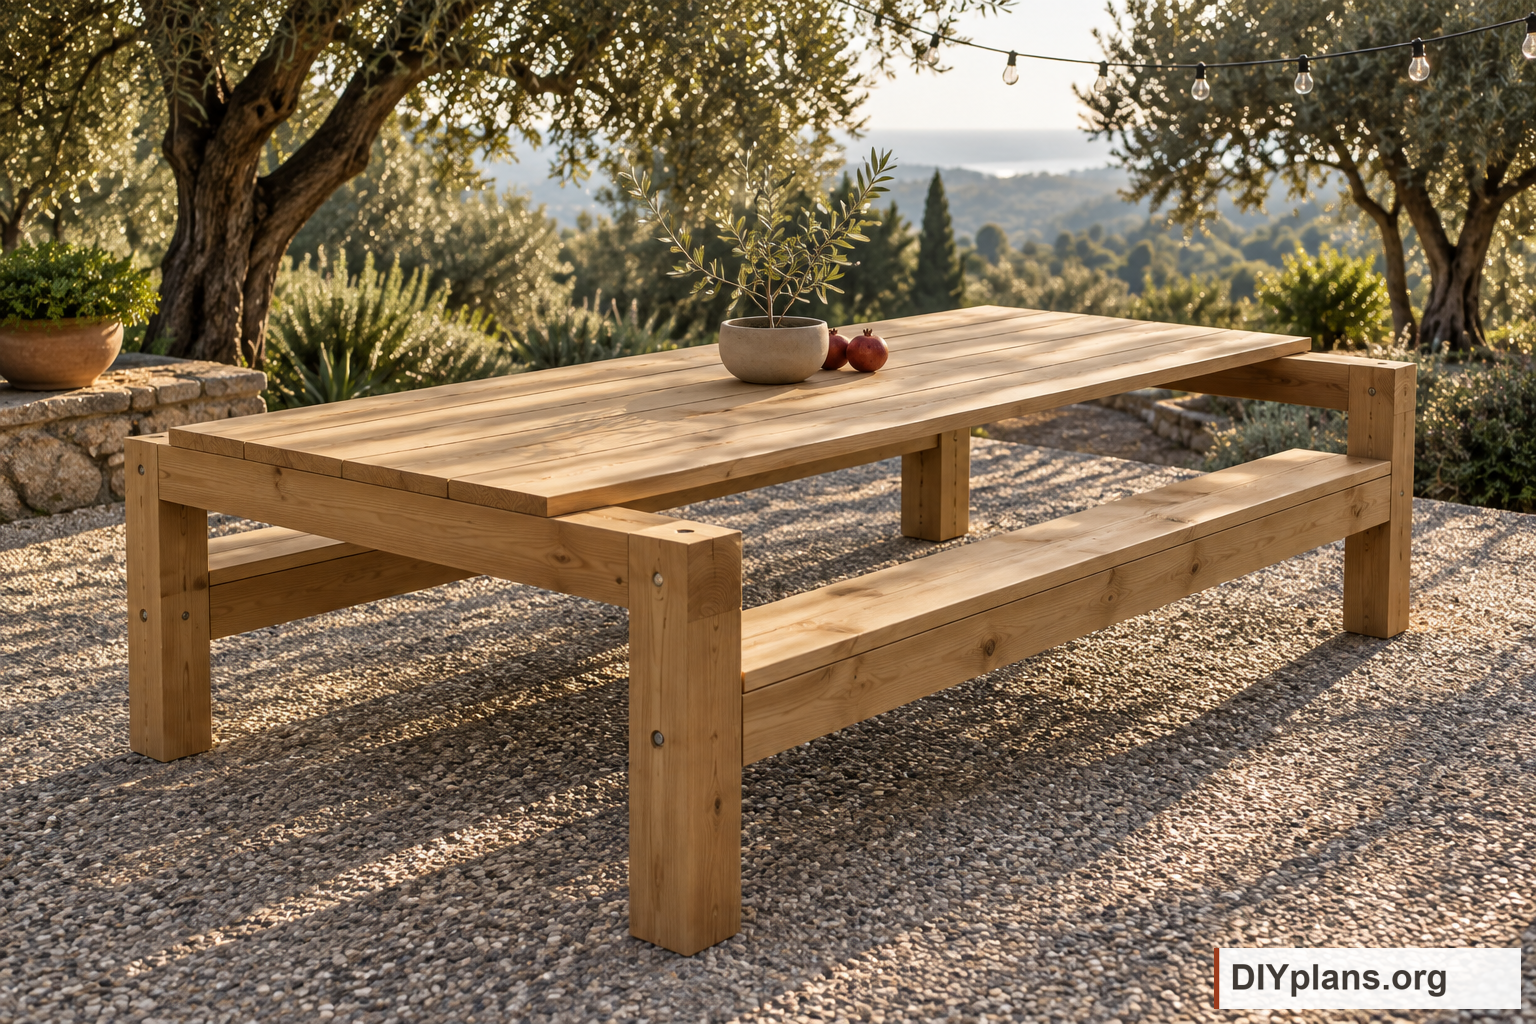
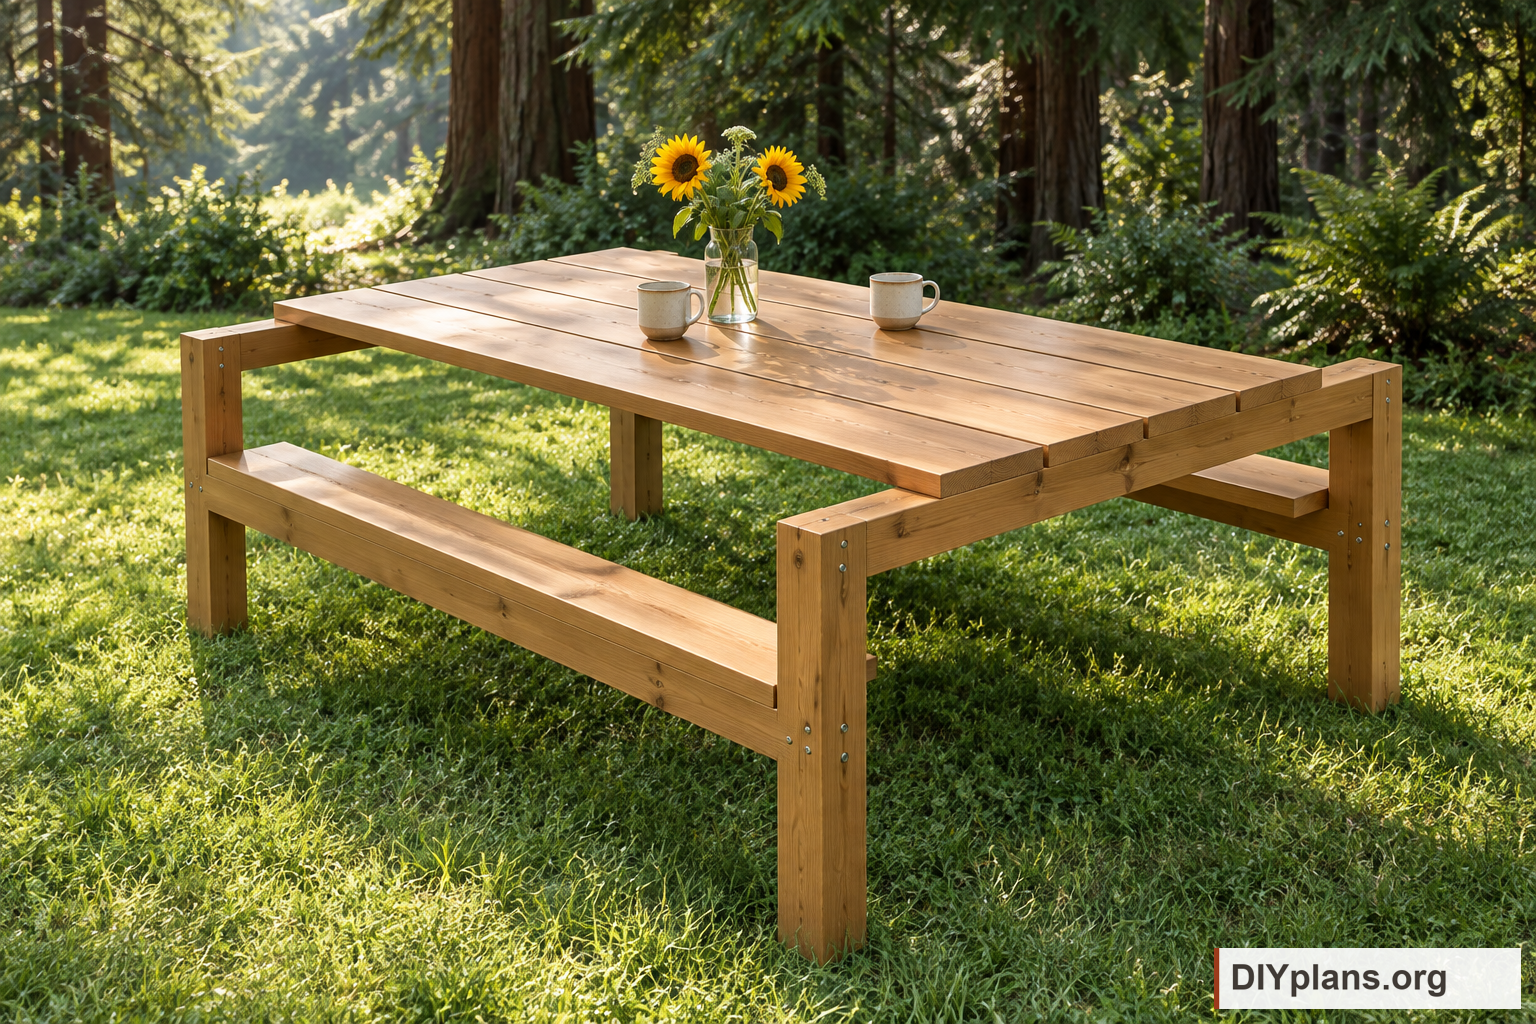
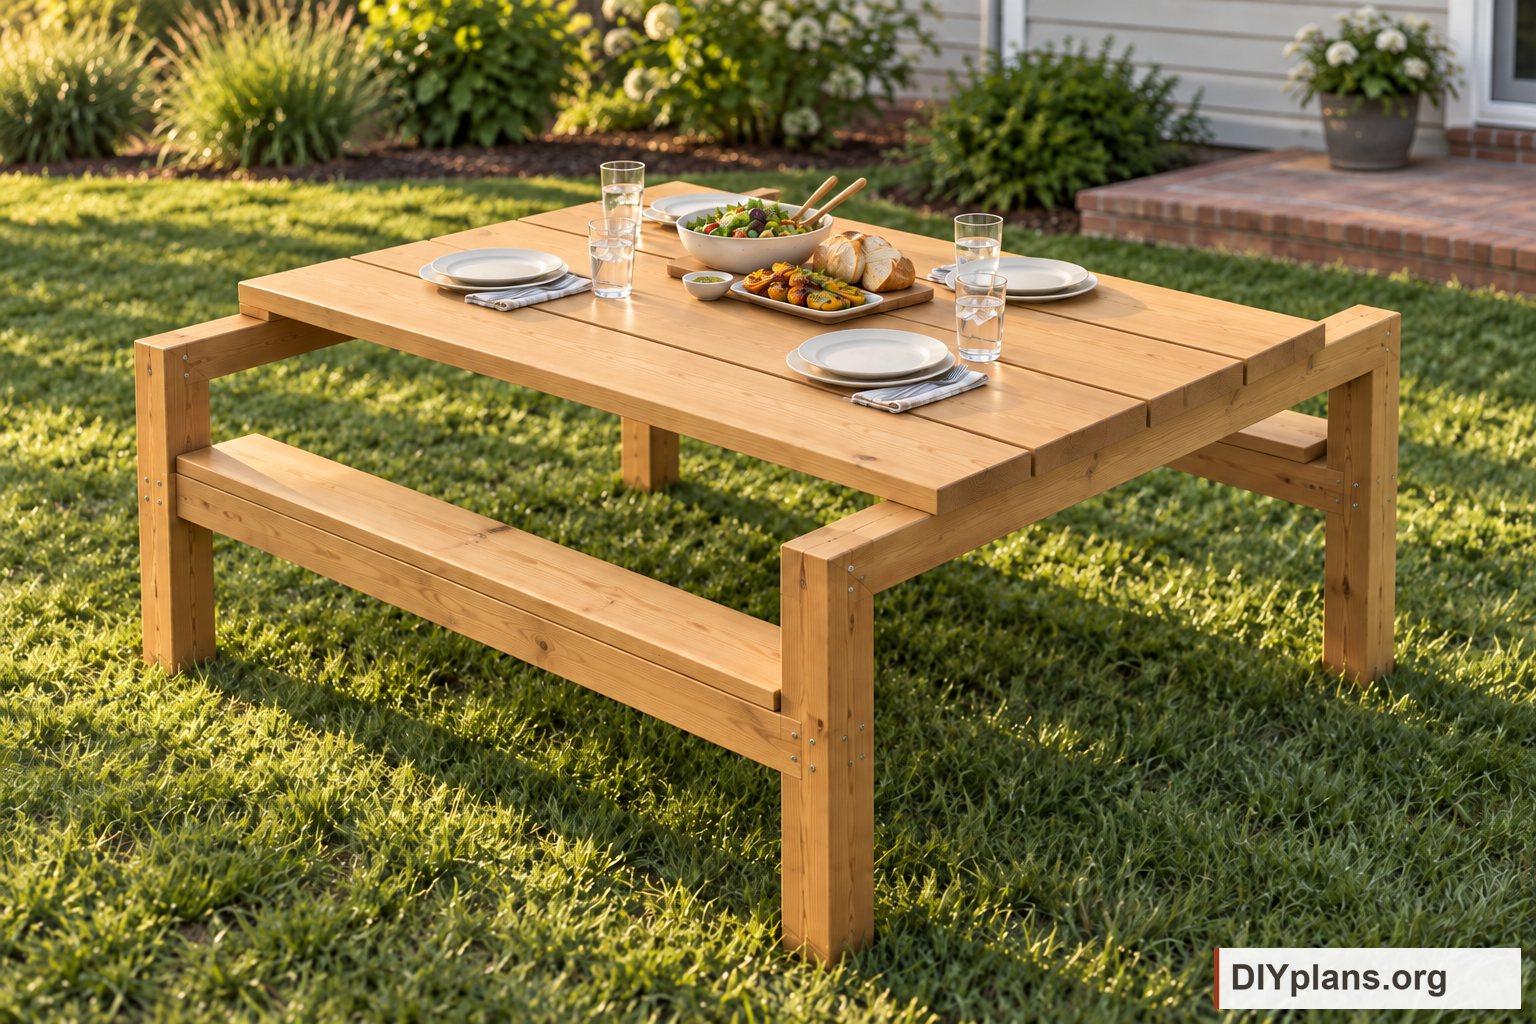
BEFORE YOU BUILD
Use this work at your own risk
These files have not been checked for accuracy, safety, structural adequacy, or building-code compliance. They may contain serious errors and are not construction-ready. Obtain independent qualified design and review before building.
No person or organization makes any guarantee or warranty, express or implied, regarding this design, its documentation, digital files, or website views. They are not professional services and do not create an architect-client or other professional-client relationship. No promise is made about accuracy, completeness, reliability, code compliance, or fitness for your project.
Buildings and building projects are complex, and many things can go wrong. You are responsible for checking dimensions and site conditions, choosing suitable materials and methods, obtaining permits, following codes and manufacturer instructions, and getting qualified professional help when needed. To the fullest extent permitted by law, DIYPlans.org disclaims liability for damages resulting from use of this work. Read the FAQ about your responsibilities.
Instructions
Step 1 Cut and label the stock
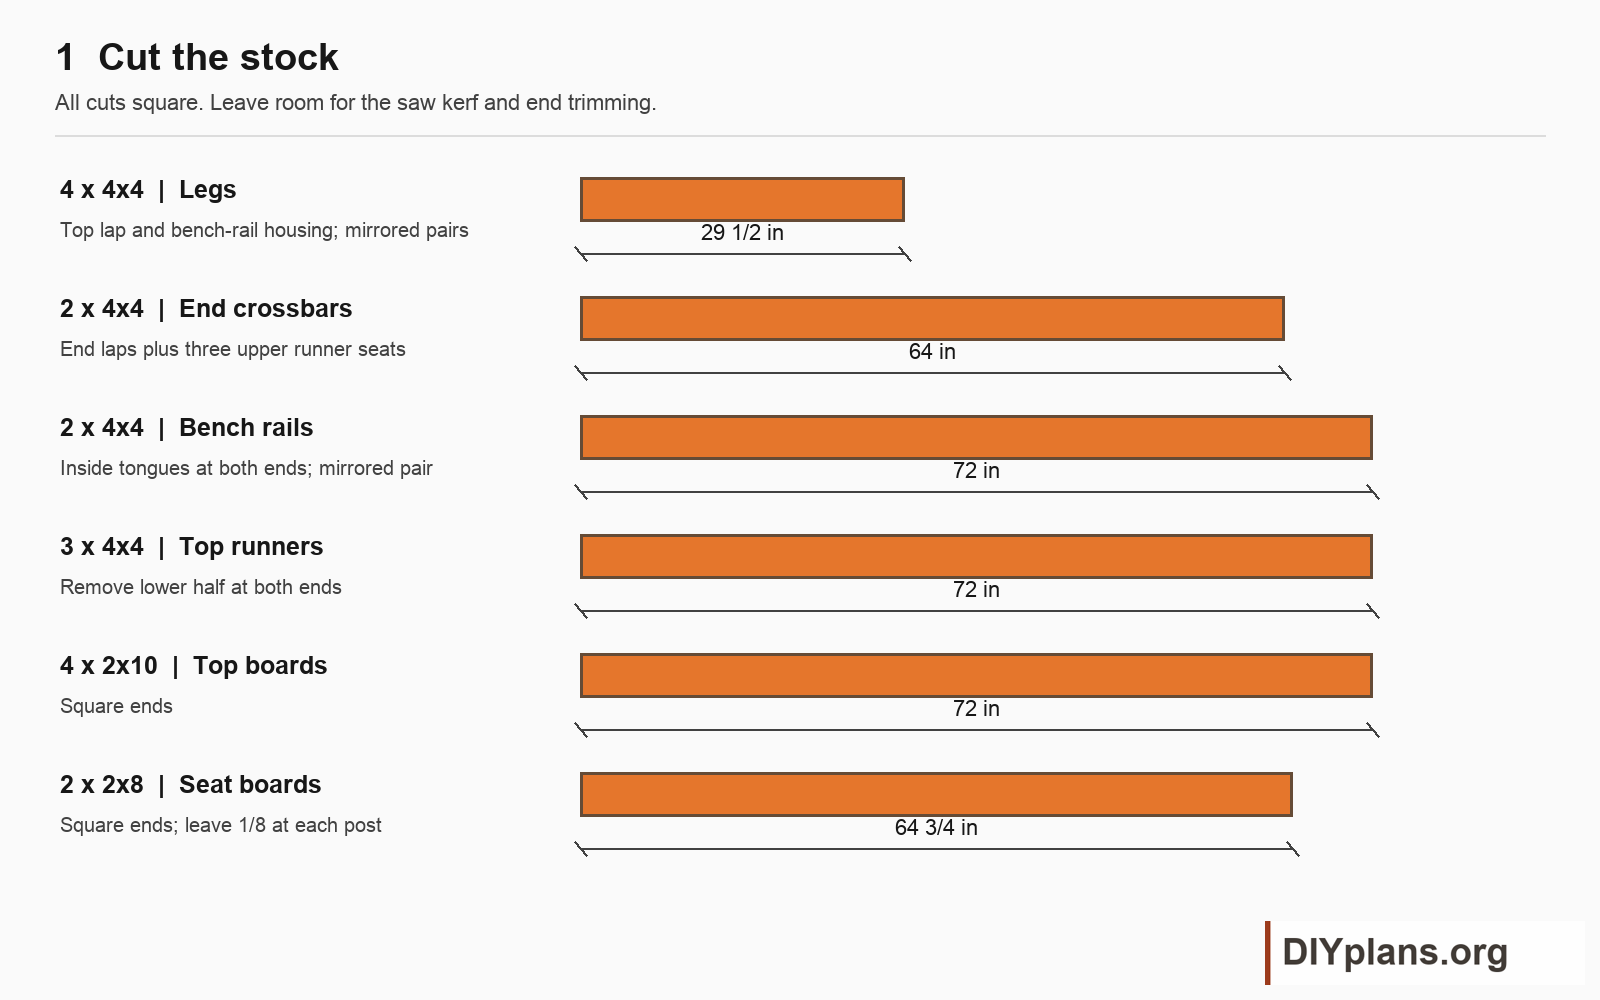
- Cut four 4x4 legs to 29 1/2 inches, two crossbars to 64 inches, and five rails to 72 inches.
- Cut four 2x10 top boards to 72 inches and two 2x8 seat boards to 64 3/4 inches.
- Label the two bench rails separately from the three top runners. Mark the outside and bottom faces of all four legs before laying out mirrored joints.
Check: You have 17 wooden parts with square ends and matching pairs.
Step 2 Cut the leg and crossbar joints
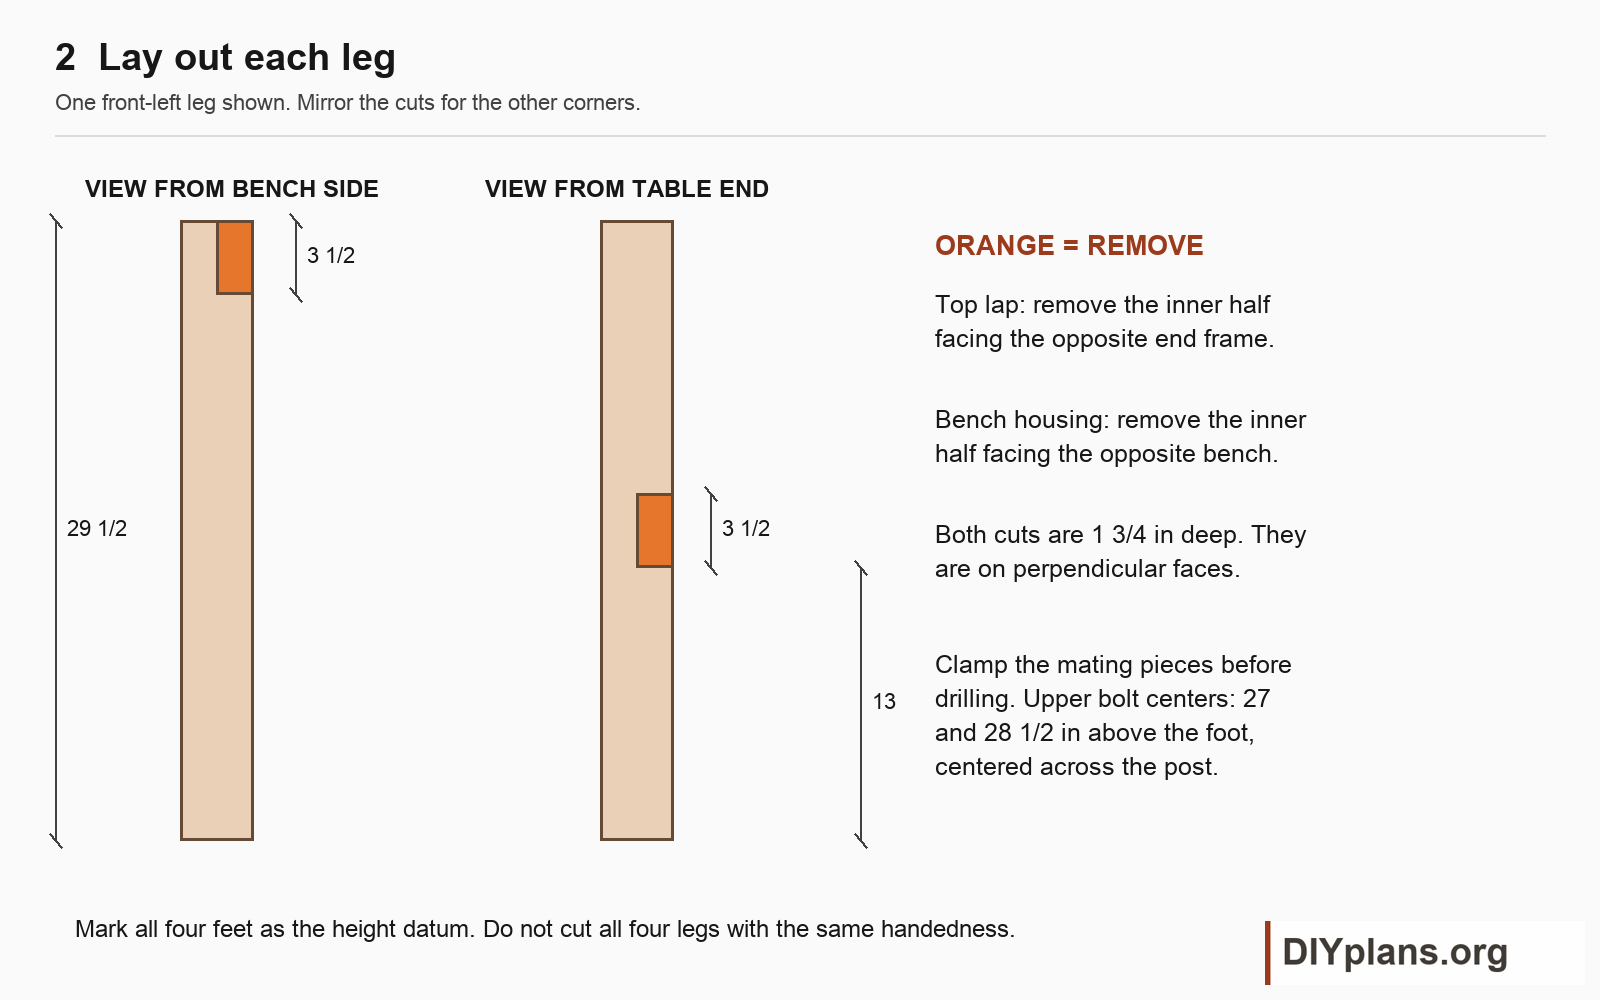
- Mark each leg's top lap from 26 to 29 1/2 inches above the foot. Remove 1 3/4 inches from the face pointing toward the opposite end frame. Keep the outer half.
- Mark the bench housing from 13 to 16 1/2 inches above the foot. Remove 1 3/4 inches from the face pointing across the table toward the opposite bench. The two leg cuts are on perpendicular faces.
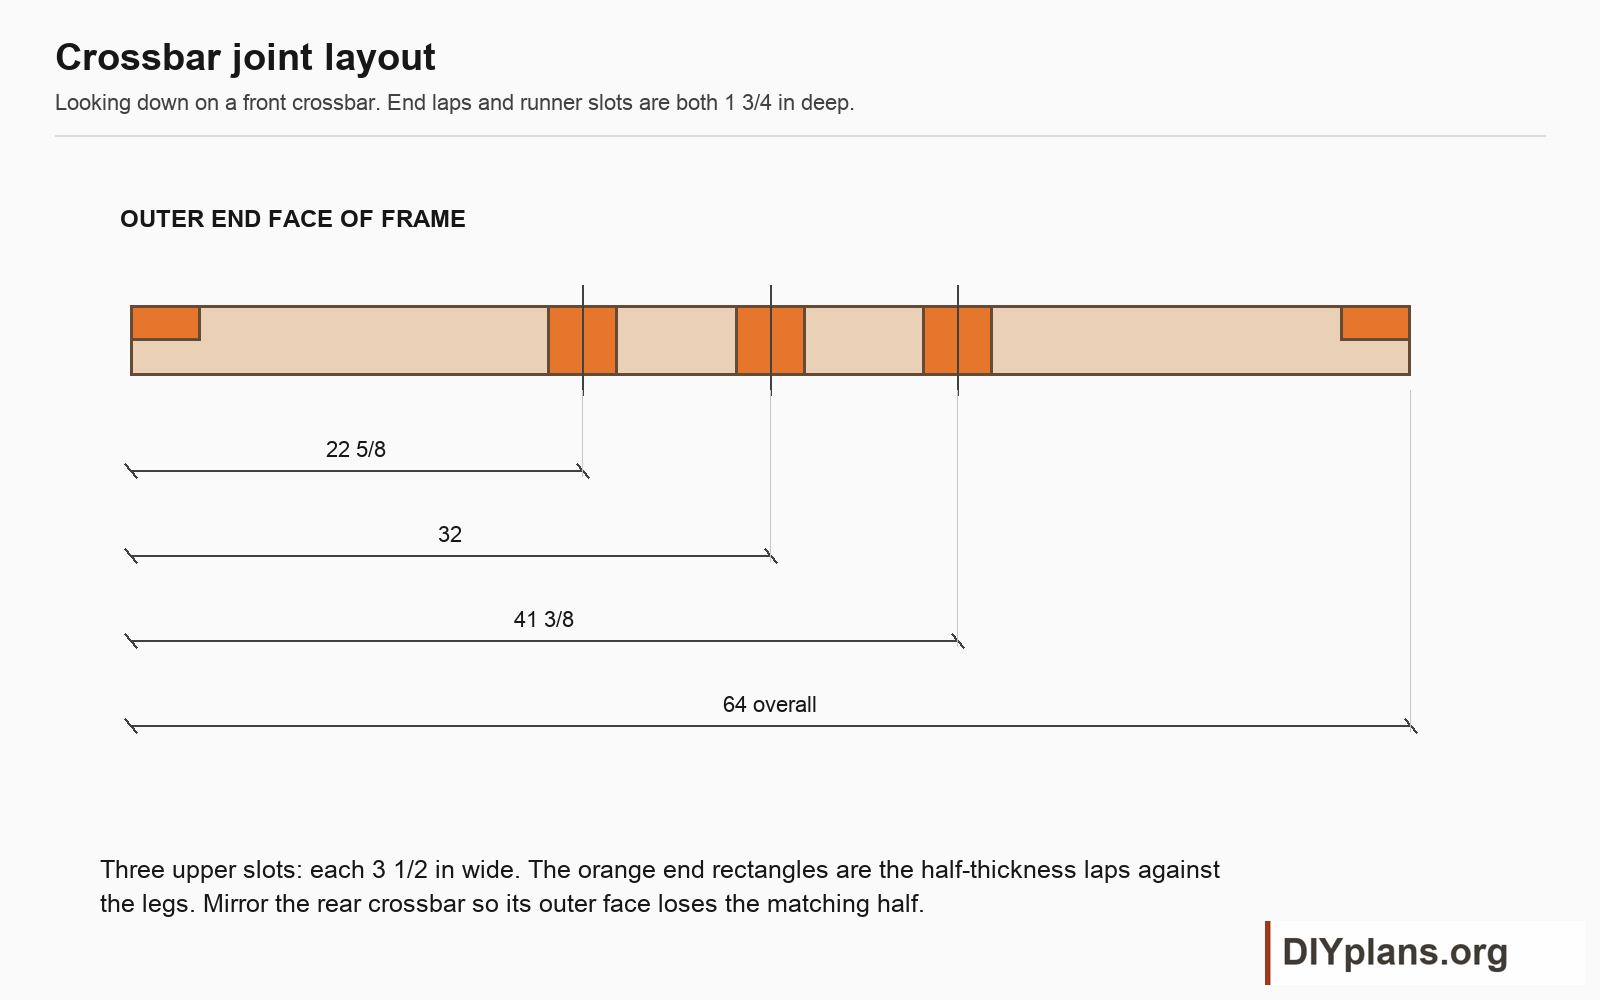
- At both ends of each crossbar, remove the outer half of its 3 1/2-inch thickness for 3 1/2 inches along the bar. This leaves an inner tongue that mates with the leg's outer tongue.
- Cut three slots down from each crossbar's top, 3 1/2 inches wide and 1 3/4 inches deep. Their centerlines are 22 5/8, 32 and 41 3/8 inches from the same left end. Test each joint on an offcut first.
Check: The dry-fit upper joints finish flush and the bench shoulders are all 13 inches above the feet.
Step 3 Bolt the two end frames
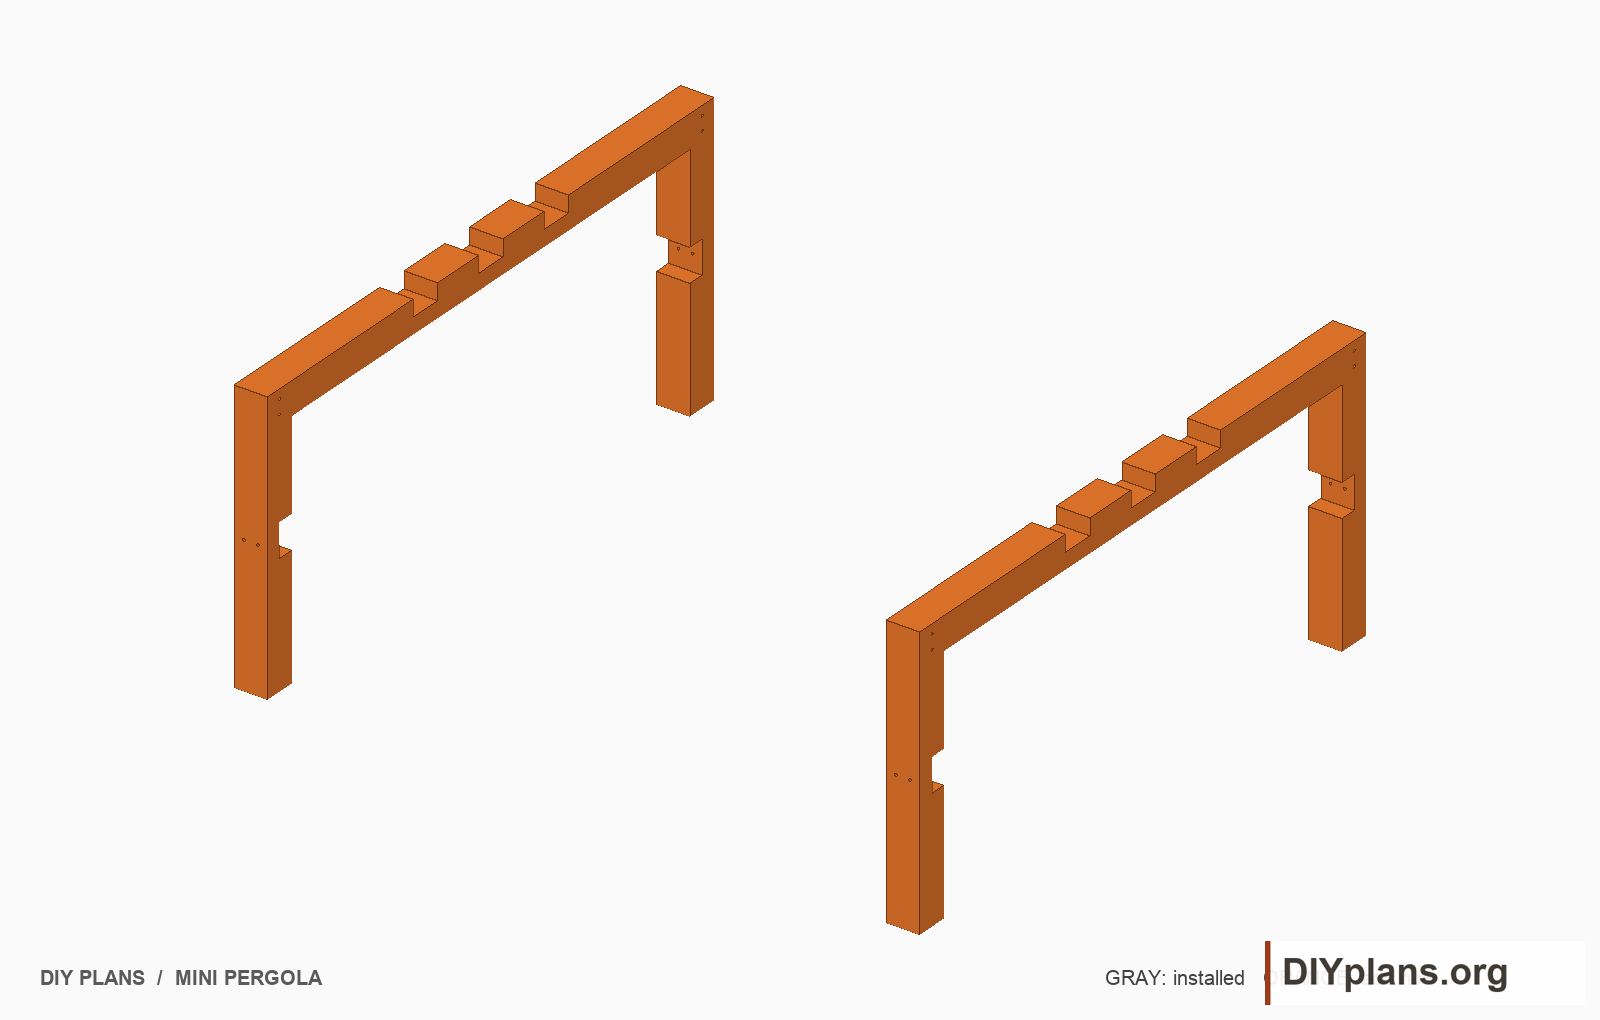
- Fit a crossbar to each pair of legs. Clamp the half-laps tight against their shoulders and square each end frame.
- Drill two 9/32-inch holes through each clamped upper lap. Center them across the 3 1/2-inch post width, 27 and 28 1/2 inches above the foot. Back the exit face with scrap.
- Install one 1/4 x 4 1/2-inch bolt through each hole, with a washer under the head and locking nut. Keep heads on the outer end faces. Snug the joints without crushing the wood.
Check: Both frames measure 64 inches outside the legs and 29 1/2 inches to the top of the crossbar.
Step 4 Cut the rail laps
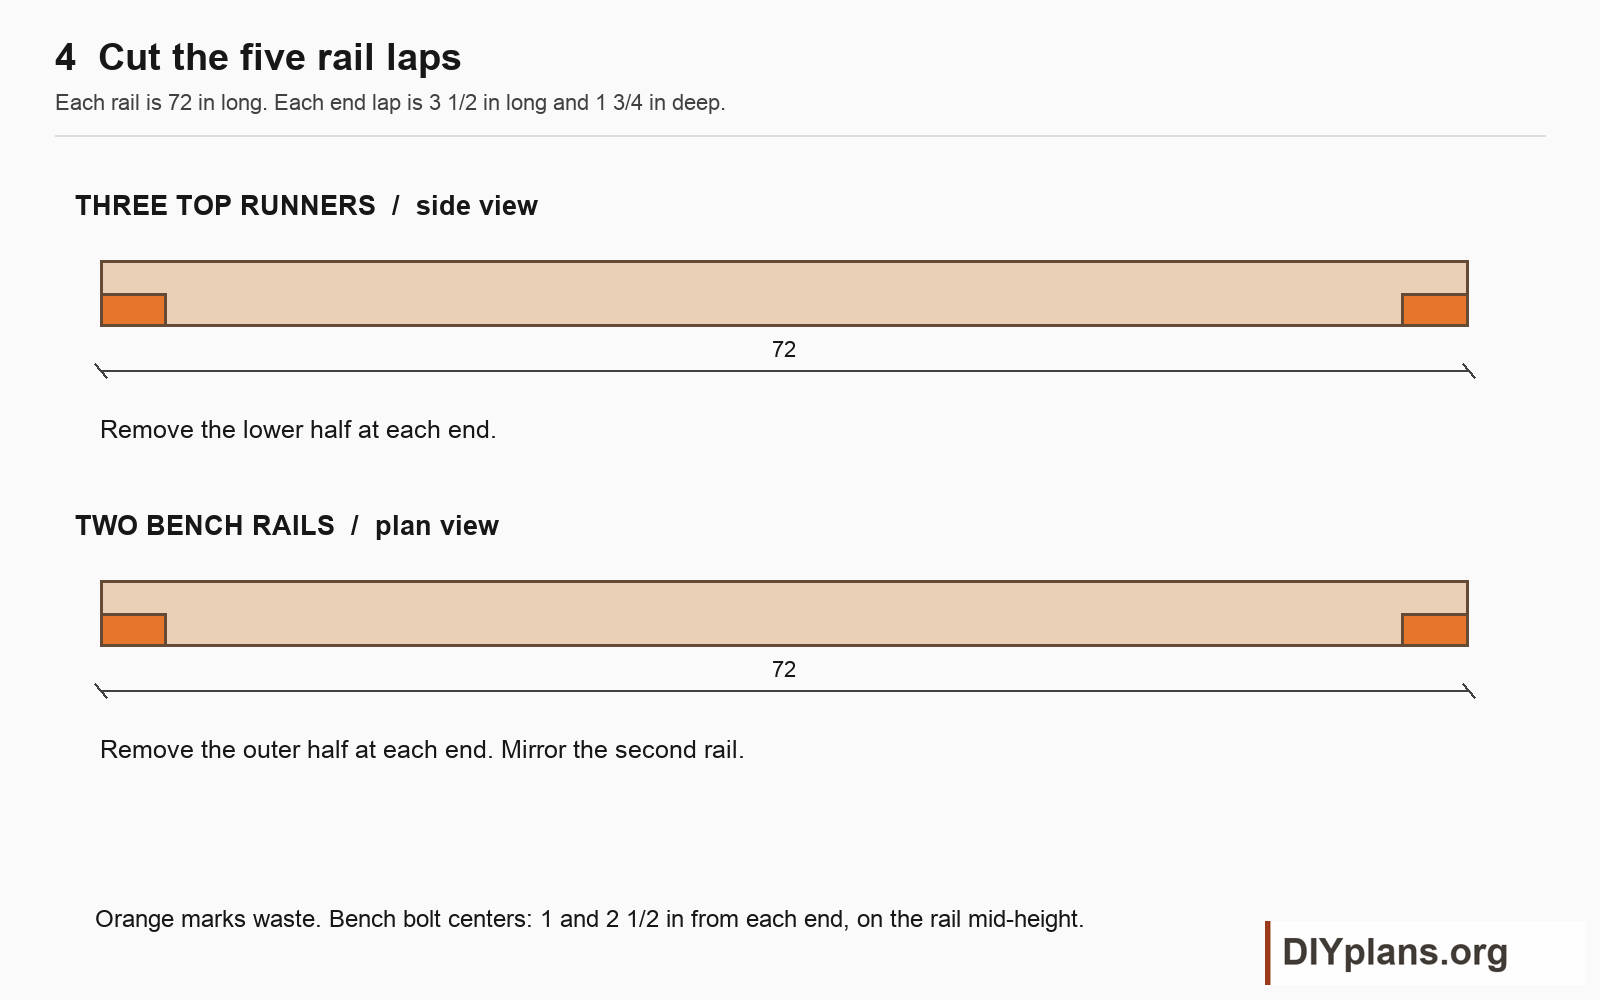
- Mark 3 1/2 inches from both ends of all five 72-inch rails. Cut each marked end to half thickness, 1 3/4 inches deep.
- On the three top runners, remove the lower half. Their upper tongues rest in the crossbar slots.
- On the two bench rails, remove the outer half at both ends. Mirror the second rail so both rails keep their inner tongues.
- Keep the shoulders square and fit snugly without forcing. Use the mating parts to check the width before making repeated cuts.
Check: Three runners have matching underside laps; the bench rails form a left and right pair.
Step 5 Join the frames with the bench rails
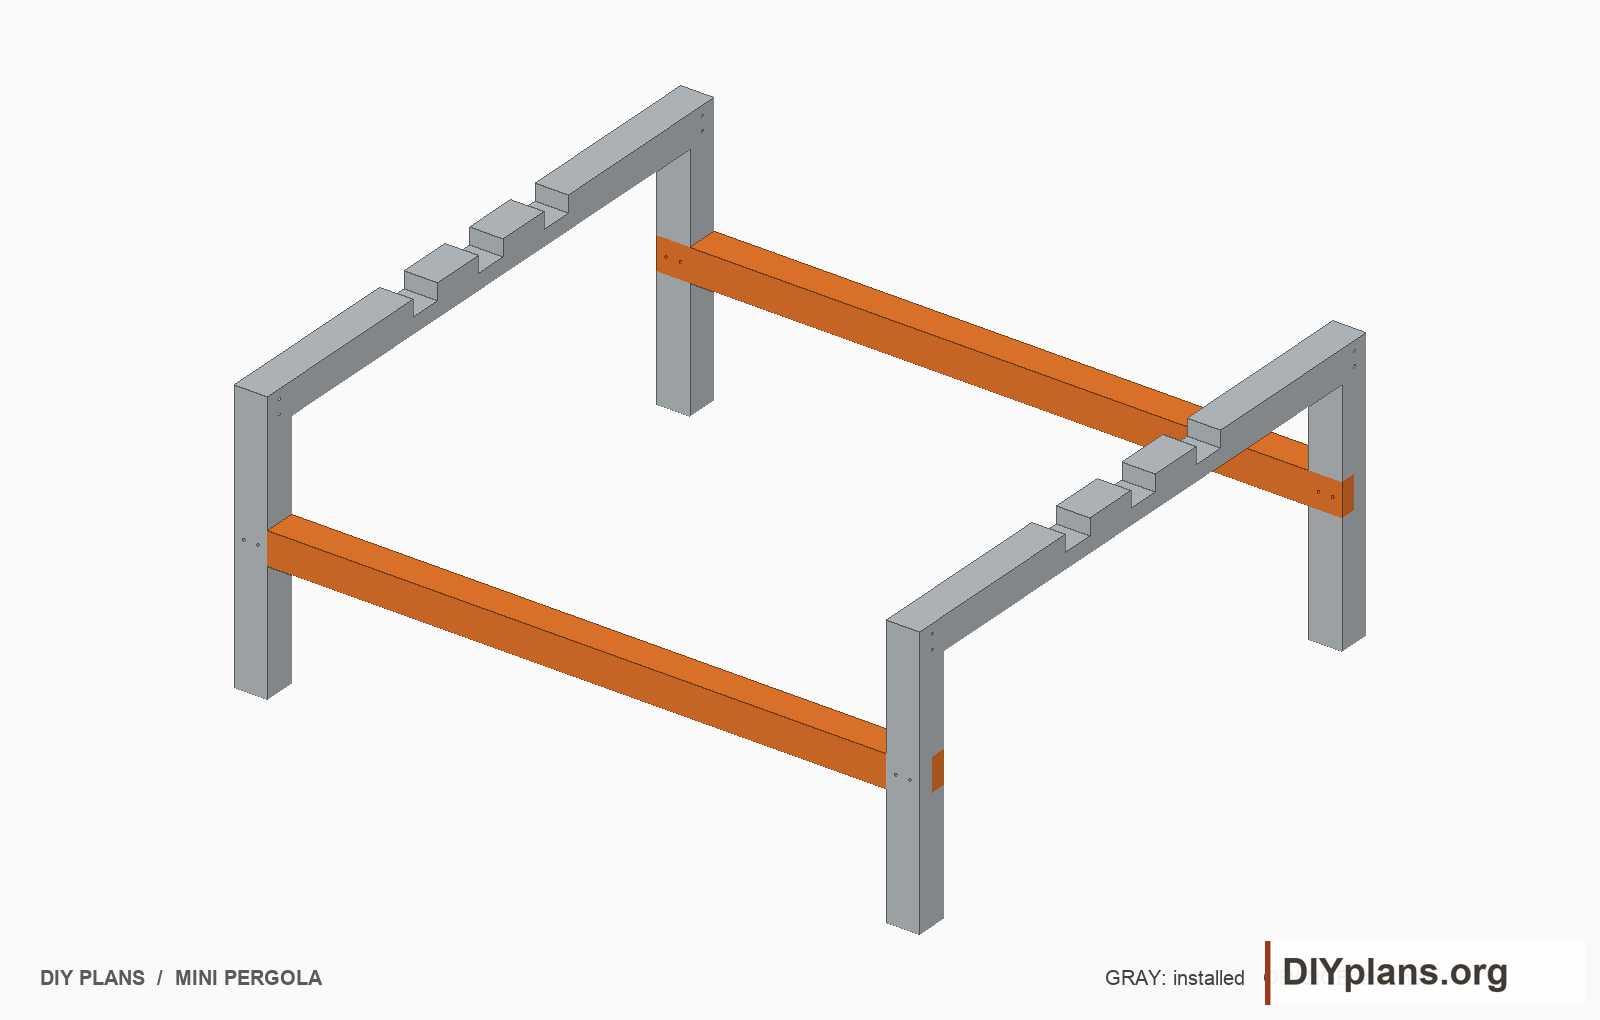
- Stand and brace the end frames with 72 inches between their outer faces. Keep 65 inches clear between their inner faces.
- Fit both bench rails from the inside of the frame into the leg housings. Seat the rails on the 13-inch-high shoulders and clamp them.
- Drill the two holes at each rail end through both clamped lap halves. Place them 1 and 2 1/2 inches from the nearest end, centered 14 3/4 inches above the ground. Install eight bolts with washers and locking nuts, heads outside.
- Measure diagonally between corresponding outside corners in plan. Adjust until both diagonals agree and the feet sit on the same plane. Keep temporary braces in place until the whole frame is secured.
Check: Both rail tops are 16 1/2 inches high and the plan diagonals match.
Step 6 Seat the three top runners
Play animationStop animation
 Loading image
 Loading image
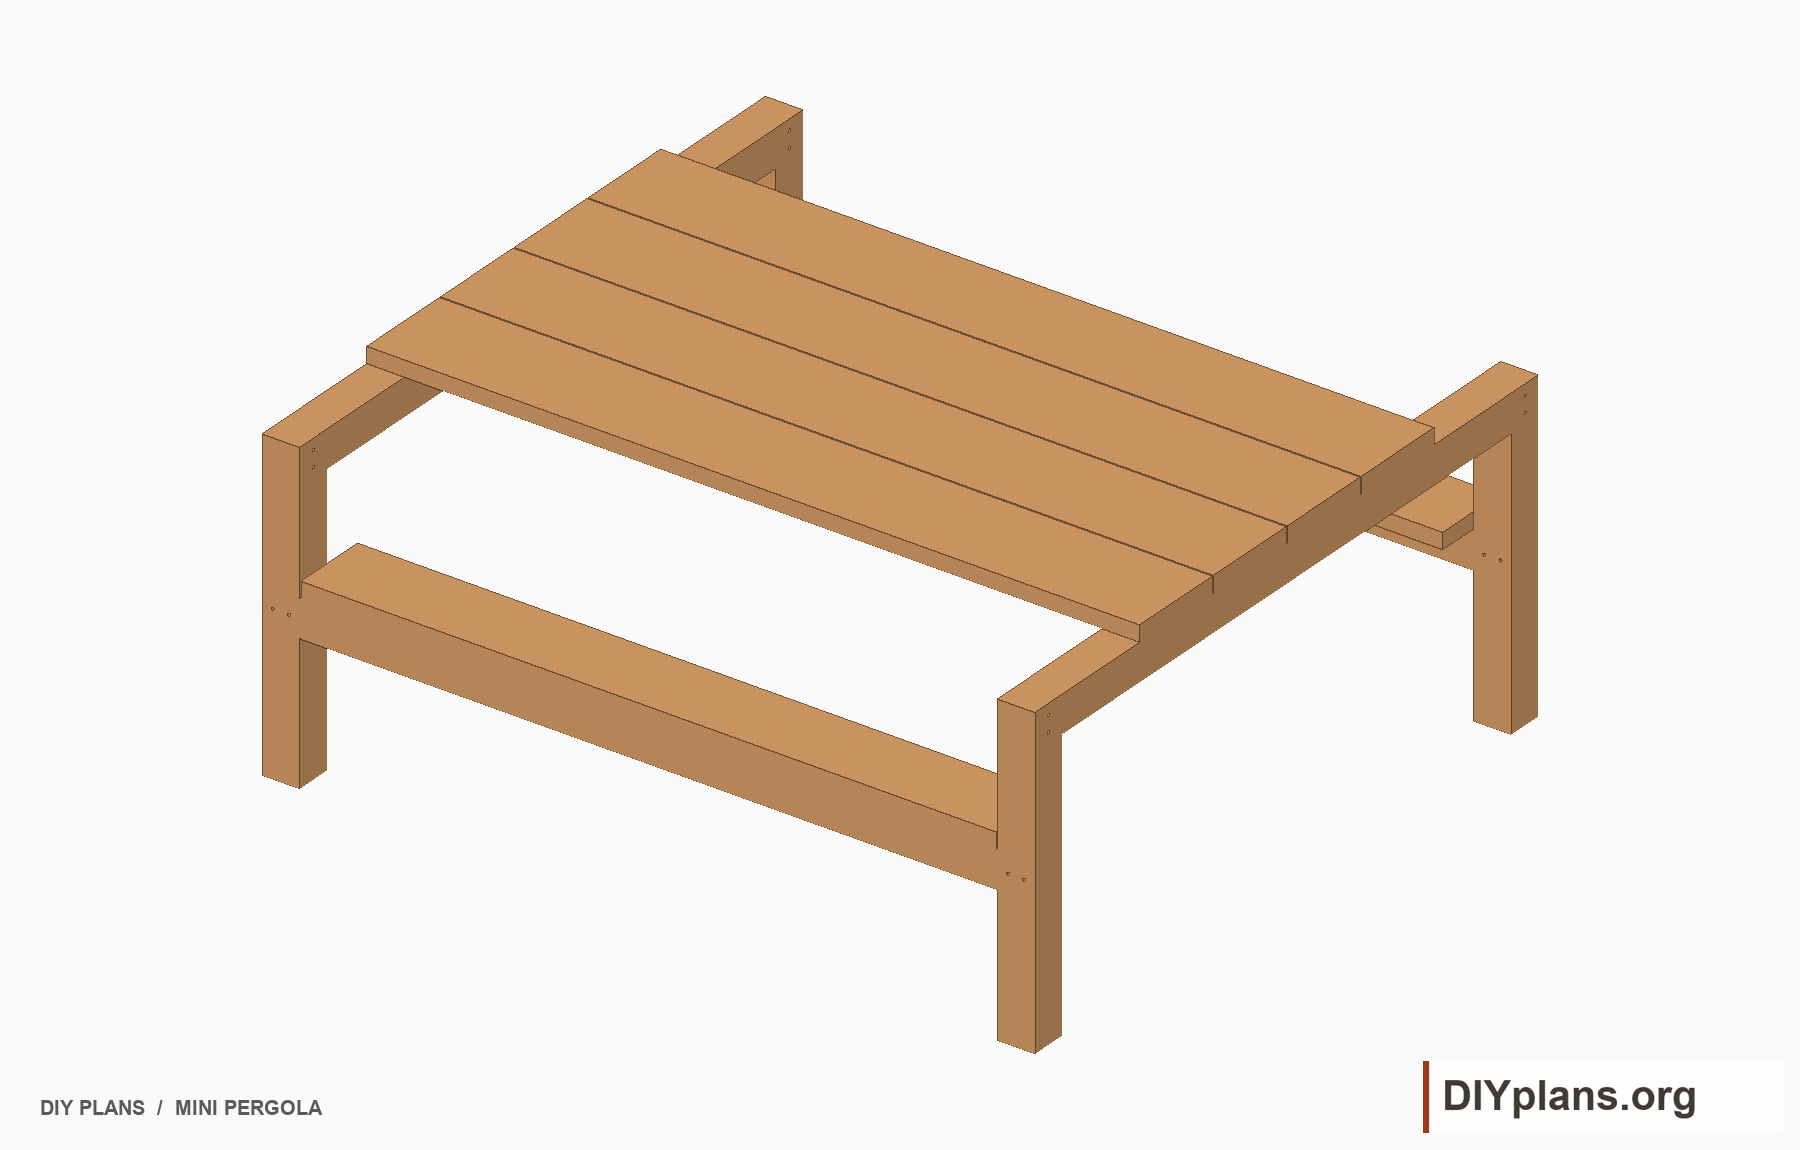
- Lower the three top runners into the matching crossbar slots. Align their ends flush with the outer faces of the end frames.
- Clamp each crossing flush. At each end, mark two screw positions on the runner centerline, 7/8 and 2 5/8 inches from the nearest end.
- Drill the selected screw's clearance hole through the upper tongue and its pilot into the crossbar below. Countersink only enough to seat the head flush, then install two #10 x 3-inch screws per crossing, twelve total.
- Check the complete top support plane with a straightedge. Correct proud joints before installing boards. The proposed screws enter the lower crossbar half by 1 1/4 inches; confirm that connection before building.
Check: All runner and crossbar tops align at 29 1/2 inches.
Step 7 Space and fasten the tabletop
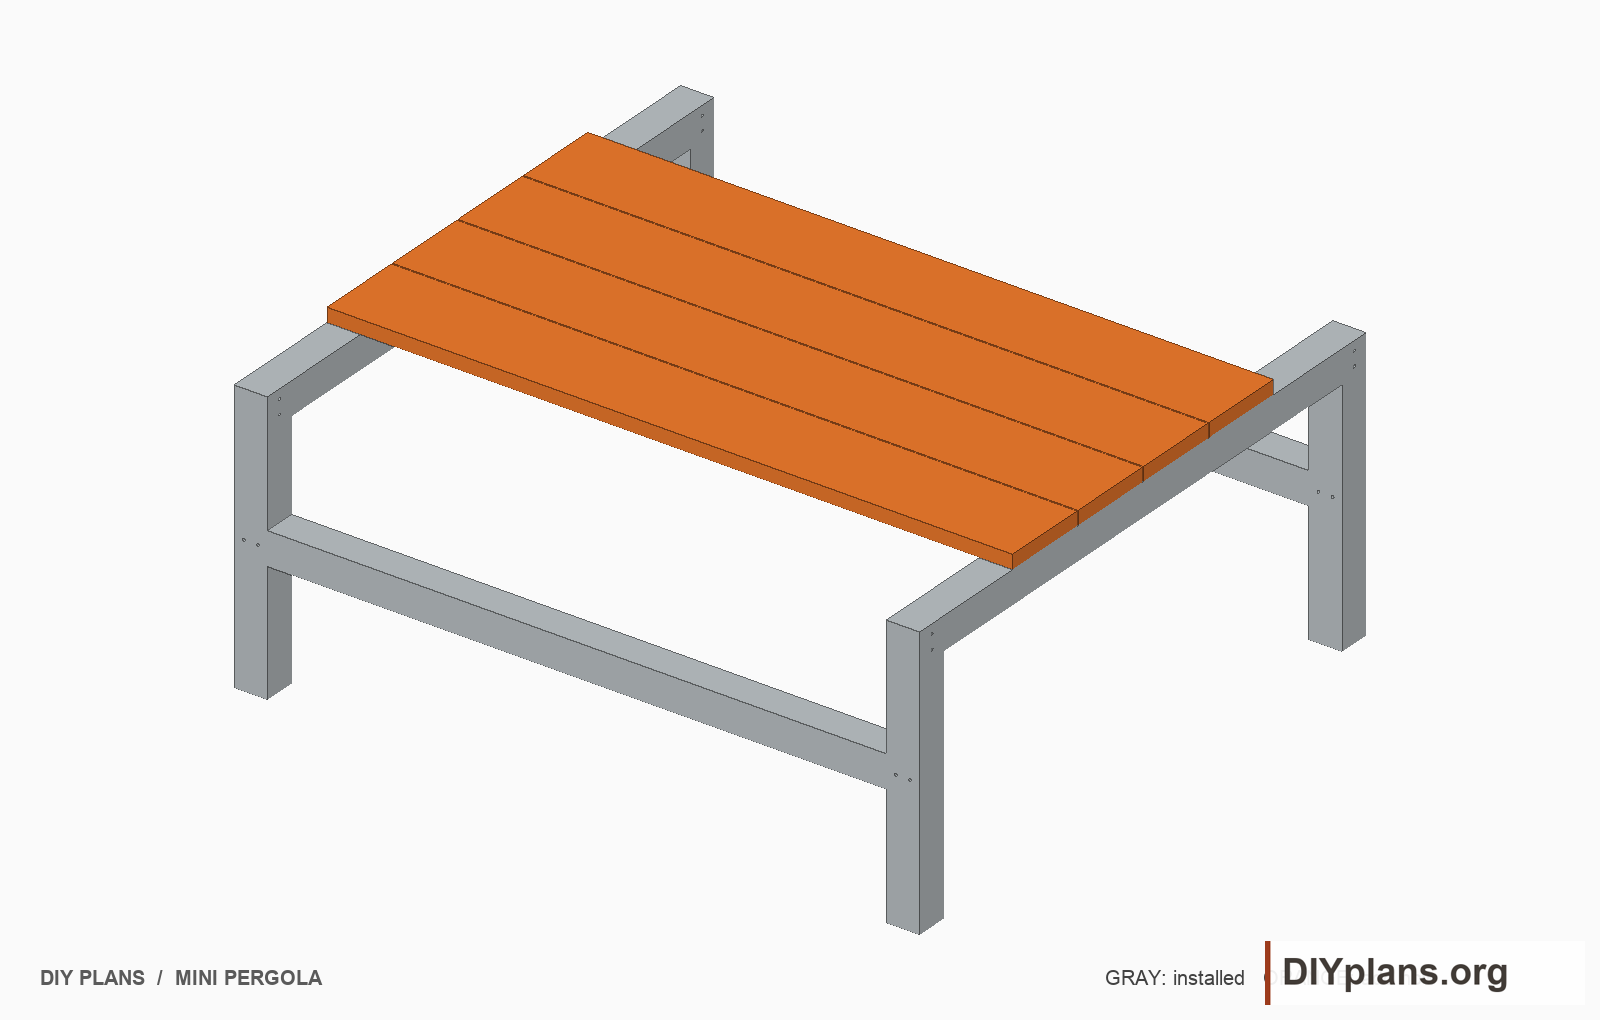
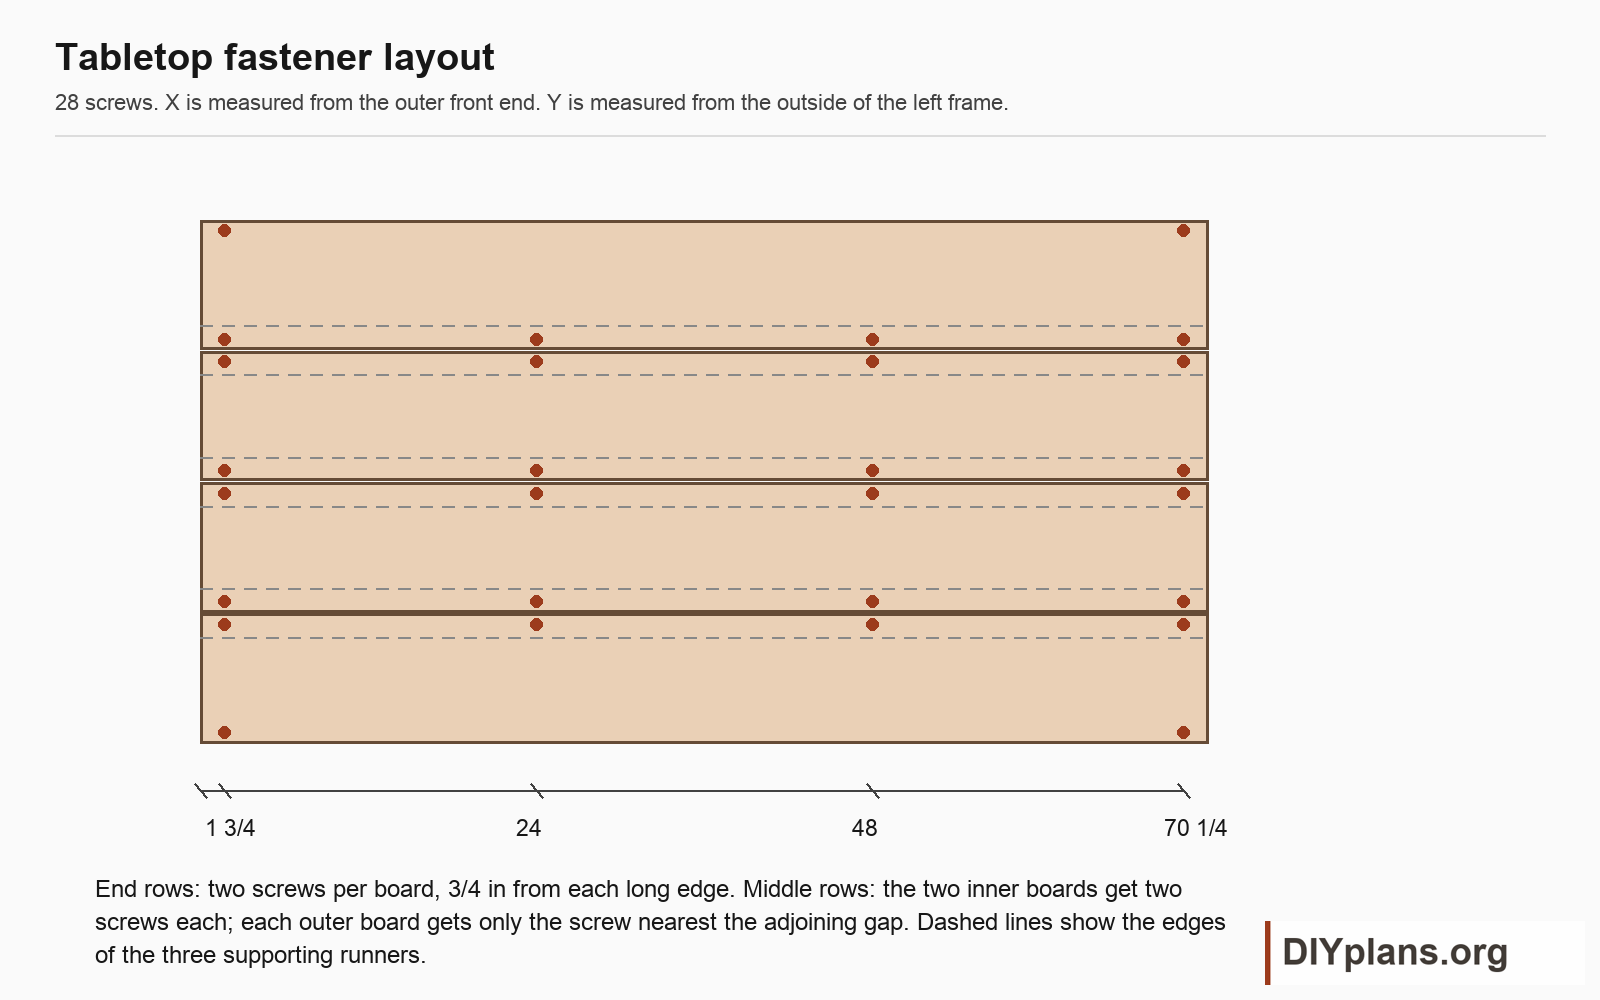
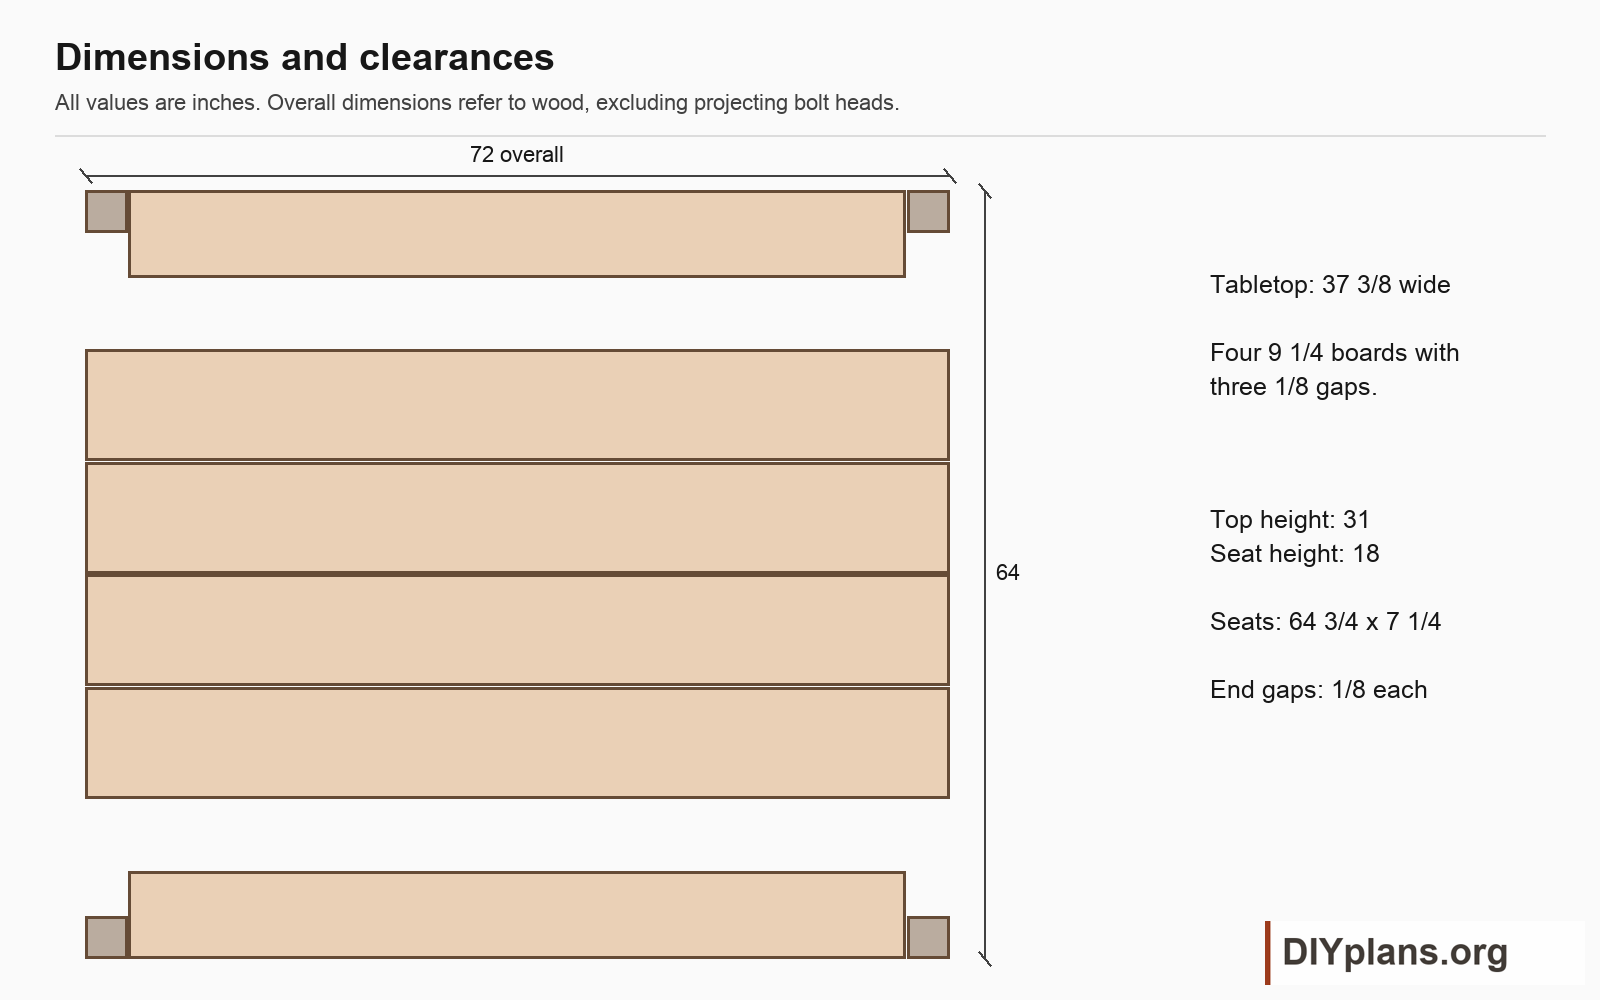
- Center the four 72-inch top boards across the frame, with 1/8-inch spacers in all three gaps. Keep both ends flush with the frame.
- Check the finished top width is 37 3/8 inches. Each outer board edge is 13 5/16 inches from the corresponding outside face of the frame.
- Use the fastener drawing to mark 28 screw positions. Drill clearance holes through the planks and pilots into the supports, then install #10 x 3-inch screws with flush heads.
- Keep all screws within the wood supports. Remove the gap spacers after fastening. Follow the finish and fastener maker's guidance for wood movement; do not glue the wide boards to the frame.
Check: The top is centered, its gaps remain open, and every screw enters a support.
Step 8 Fit the two seats
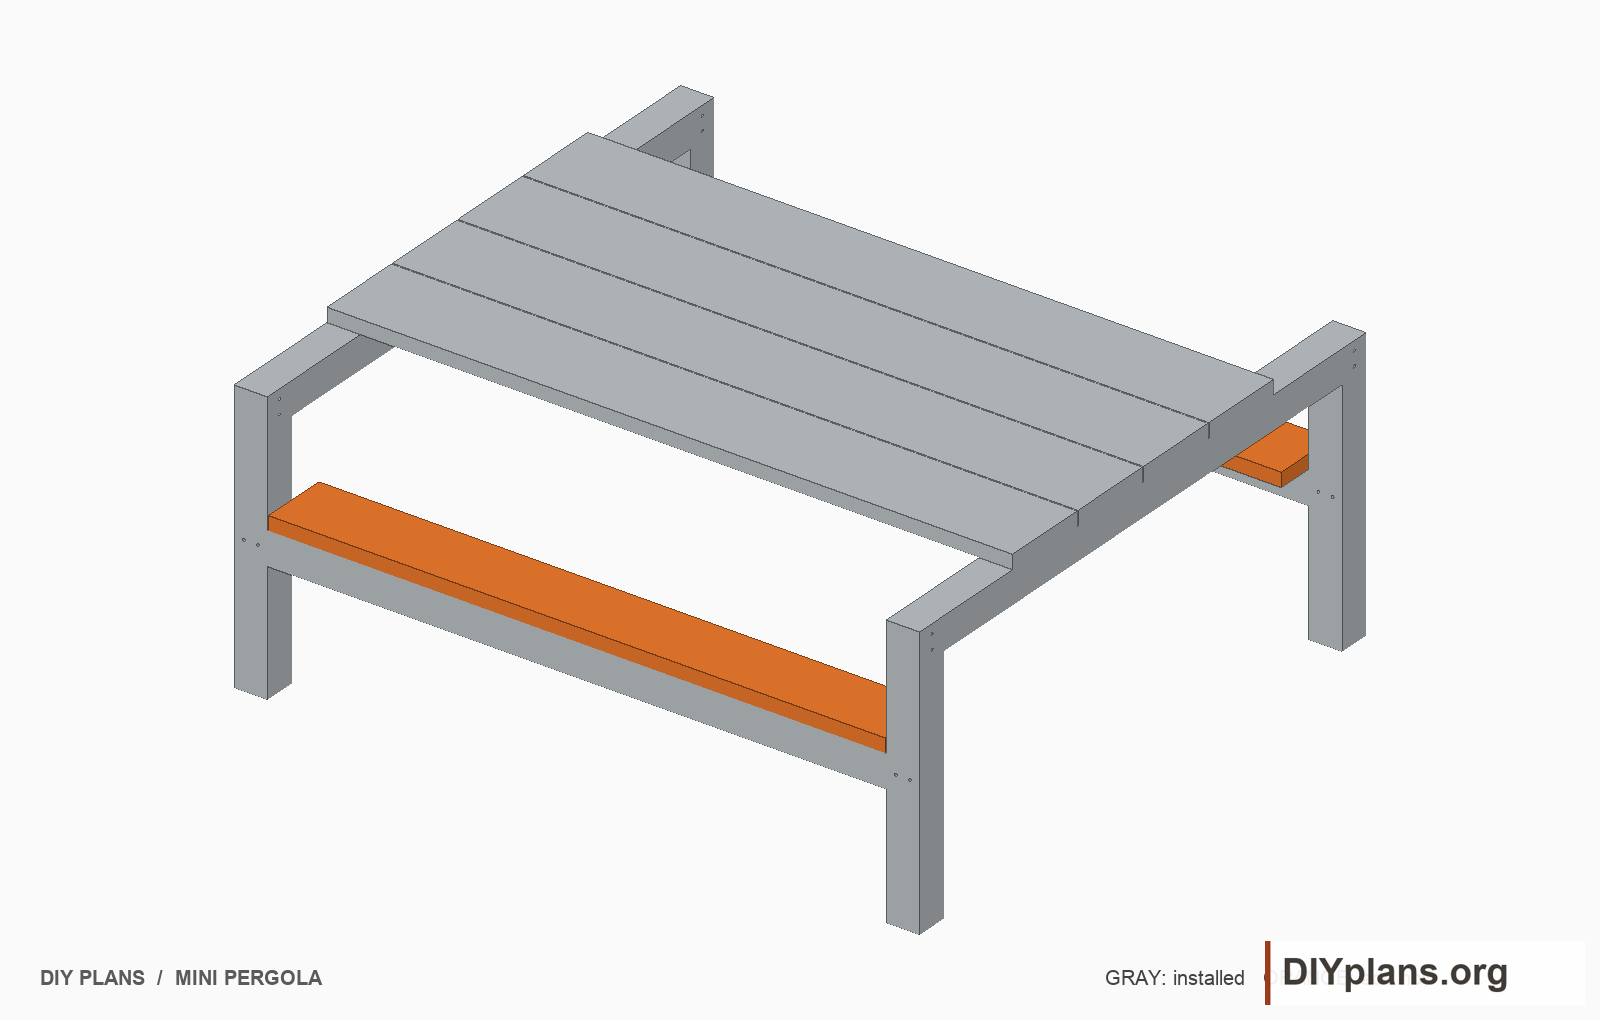
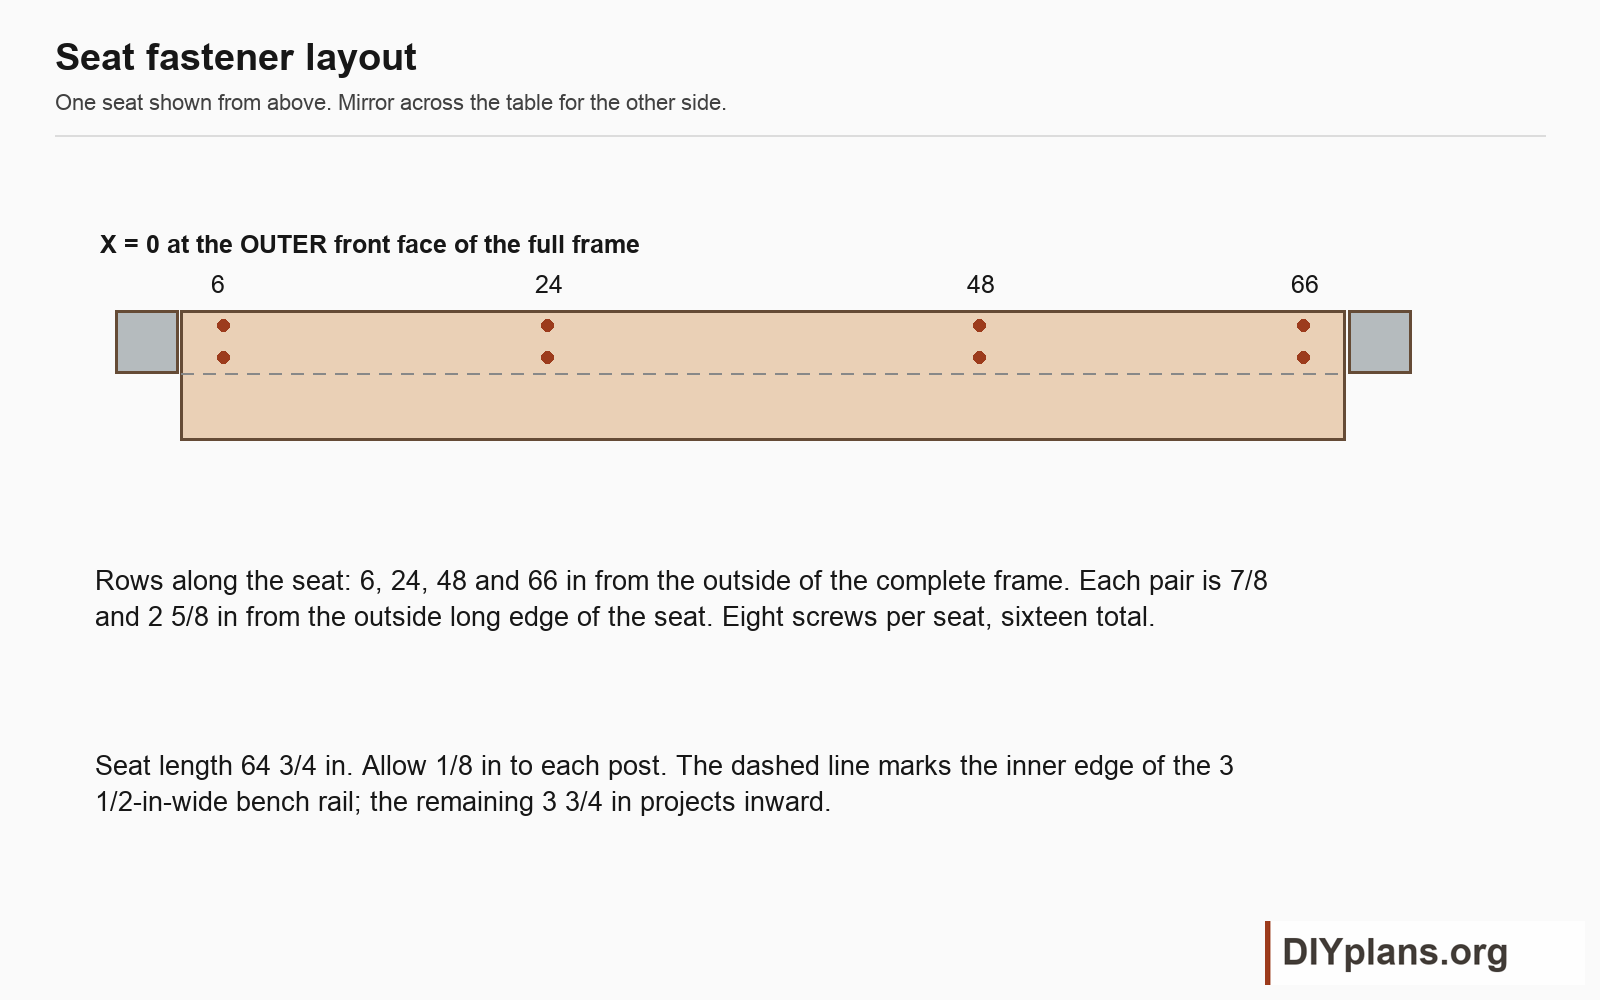
- Place each 64 3/4-inch seat between the legs with a 1/8-inch gap at each end. Align its outside long edge flush with the outside faces of the legs and bench rail.
- Mark screw pairs at 6, 24, 48 and 66 inches from the same outer end of the complete frame. Place each pair 7/8 and 2 5/8 inches from the seat's outside long edge.
- Drill clearance holes through the seat and pilots into the rail. Install eight #10 x 3-inch screws in each seat. Keep heads flush and avoid splitting the narrow rail tongues.
- Check both seating surfaces are 18 inches above the ground. Each board projects 3 3/4 inches inward beyond its bench rail.
Check: The seats clear the posts and their outside edges remain within the 64-inch timber footprint.
Step 9 Ease the edges and finish
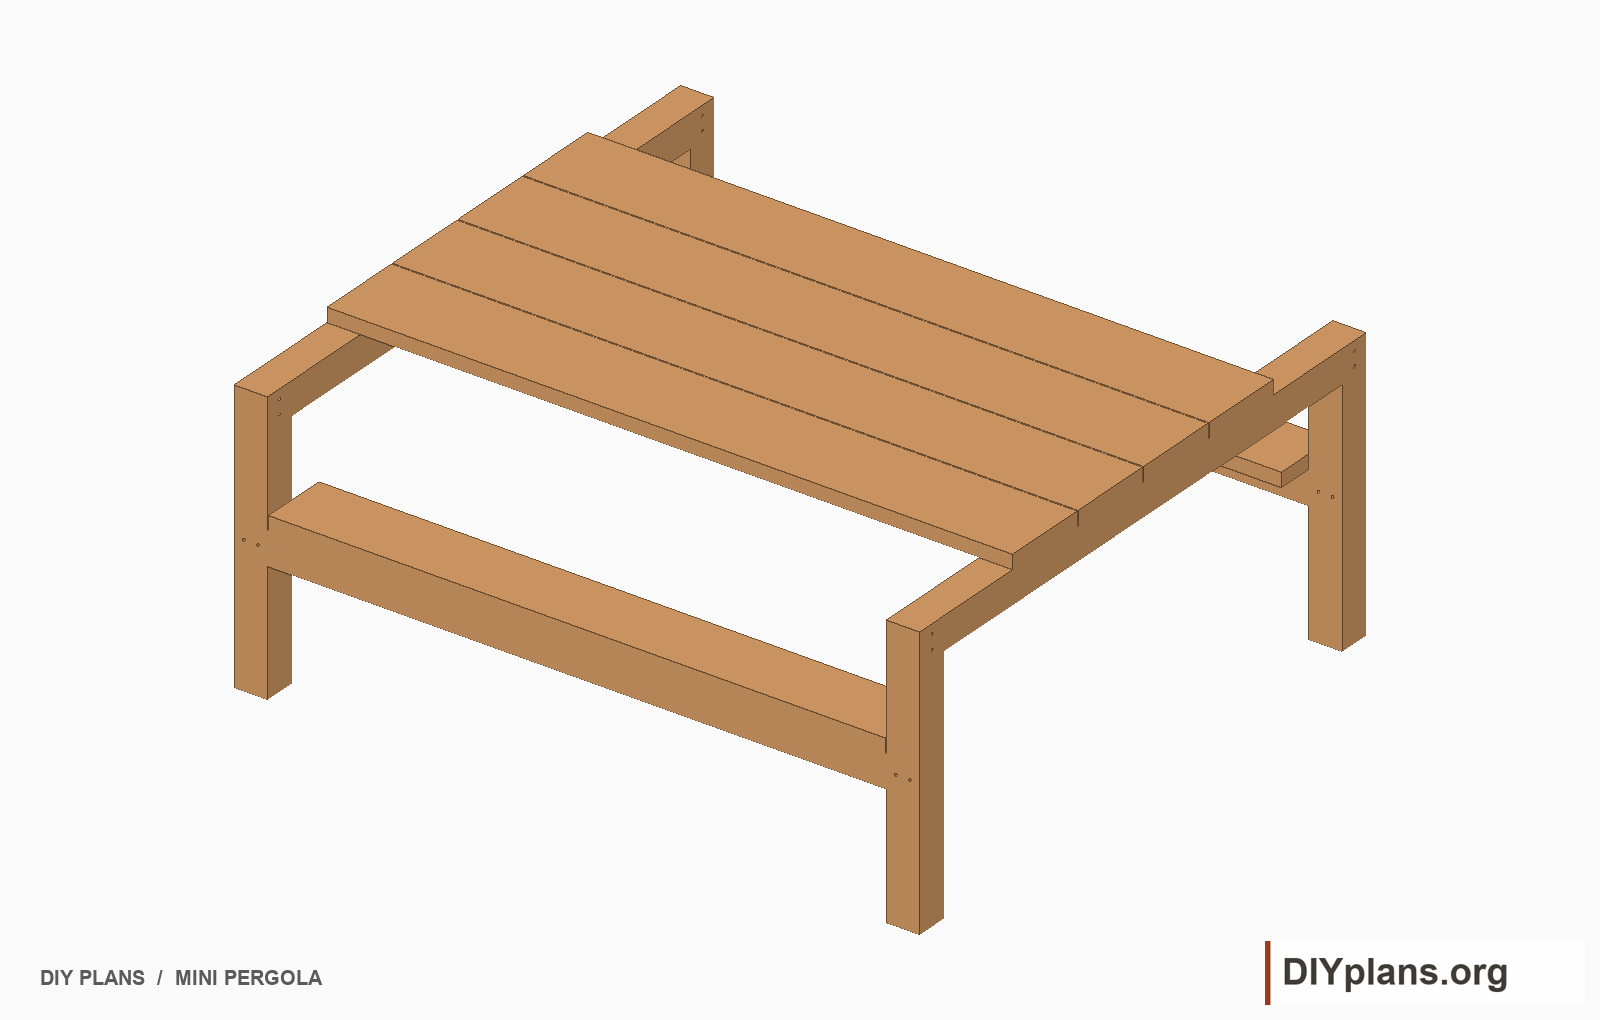
- Remove sharp edges and splinters, especially along the seats, entry points and tabletop. Keep bearing shoulders and fitted joint faces flat.
- Apply the selected exterior finish to all faces and seal end grain as directed. Let the finish cure before contact with skin or food items.
- Check that bolts have full nut engagement and no exposed sharp ends. Recheck for loose joints after the wood has acclimated, without crushing the timber.
- Have the completed design and prototype checked for side sway, joint slip, uneven-ground stability and seat loading before use. Revise connections if needed; the model supplies no load rating.
Check: Surfaces are smooth and the frame is ready for the independent prototype review.
Sources
Inspired by Joey Driftwood / Joseph Morrison’s mini table and Donald Judd’s Pergola Table 23. Original DIYplans.org model and instructions; no affiliation or endorsement.
- Joey Driftwood, mini picnic table inspiration
- Joseph Morrison table reference
- Donald Judd, Pergola Table 23
- Ground-contact 4x4 reference; measure before cutting
- Treated 2x10 reference; confirm dry width is 9 1/4 inches
- Treated 2x8 reference; confirm dry width is 7 1/4 inches
- Stainless 1/4-inch flat washers, 25 pack
- Stainless 1/4-20 locking nuts, 15 pack
- Stainless #10 x 3-inch deck screws, 60 pack
- Exterior penetrating finish, one gallon
- End-cut preservative, one quart
- Search for stainless 1/4-20 x 4 1/2-inch hex bolts; exact match unresolved