Before you start
- Complete the foundation, structural connections, hardware and weatherproofing details before construction.
- Use this configuration's drawings and cut lists. It covers the concrete floor and hinged door; the original sliding-door cuts and fittings do not apply.
- Cut-list dimensions include allowances for fitting panel edges. Confirm stock purchases and sheet layouts before ordering.
- The slab quantity excludes footings and thickened edges. Anchor sizes and embedment must be specified in the foundation design.
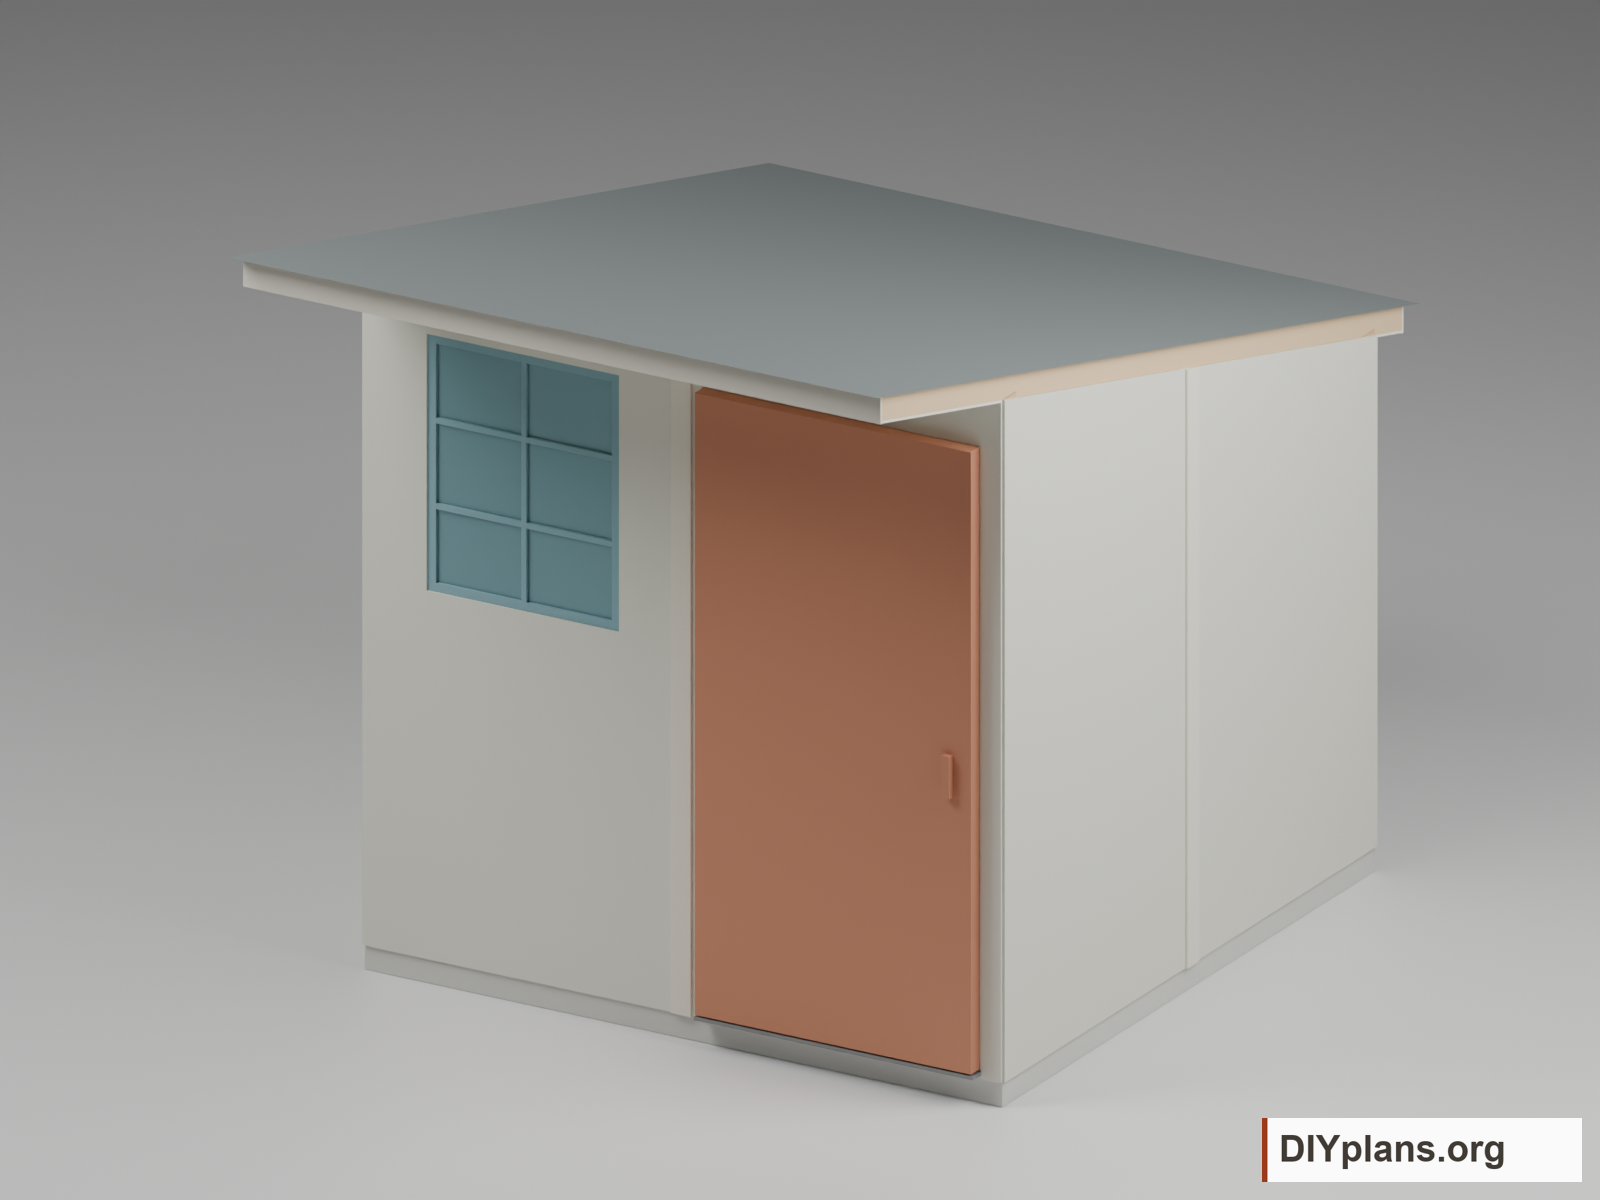
- The roof pitch is 3:12. Select windows, door hardware and roofing products before finalizing connections and clearances.
- Plan safe lifting, temporary bracing and overhead work for the heavy panels and sharp metal edges.
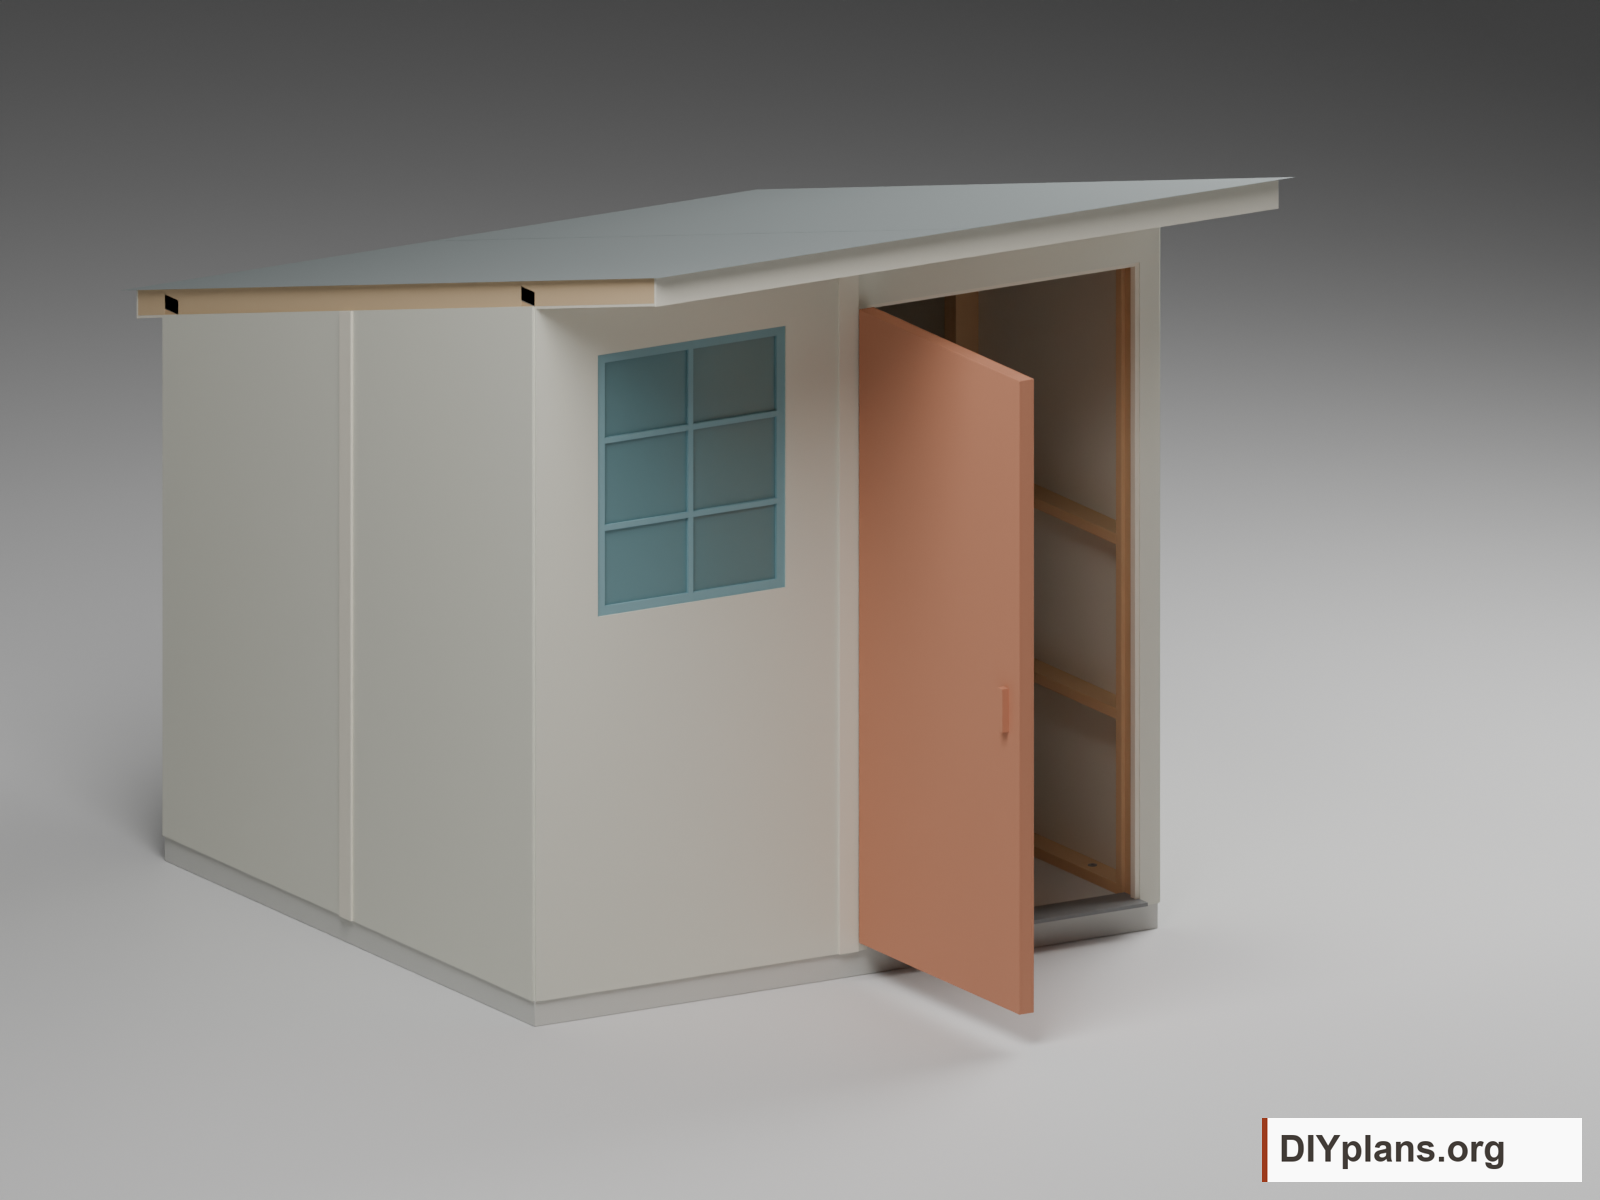
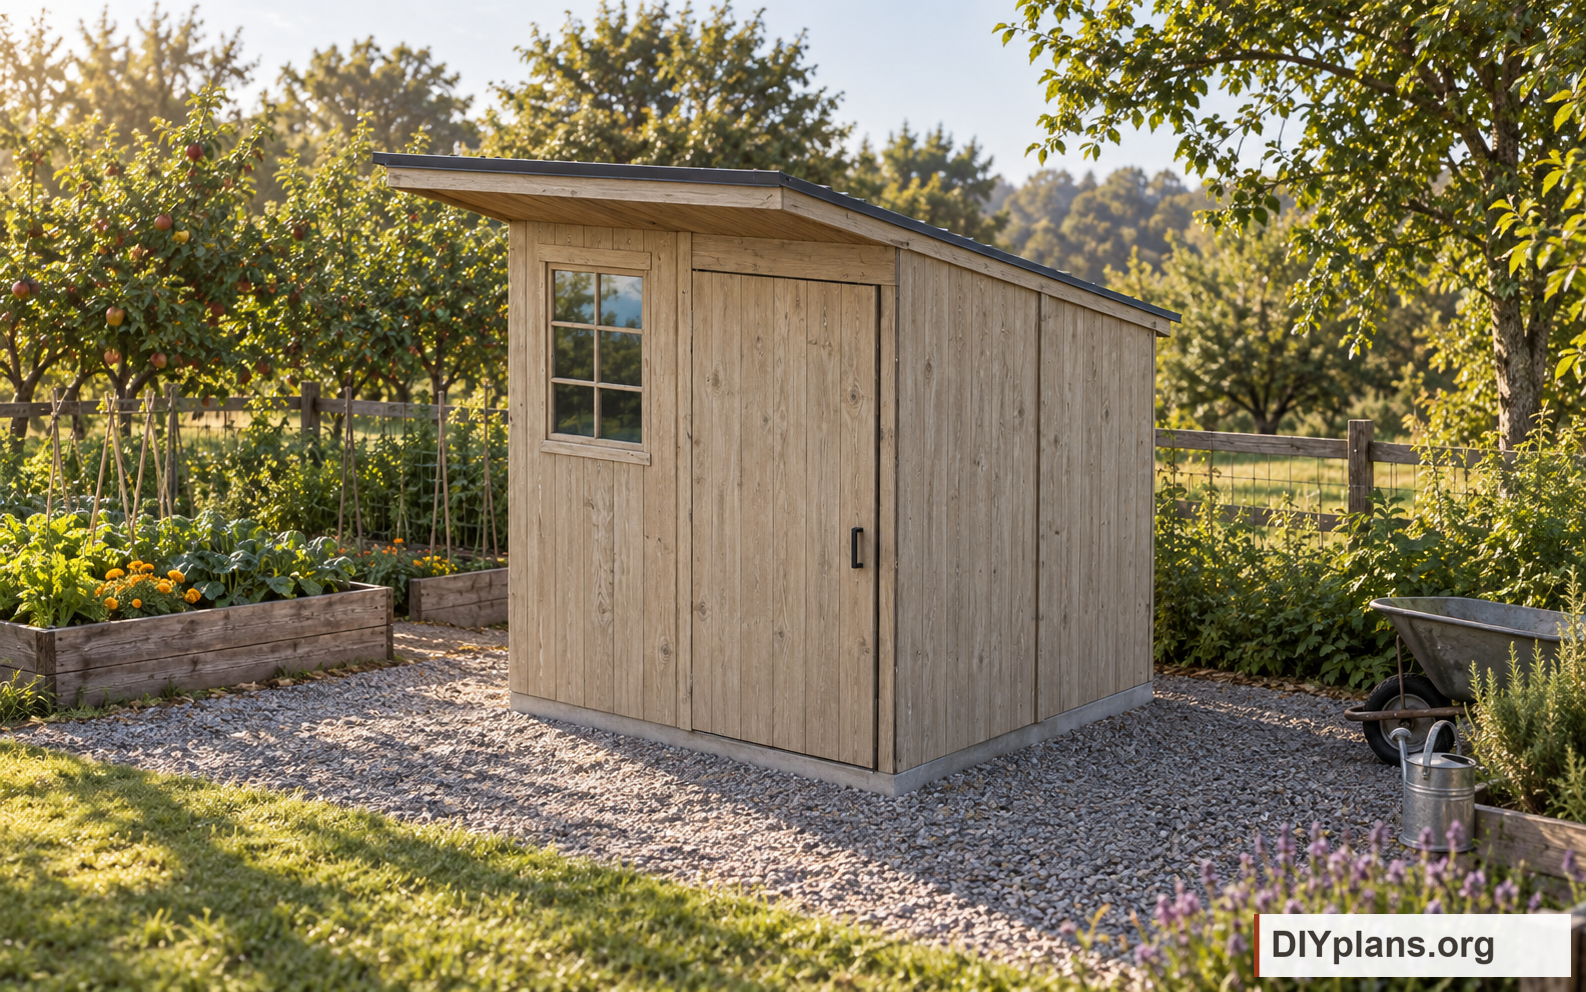
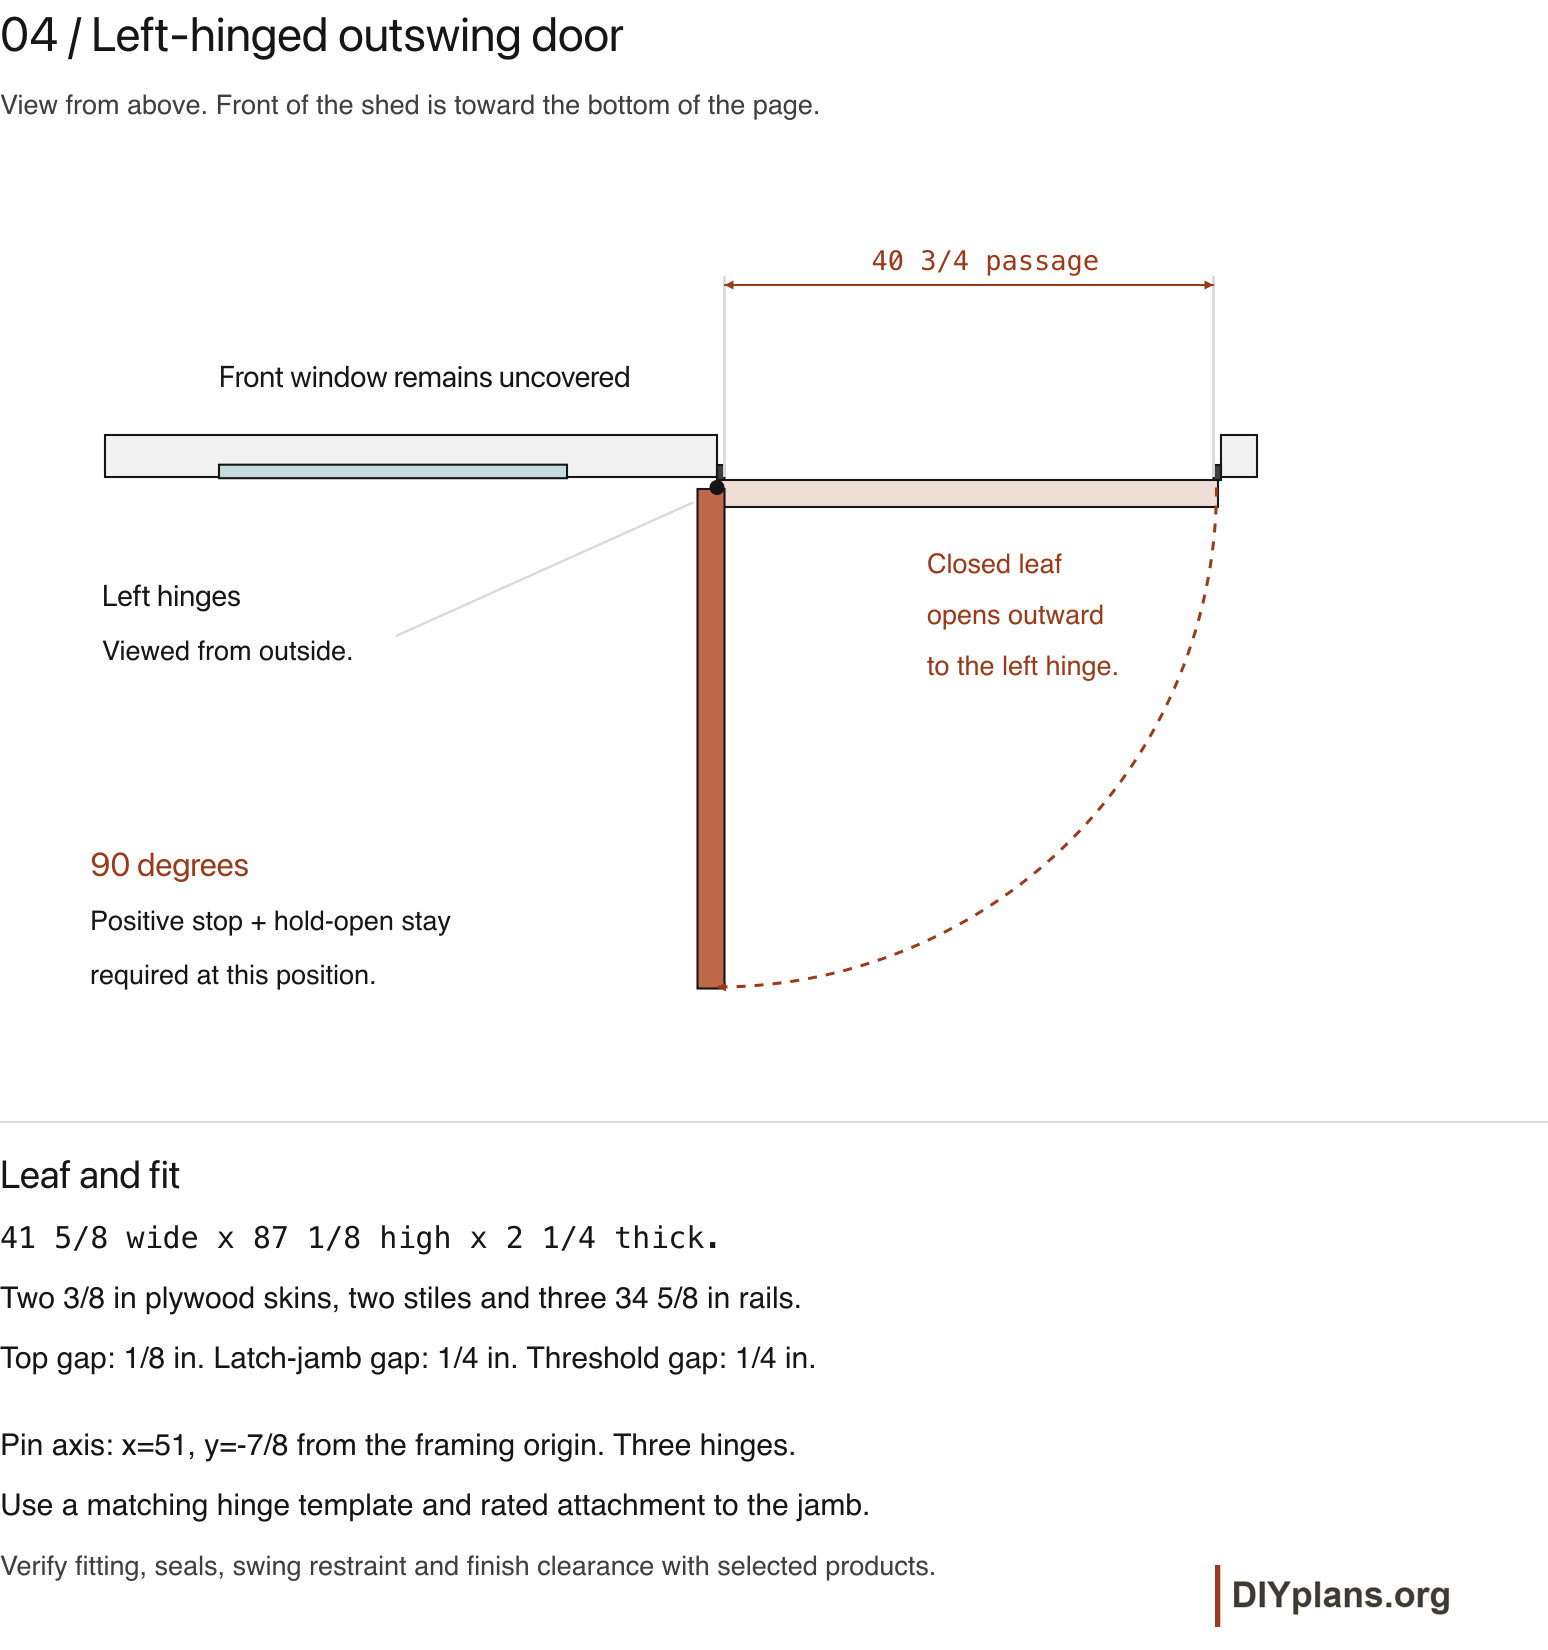
- Hinges go on the left when viewed from outside. Fit a positive 90-degree limiting stay and hold-open fitting to keep the door clear of the window and prevent it slamming in wind.
Dimensions and opening sizes
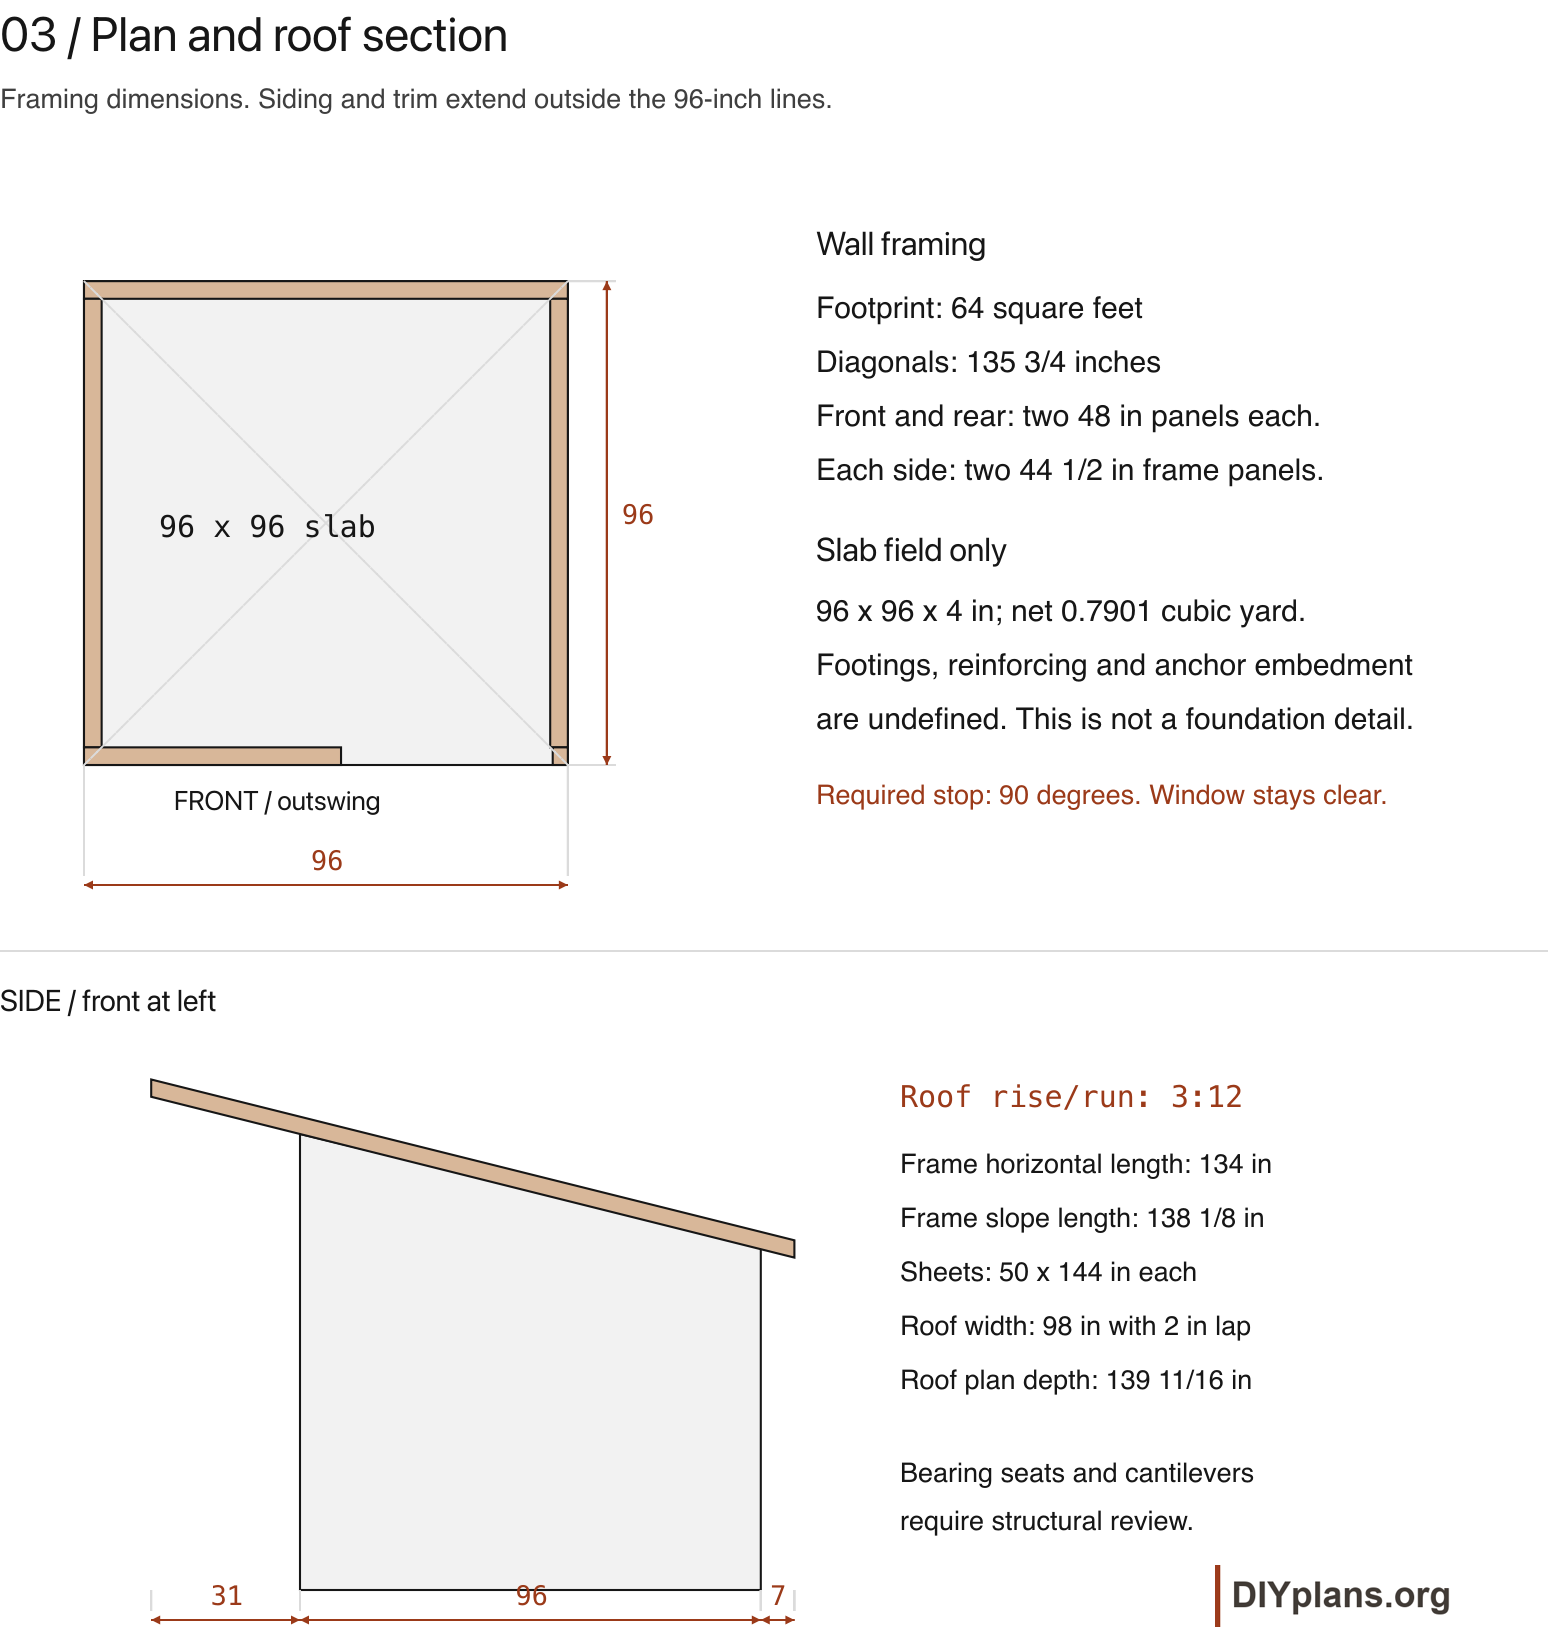
- Outside wall framing width8 ft. Siding and battens project outside this line.
- 96 in
- Outside wall framing depth8 ft. Roof overhangs are additional.
- 96 in
- Framing footprintThe slab field matches this footprint.
- 64 ft²
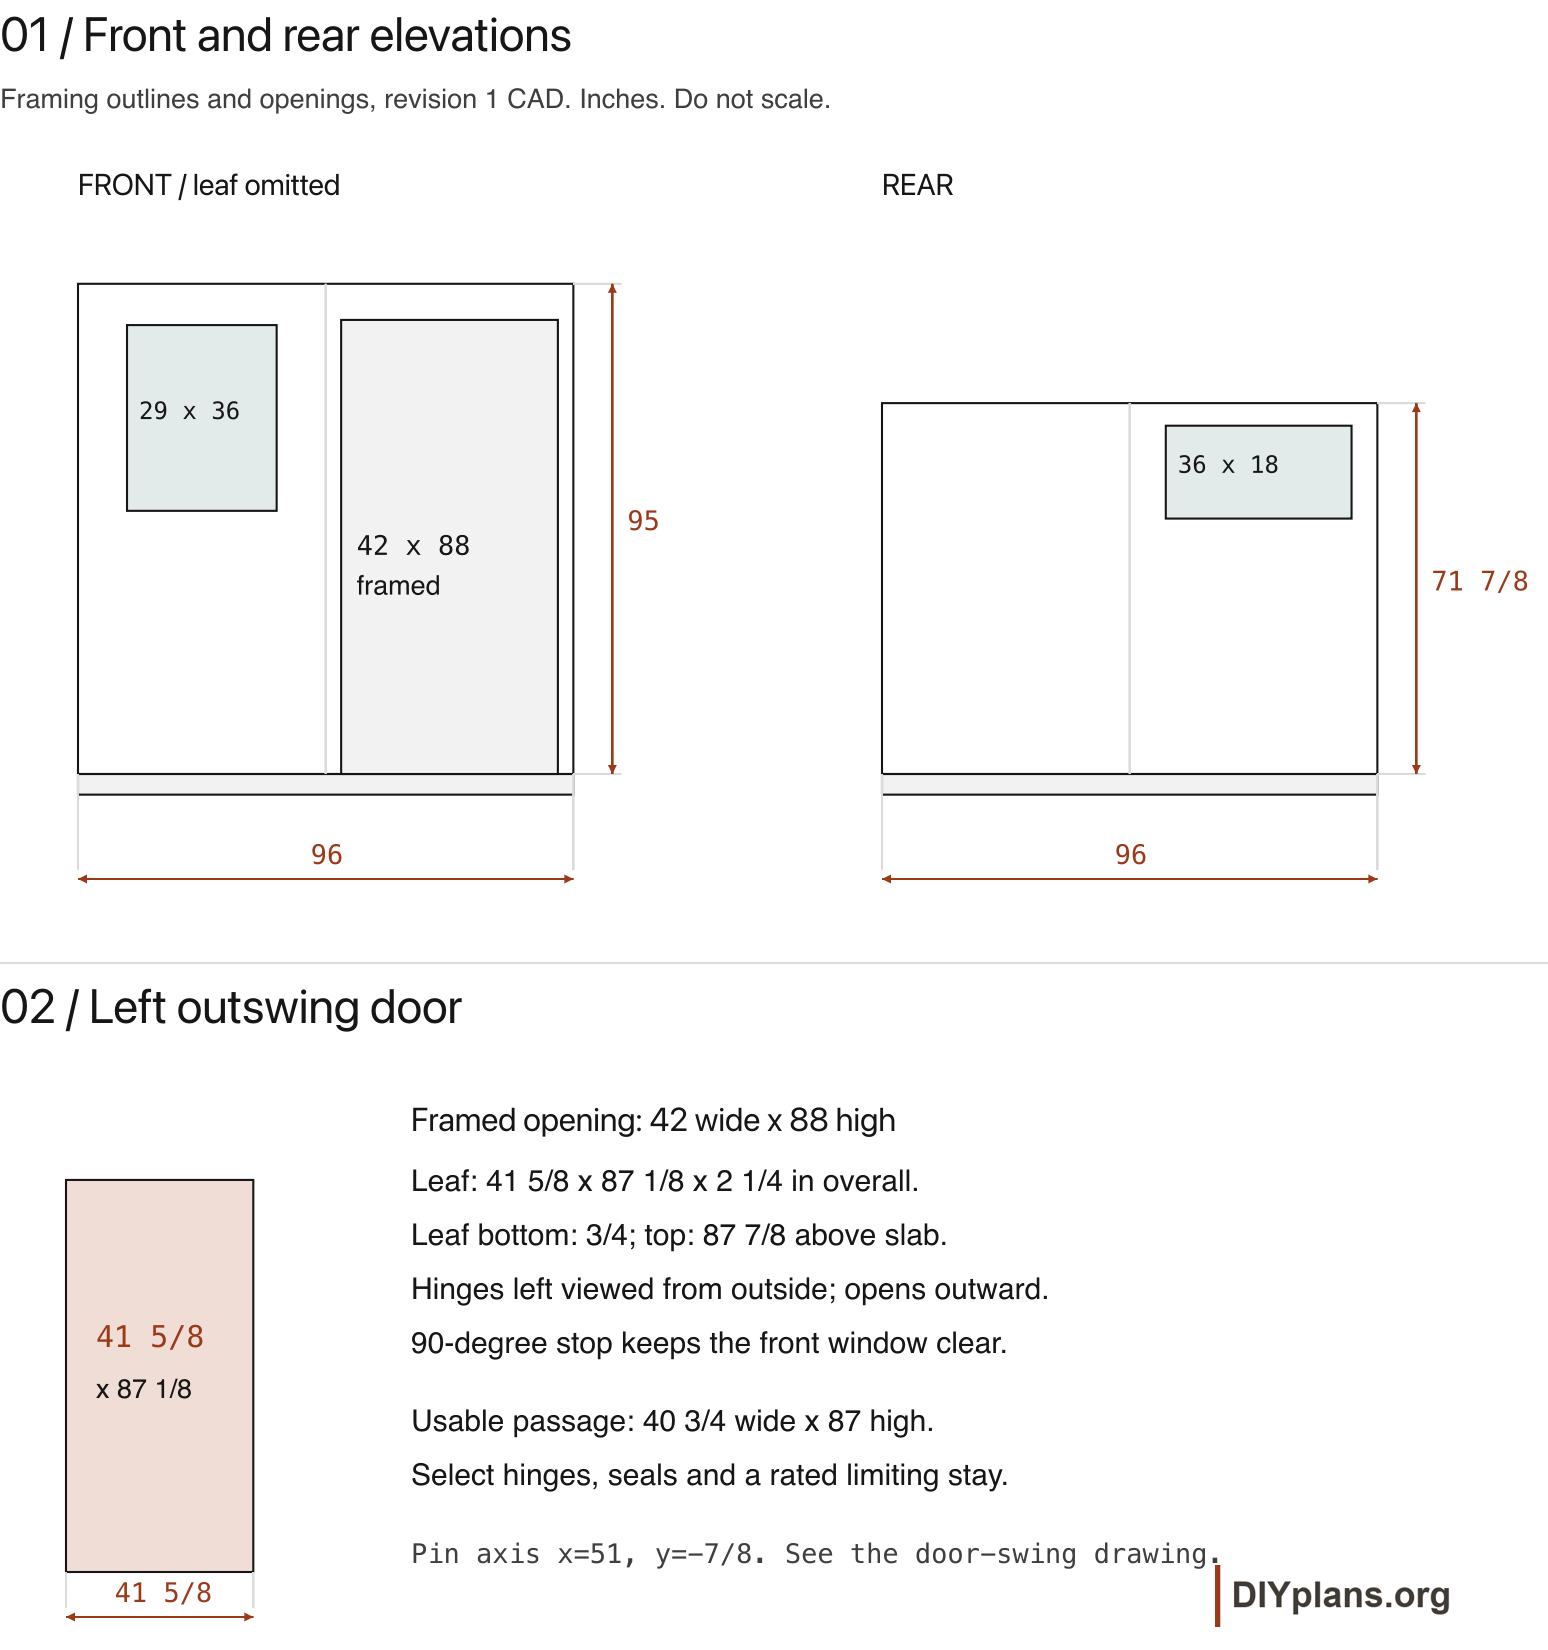
- Front wall heightUse this height with this configuration's cut list.
- 95 in
- Rear wall heightSets the rear roof-bearing height for this configuration.
- 71 7/8 in
- Roof widthIncludes 1 in projections on both sides; confirm product coverage.
- 98 in
- Roof horizontal depth144 in sheet length measured along the 3:12 slope.
- 139 11/16 in
- Framed door opening widthBefore door stops; usable passage at 90 degrees is 40 3/4 in.
- 42 in
- Framed door opening heightAbove slab; usable height above the threshold is 87 in.
- 88 in
- Door leaf widthCustom framed leaf with two 3/8 in plywood skins.
- 41 5/8 in
- Door leaf heightBottom at 3/4 in; top at 87 7/8 in above slab.
- 87 1/8 in
- Front sash widthConfirm the opening with the selected window.
- 29 in
- Front sash heightSix-light sash illustrated.
- 36 in
- Rear sash widthConfirm the opening with the selected window.
- 36 in
- Rear sash heightThree-light sash illustrated.
- 18 in
- Door leaf thickness1 1/2 in frame plus two 3/8 in skins.
- 2 1/4 in
- Usable passage width at 90 degreesBetween stops with the leaf fully open.
- 40 3/4 in
- Usable passage heightBetween threshold and head stop.
- 87 in
Shopping & cut lists
Get the shopping and cut lists
Includes all available CAD files, shopping lists and cut lists for every configuration of this plan. One payment, $19 USD.
Get the plan package · $19Secure checkout with Stripe. Your account is created after payment.
Already purchased? Sign in to access your plans.
Tools & equipment
- Tape measure, framing square, level and layout lines
- Saw and guides for lumber and plywood
- Clamps and a stable panel-assembly bench
- Drill/driver and tools for the specified connectors
- Roofing tools for the selected metal profile
- Foundation tools and lifting equipment
- Eye, hearing and hand protection, and safe overhead access
BEFORE YOU BUILD
Use this work at your own risk
No person or organization makes any guarantee or warranty, express or implied, regarding this design, its documentation, digital files, or website views. They are not professional services and do not create an architect-client or other professional-client relationship. No promise is made about accuracy, completeness, reliability, code compliance, or fitness for your project.
Buildings and building projects are complex, and many things can go wrong. You are responsible for checking dimensions and site conditions, choosing suitable materials and methods, obtaining permits, following codes and manufacturer instructions, and getting qualified professional help when needed. To the fullest extent permitted by law, DIYPlans.org disclaims liability for damages resulting from use of this work. Read the FAQ about your responsibilities.
Instructions
01 Resolve the design before buying material
- Confirm the 8-by-8-foot framing footprint and concrete-floor layout on the dimension sheet. Have the foundation, structure, fasteners and selected door and window details specified for your site before ordering materials. Use only this configuration's cut lists and drawings.
Check: Confirm the 8-by-8-foot framing footprint and concrete-floor layout on the dimension sheet.
02 Set out the footprint
- Mark a 96-by-96-inch square at the outside of the wall framing. Its diagonals are 135 3/4 inches. Confirm drainage, access and the required location before excavation. The plywood and battens extend outside this framing line. The roof is 98 inches wide and about 139 11/16 inches from front to rear in horizontal projection; allow the roof and its drainage to fit the site. Keep the outward door sweep and the approach clear of grade changes and obstacles.
Check: Confirm drainage, access and the required location before excavation.
03 Prepare the approved foundation
- Use the completed foundation design for bearing levels, excavation, compacted base, reinforcing, moisture control and anchorage. The drawing shows a 96-by-96-by-4-inch slab with a net volume of 0.7901 cubic yard. Footings and thickened edges are not included, so this is not a concrete order quantity. The 14 anchor locations are placeholders; size, embedment and installation must be specified before drilling. Keep the slab square and level and follow the foundation requirements for curing before installing walls.
Check: Prepare the approved foundation
04 Prepare and label the panel parts
- Use the parts list to label each piece and the cut list for repeated cuts and fitted-edge allowances. Neither list gives stock purchase quantities. Use dressed 1 1/2-by-3 1/2-inch 2×4 and 1 1/2-by-5 1/2-inch 2×6 lumber. Check the header backing, ripped front-window header and beveled side studs before cutting. Mark front, rear, left and right on each panel so the roof slopes toward the rear.
Check: Check the header backing, ripped front-window header and beveled side studs before cutting.
05 Assemble the two rear panels
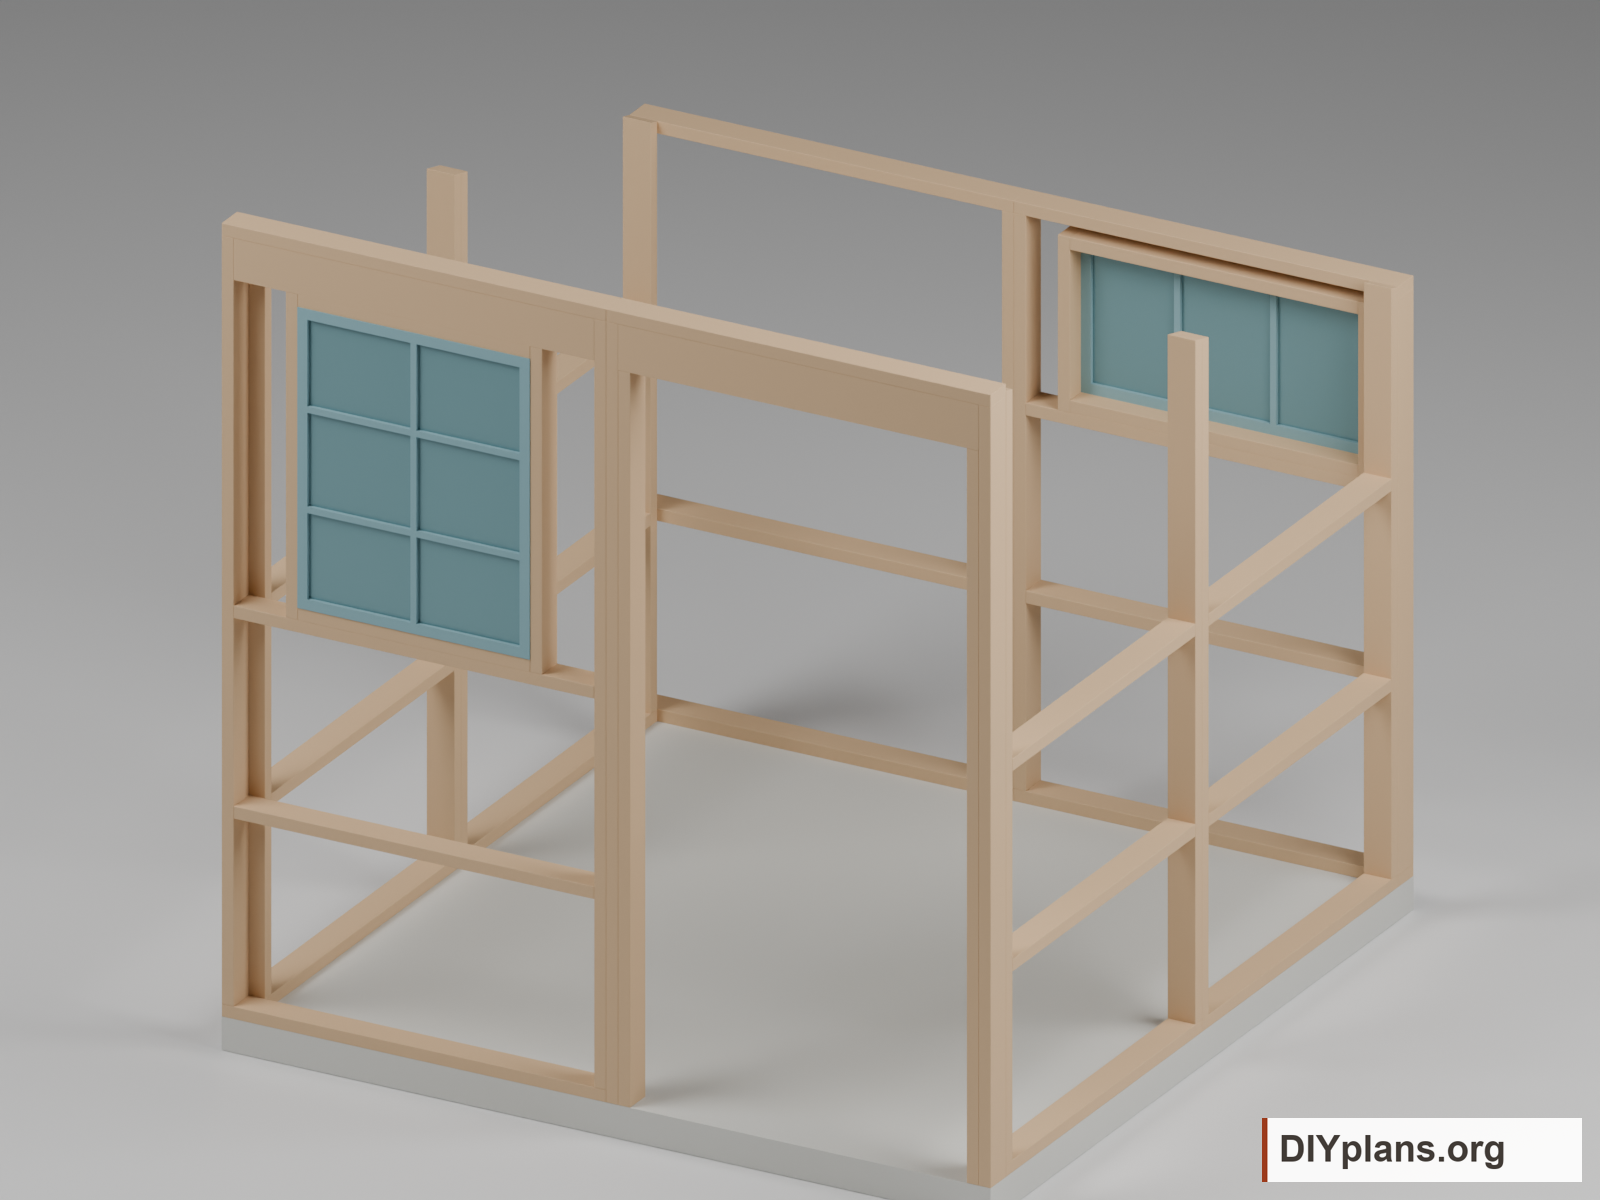
- Lay out two 48-inch-wide rear frames on a flat bench. Each is 71 7/8 inches high, including the sill and plate, with two outside studs and horizontal girts to support the plywood. In the right-hand panel, keep the 36-by-18-inch window opening with its bottom 49 1/2 inches above the slab. Confirm the opening with the selected window before attaching plywood.
Check: Confirm the opening with the selected window before attaching plywood.
06 Assemble the four side panels
- Build two 44 1/2-inch-long frames for each side, fitting between the front and rear walls. Mark the taller ends as front. Cut the stud tops to the 3:12 slope, a 3-inch fall over 12 inches of horizontal run. The cut list gives long-point lengths and a 14.036-degree bevel. Place girts at 24 and 48 inches above the slab. Dry-fit the frames with the front and rear walls before fixing plywood.
Check: Assemble the four side panels
07 Assemble the front window panel
- Build the 48-inch-wide left-front panel to a height of 95 inches. Keep its window opening 29 inches wide and 36 inches high, with the bottom 51 inches above the slab. The header uses a 2×6 ripped to 5 inches deep with separate backing. Have its material and connections specified before cutting. Fit the window blocking and check the panel diagonals before sheathing.
Check: Fit the window blocking and check the panel diagonals before sheathing.
08 Frame the left-hinged opening
- Frame the right-front opening 42 inches wide and 88 inches high, with its left edge 51 inches from the left building edge. Keep the paired studs together to support the hinges. Fit stops at the left, right and head behind the closed door, with a proposed half-inch threshold. These reduce the passage to 40 3/4 inches wide and 87 inches high. Specify the hinge fasteners and an outward-draining threshold before fixing the final positions.
Check: Frame the left-hinged opening
09 Stand, join and brace the walls
- Start at a rear corner and join the side and front panels with the specified connectors. Brace each panel as it is raised. Keep the framing 96 inches square, the diagonals equal and the walls plumb. Keep paired studs together at panel seams. Follow the specified sill separation and anchorage details. The layout shows 14 anchors, two in each of the seven closed panel sills; confirm their locations with the foundation design. Leave temporary bracing until permanent bracing and connections are complete.
Check: The layout shows 14 anchors, two in each of the seven closed panel sills; confirm their locations with the foundation design.
10 Assemble the two roof panels
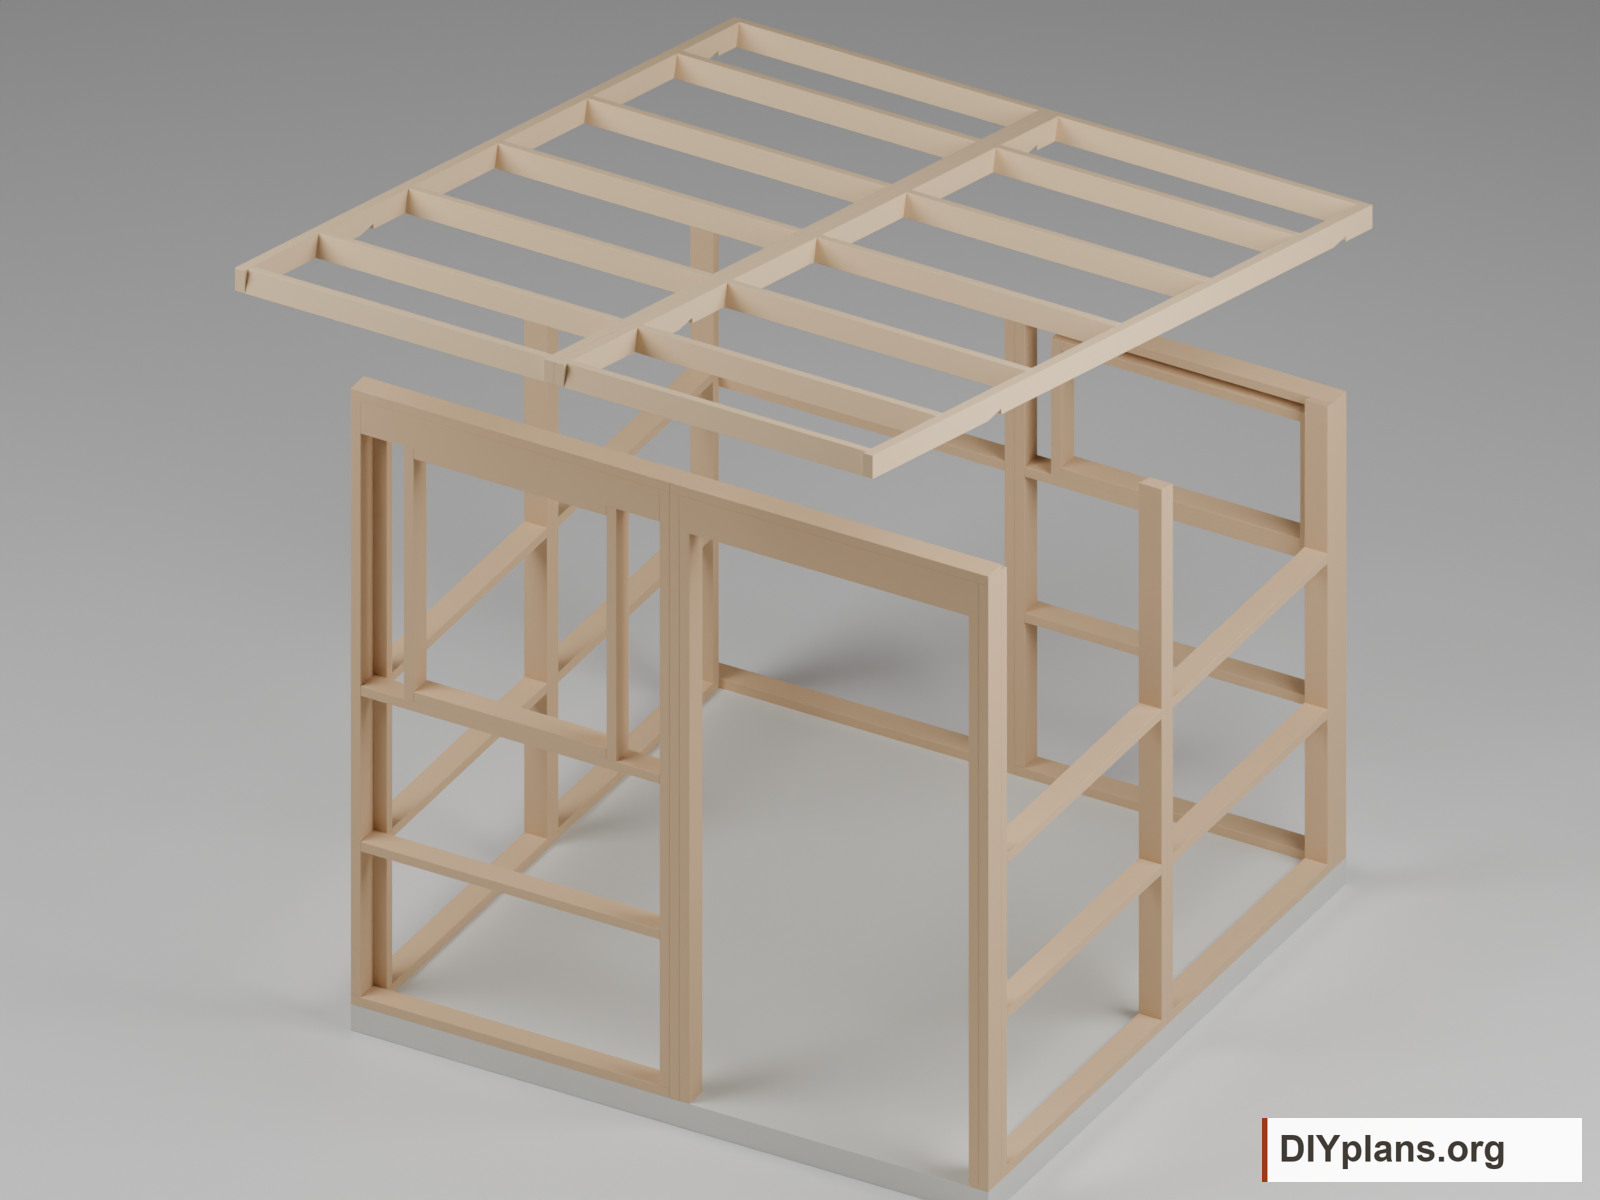
- Build two 48-inch-wide roof panels, each with two edge rafters and seven 45-inch girts. The inner rafters meet at the building center. The frame projects 31 inches horizontally beyond the front wall and 7 inches beyond the rear, giving 138 1/8 inches along the 3:12 slope. Rafters have plumb ends and two 7/8-inch-deep bearing seats, with a blank allowance of about 139 inches. Check a full-size template before cutting. Have the seats, girt spacing, end joints and cantilever sized for the required loads.
Check: Check a full-size template before cutting.
11 Set and connect the roof frames
- Use the planned lifting method to place both roof panels with the high end at the front. Check the bearing seats against the front and rear plates. Join the center seam and eight roof-to-wall connections with the selected rated connectors and their specified fasteners. The drawings show connection locations; connector sizes must be specified separately. Keep workers off unsupported frames.
Check: Check the bearing seats against the front and rear plates.
12 Fit the plywood, trim and roofing
- Fit 3/8-inch exterior plywood with a half-inch extension below the floor. Trim the upper panel and batten edges to the roof and soffit profiles in the drawings; the cut-list sizes include allowances for this fitting. Install the specified weather barrier, corner details and panel gaps. Fit three-inch seam battens, fascia and soffits. The roof layout shows two 50-by-144-inch sheets with a two-inch side overlap and one-inch side projections. Front and rear sheet extensions are about 2 15/16 inches along the slope. Confirm coverage, support spacing, closures, flashing and fasteners with the roofing product before ordering.
Check: Confirm coverage, support spacing, closures, flashing and fasteners with the roofing product before ordering.
13 Install and seal the windows
- Fit the selected front and rear windows with the required sill pans, jamb and head flashing, clearances and fasteners. The illustrated front window has six panes and the rear has three; confirm the actual window sizes before installation. Check projecting window hardware against the door, hinges and 90-degree stay. Keep the front window clear of the outward door swing and provide outward drainage.
Check: The illustrated front window has six panes and the rear has three; confirm the actual window sizes before installation.
14 Build and hang the left outswing door
- Build the door leaf 41 5/8 inches wide, 87 1/8 inches high and 2 1/4 inches thick. Fit two 3/8-inch exterior plywood skins around a 1 1/2-inch-thick frame with two full-height 2×4 stiles and three 34 5/8-inch rails between them. Specify exterior joints, adhesive and fasteners, and seal every edge. Fit three rated hinges on the left as viewed from outside. The hinge line is 51 inches from the left framing edge and 7/8 inch in front of the wall frame. With the door closed, its left edge is 51 1/8 inches from the left framing edge, its outer face is 2 1/2 inches in front of the frame, and its bottom is 3/4 inch above the slab. Confirm these positions with the selected hinge template. Leave 1/8 inch above the leaf, 1/4 inch at the latch jamb and 1/4 inch above the threshold. Fit a positive 90-degree limiting stay, hold-open fitting, latch and seals. Test the full swing with the finished hardware. At 90 degrees, the window stays clear and the passage between the stops is 40 3/4 inches wide.
Check: Confirm these positions with the selected hinge template.
15 Check the completed assembly
- Check the footprint, plumb walls, roof slope, bearing, panel seams and fasteners against the completed construction documents. Make sure the door opens without rubbing, latches and is held by the 90-degree stop and hold-open fitting. Check window and flashing drainage. Finish exposed plywood edges and protect end grain. Update the drawings, cut list and instructions to record any changes.
Check: Check the footprint, plumb walls, roof slope, bearing, panel seams and fasteners against the completed construction documents.